Okay, so the holiday season is *officially* here, and you know what that means! It’s time for all the cozy baking, the twinkling lights, and of course, those iconic Little Debbie Christmas Tree Cakes. I remember the first time I saw these little guys pop up in the stores as a kid – pure magic! Now, I’ve found a way to take that nostalgic magic and turn it into something even more special: The Best Little Debbie Christmas Tree Cake Truffles. Seriously, these are a game-changer for your holiday dessert table. They’re no-bake, ridiculously easy, and look *so* festive. Trust me, if you’re looking for an effortless way to impress everyone this Christmas, you’ve found it!

Why You’ll Love The Best Little Debbie Christmas Tree Cake Truffles
Seriously, these little guys are a holiday dream come true. They’re:
- So quick and easy to whip up – no baking involved at all!
- Absolutely adorable with their festive look, perfect for all your Christmas decorations.
- Guaranteed to be a hit at any party or gathering – everyone loves them!
- The perfect sweet treat to package up as charming homemade Christmas snack gifts for friends and family.
Ingredients for The Best Little Debbie Christmas Tree Cake Truffles
Alright, gathering your ingredients is the first step to holiday dessert success! For these super easy and festive truffles, you’ll need a few things that probably look familiar if you’re a fan of Christmas snack cakes. Make sure you grab:
- Six Little Debbie Christmas Tree Cakes – Yep, the whole package! We’re going to crumble these up to form the base of our truffles.
- 1/2 cup cream cheese, softened – Make sure it’s nice and soft so it mixes in smoothly without any lumps.
- 1 cup powdered sugar – This helps bind everything together and adds a little sweetness.
- 1/2 teaspoon vanilla extract – Just a touch to boost all those yummy flavors.
- 1 cup white chocolate chips – These are for our glorious coating.
- 1 tablespoon vegetable shortening – This little bit helps the white chocolate melt smoothly and gives it a nice shine.
- Red and green sprinkles, for decorating – Because what’s a Christmas treat without sprinkles? Get your festive colors ready!
How to Prepare The Best Little Debbie Christmas Tree Cake Truffles
Okay, let’s get these festive little guys made! It’s honestly so simple, you’ll wonder why you haven’t done it before. Grab your apron, and let’s do this!
Step 1: Prepare the Truffle Base
First things first, we need to get our truffle mixture ready. Take those six Little Debbie Christmas Tree Cakes and crumble them up really well in a medium-sized bowl. Don’t be shy; get them into small pieces. Then, toss in your softened cream cheese, the powdered sugar, and that little splash of vanilla extract. Now, get your hands in there (or use a sturdy spoon if you prefer!) and mix it all up until it’s really well combined. You want a nice, dough-like consistency that holds together.
Step 2: Shape and Chill the Truffles
Once you have that yummy mixture, it’s time to roll! Take small portions of the dough and roll them into little balls, about one inch in diameter. Try to make them as uniform as you can so they look nice when they’re all done. Place these little balls onto a baking sheet that you’ve lined with parchment paper. This stops them from sticking. Pop that baking sheet into the refrigerator for at least 30 minutes. This chilling step is super important – it firms them up so they don’t fall apart when we dip them in chocolate.
Step 3: Melt the Chocolate Coating
While those truffles are getting nice and cold, let’s get our white chocolate ready. Put your white chocolate chips and the vegetable shortening into a microwave-safe bowl. Zap it in the microwave on 30-second intervals, stirring really well between each one. Keep going until it’s all melted and super smooth. If it seems a little too thick, just add another tiny bit of shortening – that usually does the trick to get it perfectly dippable.
Step 4: Dip and Decorate
Okay, time for the fun part! Take your chilled truffle balls out of the fridge. Grab one, dip it into the melted white chocolate, and use a fork or a toothpick to help coat it all over. Let any excess chocolate drip back into the bowl. Immediately after dipping, place the coated truffle back onto your parchment-lined baking sheet. While the chocolate is still wet, sprinkle it with your red and green sprinkles! You’ve got to work pretty quickly here so the sprinkles stick before the chocolate starts to set.

Step 5: Set and Serve
Once all your truffles are dipped and sprinkled, just let them sit there on the parchment paper until the white chocolate coating is completely set. This usually doesn’t take too long, especially if they’re still a bit cool from the fridge. And voilà! Your adorable, no-bake Little Debbie Christmas Tree Cake Truffles are ready to be devoured or packed up as the cutest homemade holiday gifts.
Tips for Success with The Best Little Debbie Christmas Tree Cake Truffles
Okay, so you want these little guys to turn out absolutely perfect, right? I’ve made these a few times now, and a couple of things really make a difference. First off, make sure your cream cheese is *really* softened. Like, leave it on the counter for at least an hour before you start. It makes all the difference when you’re mixing it into the cake crumbles – no lumps allowed! Also, when you’re dipping them in that melted white chocolate, you gotta work fast! Those chilled truffle balls are great, but the chocolate sets up surprisingly quickly. Have your sprinkles ready to go right next to the bowl. And if that white chocolate ever gets too thick on you, just stir in another tiny little bit of shortening – it’ll loosen right up. Trust me on this, chilling those balls properly makes dipping SO much easier and keeps them from getting all melty in your hands!
Ingredient Notes and Substitutions
A little tweak here or there can make these truffles even more special! If you’re looking for a slightly richer flavor, go ahead and stir in about a tablespoon of melted butter along with the cream cheese mixture. It adds a nice depth! Now, if you can’t find those iconic Little Debbie Christmas Tree Cakes (gasp!), don’t worry too much. You can totally swap them out for other cream-filled snack cakes. Just know that the super festive look might change a bit, but the delicious truffle goodness will still be there!
Serving Suggestions for Christmas Bakery Desserts
These adorable truffles are just begging to be the star of your holiday spread! Arrange them on a festive platter for your next Christmas party – they look so pretty with their sprinkles. They also make the most charming Christmas snack gifts homemade, all wrapped up with a cute ribbon. And for a cozy night in, they’re absolutely perfect served alongside a steaming mug of hot cocoa or a warm cup of coffee while you’re watching your favorite Christmas movies!
Storage and Reheating Instructions
Once you’ve made these delightful Christmas treats, storing them is super easy! Just pop any leftovers into an airtight container. Keep them in the refrigerator, and they should stay yummy for up to about 5 days. Honestly, these truffles are best served chilled straight from the fridge, so no need to worry about reheating them at all!
Frequently Asked Questions about Little Debbie Christmas Tree Recipes
Got questions about whipping up these festive Little Debbie Christmas Tree Recipes? I’ve got you covered! Here are some common things folks ask:
Q: Can I use a different type of chocolate for dipping?
You sure can! While white chocolate is classic for these, you could try milk chocolate or even dark chocolate chips. Just remember that different chocolates melt a little differently, so you might need to adjust the amount of shortening slightly to get that perfect dipping consistency. You won’t get that iconic look, but they’ll still taste amazing!
Q: How many truffles does this recipe make?
You’ll get about 18 to 20 of these adorable little truffles from one batch. It depends a little on how big you roll your balls, but that’s a good estimate!
Q: Can these be made ahead of time?
Absolutely! These are fantastic make-ahead Christmas bakery desserts. You can make them a few days in advance and store them in an airtight container in the fridge. They actually taste even better after chilling for a bit!
Q: Are these suitable for Christmas Desserts For Gifts?
Oh, 100%! These are *perfect* for Christmas Desserts For Gifts. They look so professional and festive. Just package them up in cute little boxes or tins with some tissue paper, maybe tie a ribbon around it, and you’ve got yourself a thoughtful, homemade Christmas snack gift that anyone would be thrilled to receive!
Nutritional Information
Just a little heads-up, these numbers are estimates because, you know, homemade always varies a bit! But for roughly two of these delightful truffles, you’re looking at about 200 calories. You’ll also get around 12g of fat, 22g of carbohydrates, and 2g of protein. And yes, about 25g of that is sugar – hey, it’s the holidays! These figures can change depending on the exact brands and ingredients you use, so think of them as a good ballpark.
Did you whip up these super fun Christmas Tree Cake Truffles? I would absolutely LOVE to see how yours turned out! Please share your photos with me on social media and tag me so I can see all your festive creations. And hey, drop a comment below and let me know how your holiday baking adventure went!

For more festive recipes and inspiration, check out our Pinterest page!
Print
The Best Little Debbie Christmas Tree Cake Truffles
- Total Time: 1 hour 25 minutes (includes chilling time)
- Yield: Approximately 18-20 truffles
- Diet: Vegetarian
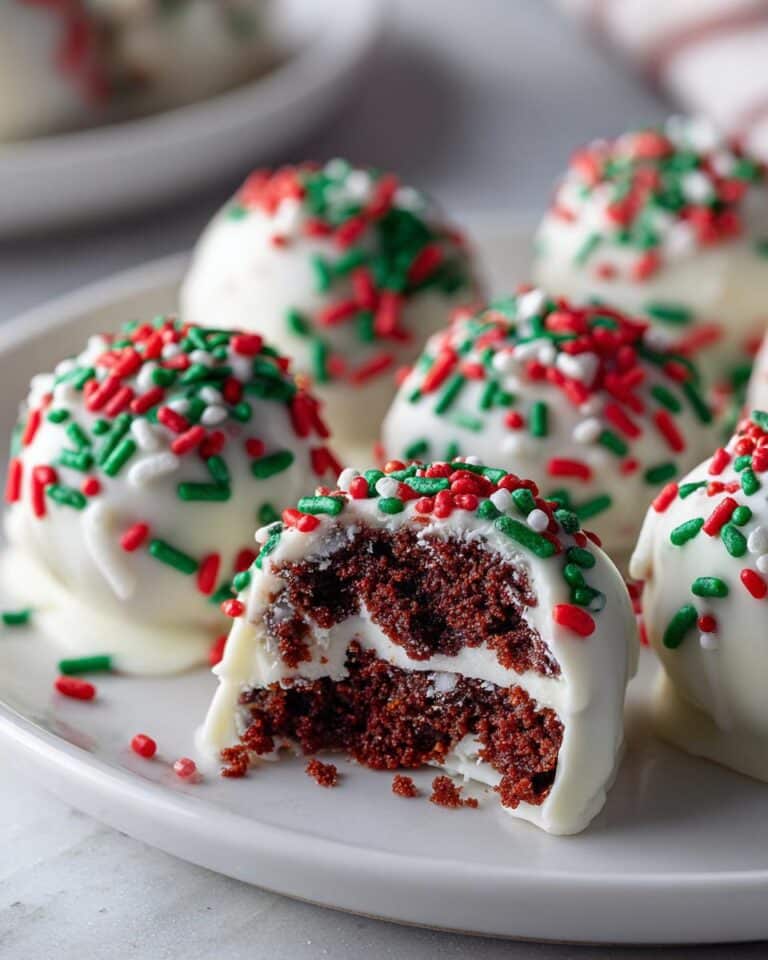
Description
Easy no-bake truffles made with Little Debbie Christmas Tree Cakes. These festive treats are perfect for holiday parties and homemade gifts.
Ingredients
- 1 package (6 cakes) Little Debbie Christmas Tree Cakes
- 1/2 cup cream cheese, softened
- 1 cup powdered sugar
- 1/2 teaspoon vanilla extract
- 1 cup white chocolate chips
- 1 tablespoon vegetable shortening
- Red and green sprinkles, for decorating
Instructions
- Crumble the Christmas Tree Cakes in a bowl.
- Add the softened cream cheese, powdered sugar, and vanilla extract to the crumbled cakes. Mix until well combined.
- Roll the mixture into 1-inch balls. Place them on a baking sheet lined with parchment paper.
- Chill the truffle balls in the refrigerator for at least 30 minutes.
- Melt the white chocolate chips and vegetable shortening in a microwave-safe bowl in 30-second intervals, stirring between each, until smooth.
- Dip each chilled truffle ball into the melted white chocolate, coating completely.
- Place the coated truffles back on the parchment-lined baking sheet.
- Immediately decorate with red and green sprinkles before the chocolate sets.
- Allow the truffles to set completely before serving or packaging.
Notes
- For a richer flavor, you can add a tablespoon of melted butter to the truffle mixture.
- If white chocolate is too thick, add a little more shortening.
- Store truffles in an airtight container in the refrigerator.
- Prep Time: 20 minutes
- Cook Time: 5 minutes (for melting chocolate)
- Category: Desserts
- Method: No-Bake
- Cuisine: American

 9")


 12")
 13")