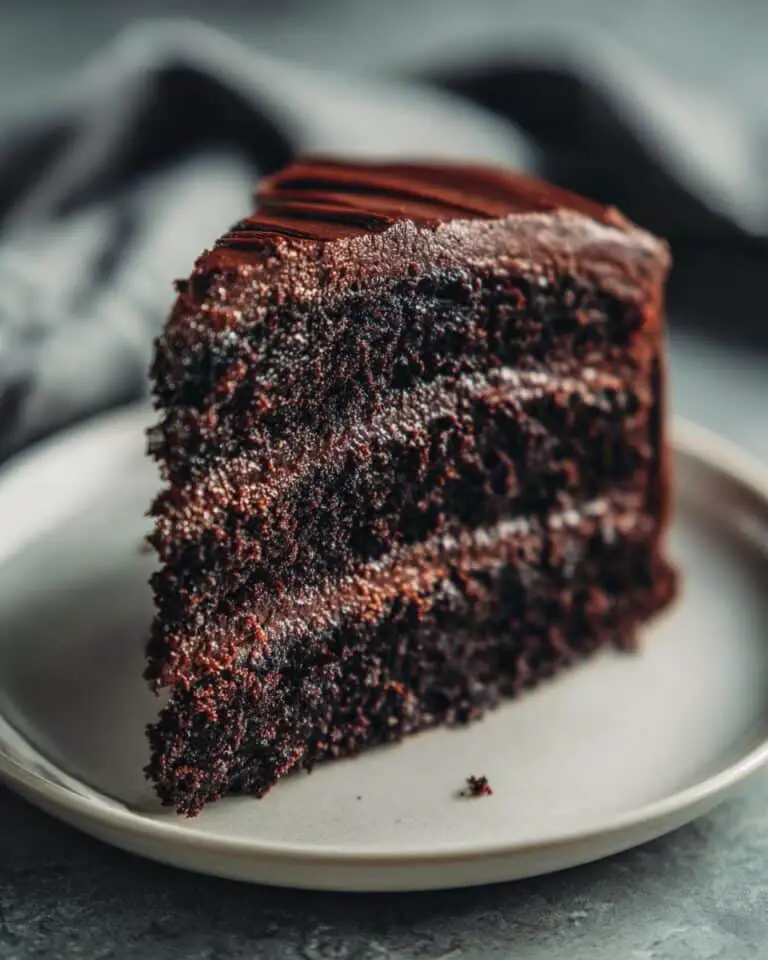
Picture this: a towering slice of black velvet cake, so dark it could disappear into the night sky, with swirls of creamy frosting that peek through like ghosts in the fog. That’s exactly what happened when I first made this cake for a Halloween party years ago—the gasps, the wide-eyed kids whispering, “Is that really edible?!” Oh, it was. Deep, dark chocolate with a slightly mysterious edge (thanks to that bold black hue), and just sweet enough to balance the cocoa’s bitterness. I’ve baked this for every Halloween since, tweaking the recipe until it’s foolproof—trust me, after a decade of testing, I know the tricks to nail this gothic showstopper. The secret? Gel food coloring (not liquid!) and a generous hand with the cocoa. But the real magic is how simple it is—no fancy techniques, just a batter that transforms into something spellbinding. Get ready to bake the cake that’ll haunt your dessert table (in the best way possible).

Why You’ll Love This Black Velvet Cake
This isn’t just any chocolate cake—it’s a full-on Halloween masterpiece. Imagine slicing into that midnight-black crumb, revealing a rich chocolate interior that tastes as dramatic as it looks. Here’s why it’s become my go-to for every spooky celebration:
- Showstopper looks: That deep black color? Pure magic. It’s instantly eye-catching, especially when paired with creamy white frosting for contrast. Bonus points if you pipe little spiderwebs or ghosts on top!
- Rich chocolate flavor: Don’t let the color fool you—this isn’t just for show. The double dose of cocoa powder gives it an intense chocolate taste that’s balanced perfectly by the cream cheese frosting.
- Halloween-ready: The gothic vibes are strong with this one. It’s the perfect centerpiece for your Halloween party, whether you’re going for elegant dark decor or full-on haunted house.
Plus, it’s surprisingly easy to make—no tricky techniques, just good old-fashioned baking with a spooky twist.
Ingredients for Black Velvet Cake
Alright, let’s talk ingredients—because this cake’s dark magic starts with the right components. I’ve learned the hard way that skimping on quality or measurements can turn your gothic masterpiece into a sad, gray-ish mess. Here’s exactly what you’ll need:
- 2 cups all-purpose flour (spooned and leveled—don’t pack it!)
- 1 cup unsweetened cocoa powder (the darker, the better—I use Dutch-processed for that deep color)
- 1½ cups granulated sugar (trust me, this balances the cocoa’s bitterness perfectly)
- 3 large eggs at room temperature (cold eggs can make your batter lumpy—take ’em out an hour early)
- 1 tablespoon black gel food coloring (not liquid! Gel gives that intense color without thinning the batter)
- ½ cup vegetable oil (keeps the cake moist without weighing it down)
- 1 cup buttermilk (if you don’t have any, mix 1 cup milk with 1 tbsp lemon juice and let it sit for 5 minutes)
- 1 teaspoon baking soda (freshness matters—check the expiration date!)
- 1 teaspoon pure vanilla extract (skip the imitation stuff—it makes a difference)
- ½ teaspoon salt (just enough to make the chocolate flavor pop)
Cream Cheese Frosting Ingredients
Now, for the crowning glory—the frosting that makes this cake sing. You’ll want to use full-fat everything here; low-fat cream cheese just doesn’t whip up right. Here’s your shopping list:
- 8 oz (1 block) full-fat cream cheese, softened (leave it on the counter for at least 30 minutes)
- ½ cup unsalted butter, softened (same deal—room temp is key)
- 4 cups powdered sugar, sifted (trust me, sifting prevents lumps)
- 1 teaspoon vanilla extract (yes, more vanilla—it cuts the sweetness)
- Pinch of salt (balances the sugar and enhances the cream cheese tang)
Pro tip: If you’re feeling fancy, add a teaspoon of lemon zest to the frosting—it gives a bright contrast to the dark cake!
Equipment Needed for Black Velvet Cake
Listen, I know how tempting it is to just grab whatever’s in your kitchen and start baking—but trust me, having the right tools makes all the difference with this dramatic cake. Here’s what you’ll absolutely need:
- Two 9-inch round cake pans: Not 8-inch, not 10-inch—9-inch is the sweet spot. The dark color means these cakes bake differently, and this size ensures even cooking.
- Stand mixer or hand mixer: You could mix by hand, but your arm will hate you after creaming that butter and sugar. I learned this the hard way during a power outage one Halloween!
- Silicone spatulas: One for scraping the bowl clean (every last bit of that precious black batter counts!), and one for folding in the food coloring evenly.
- Cooling racks: Two if you have them—this cake needs to cool completely before frosting, and air circulation prevents soggy bottoms.
- Cake leveler or serrated knife: For trimming those domes if you’re going for that perfect flat, professional look.
- Offset spatula: My secret weapon for smoothing that cream cheese frosting like a pro.
Optional but fun: Piping bags and tips if you want to get creative with decorations—think spiderwebs, tombstones, or just elegant swirls. A rotating cake stand makes frosting easier, but I’ve used a lazy Susan in a pinch!
How to Make Black Velvet Cake
Okay, let’s get into the good stuff—the actual baking! This recipe is simple, but there are a few key moments where timing and technique really matter. Follow these steps, and you’ll have a cake that looks straight out of a gothic fairytale (but tastes like chocolate heaven).
- Preheat and prep: Crank that oven to 350°F (175°C)—no shortcuts here, or your cakes won’t rise evenly. While it heats, grease your pans with butter or baking spray, then line the bottoms with parchment rounds. (Trust me, you don’t want to lose any of that precious black cake to sticking!)
- Whisk the dry team: In a big bowl, whisk together the flour, cocoa powder, sugar, baking soda, and salt. Get it all evenly mixed—no cocoa clumps allowed! I like to sift mine if the cocoa seems lumpy, but a good whisking usually does the trick.
- Mix the wet squad: In another bowl (or your stand mixer), beat the eggs until they’re light and frothy. Drizzle in the oil slowly while mixing—this helps it emulsify properly. Then add the buttermilk and vanilla, mixing just until combined. The batter will look a bit like chocolate milk at this point.
- Bring them together: Now, add the dry ingredients to the wet in three batches, mixing just until each addition disappears. Don’t overmix—you want to stop when you no longer see flour streaks. Overworking the batter makes tough cake, and nobody wants that.
- Go dark side: Here’s the fun part! Add that black gel food coloring and mix gently until the color is uniform. Pro tip: Start with 1 tablespoon, but if it’s not as dark as you’d like, add more ½ teaspoon at a time. The batter should look almost like black satin when you’re done.
- Bake with confidence: Divide the batter between your prepared pans (a kitchen scale helps for perfect layers). Smooth the tops, then bake for 25-30 minutes. The cakes are done when a toothpick comes out with just a few moist crumbs—no wet batter. They’ll also pull slightly from the pan edges when ready.
- Cool it: Let the cakes cool in their pans for 10 minutes—this helps them set. Then, run a knife around the edges and flip onto cooling racks. Peel off the parchment and let them cool completely. No cheating—warm cakes make melty frosting!

Making the Cream Cheese Frosting
While your cakes cool, let’s whip up that dreamy frosting. This is where the magic happens—that creamy, tangy contrast against the dark cake is everything.
- Start soft: Your cream cheese and butter must be truly at room temp—leave them out for at least 30 minutes. Cold ingredients make lumpy frosting, and nobody has time for that.
- Whip it good: In your stand mixer (or with a hand mixer), beat the cream cheese and butter together on medium until perfectly smooth—about 2 minutes. Scrape down the bowl halfway to catch any stubborn bits.
- Sweeten slowly: With the mixer on low, add the powdered sugar about ½ cup at a time. Once incorporated, bump up the speed to medium and beat for 1-2 minutes until fluffy. Add the vanilla and salt, then taste. Need more tang? Add a pinch more salt. Too sweet? A splash of lemon juice balances it beautifully.
- Check the consistency: Perfect frosting should hold stiff peaks when you lift the beater. If it’s too soft, chill for 15 minutes. Too stiff? Add milk 1 teaspoon at a time until spreadable. You want it smooth but not runny—like thick whipped cream.
Now for the best part: assembling your gothic masterpiece! But we’ll get to that in a sec—for now, resist the urge to eat all that frosting straight from the bowl. (Okay, maybe just one spoonful.)
Tips for Perfect Black Velvet Cake
Alright, let me spill all my hard-earned secrets for making this cake turn out absolutely spectacular every time. I’ve had my share of kitchen disasters (who hasn’t?), so trust me when I say these tips will save you from the gray-cake blues and frosting fails.
The Coloring Conundrum
First things first – that gorgeous black color can be tricky. Here’s what I’ve learned after many stained fingers and disappointing gray batches:
- Gel food coloring only! Liquid coloring will thin your batter and never get dark enough. I use about 1 tablespoon of gel, but don’t be afraid to add more ½ teaspoon at a time until you get that inky blackness.
- Mix it early. Add your coloring when you mix the wet ingredients – it incorporates way better than if you wait until the end. I learned this after making a marbled “black and gray” cake by accident one year!
- Dark cocoa is your friend. Using Dutch-process cocoa gives you a head start on that deep color. If you only have regular cocoa, add an extra tablespoon – it makes a difference.
Patience with the Cooling
I know, I know – waiting is the worst part. But hear me out:
- Cool completely means COOL. I set timers – at least 2 hours for layers this dense. Frosting a warm cake is like putting lipstick on a melting snowman… it just slides right off.
- Speed it up safely. If you’re in a rush (Halloween party starts in an hour!), pop the cakes in the fridge for 30 minutes after they’ve cooled at room temp for a bit.
- Flat tops matter. If your cakes domed, level them with a serrated knife while they’re still slightly warm – it’s easier than when cold. Save those scraps for the best cake-pop crumbs ever!
Frosting Finesse
That cream cheese frosting can be temperamental – here’s how to win:
- Temperature is everything. If your kitchen is warm, chill the frosted cake for 15 minutes before serving so the frosting holds its shape.
- The crumb coat trick. Spread a thin layer of frosting first, chill for 15 minutes, then do your final layer. This traps crumbs so your finish stays smooth.
- Fix it fast. If your frosting gets too soft while working, just pop the whole bowl in the fridge for 10 minutes – it’ll firm right back up.
And the most important tip? Have fun with it! So what if the frosting isn’t bakery-perfect? That just adds to the haunted charm. My first attempt looked like a kindergartener’s art project, but it still tasted amazing. Now go make some edible magic!
Black Velvet Cake Variations
Okay, let’s get creative! While the classic black velvet cake is perfection on its own, sometimes you want to shake things up—especially for Halloween. Here are my favorite ways to play with this recipe while keeping that gorgeous gothic vibe:
Spooky Flavor Twists
That rich chocolate base is basically a blank canvas for hauntingly good flavors:
- Orange extract boost: Add ½ teaspoon orange extract to the batter (along with the vanilla) for a chocolate-orange combo that screams Halloween. The citrusy zing cuts through the richness beautifully.
- Coffee depth: Replace ¼ cup of the buttermilk with cold brewed coffee. It intensifies the chocolate flavor without making the cake taste like coffee—just deeper, darker magic.
- Minty fresh: Swap the vanilla for peppermint extract (start with ½ teaspoon—it’s strong!). Perfect for those who love the chocolate-mint combo year-round.
Frosting Fun
The cream cheese frosting doesn’t have to stay plain white—here’s how to make it pop:
- Ombre effect: Divide your frosting and tint portions with gel food coloring—deep purple fading to lavender makes an amazing haunted sunset look.
- Blood red drizzle: Mix ¼ cup of the frosting with red gel coloring and drizzle over the frosted cake for a “bloody” effect. So gruesome, so good!
- Black frosting accents: Use black cocoa powder (yes, it exists!) in a portion of the frosting for dark swirls that match the cake.
Shape Shifters
Who says this has to be a round cake? Some of my favorite alternatives:
- Cupcake cemetery: Bake as cupcakes and frost with “dirt” crumbs (pulse some of the cake scraps with cocoa). Top with Milano cookie tombstones—just pipe “RIP” with melted white chocolate.
- Skull pan special: If you have a skull-shaped cake pan, this batter works perfectly! Frost just the “bone” parts and leave the rest black for creepy contrast.
- Layer cake alternate: Try baking in a sheet pan and cutting into coffin shapes—frost between two layers for a 3D effect.
The possibilities are endless! My kids love helping brainstorm new variations—last year we did a “witch’s cauldron” version by stacking cake layers in a bowl and adding green frosting “smoke.” Whatever you choose, just remember: the darker, the better. Happy haunting—I mean, baking!
Serving and Storing Black Velvet Cake
Alright, you’ve baked this gothic masterpiece—now let’s talk about showing it off and keeping it fresh! Here’s everything I’ve learned about serving and storing black velvet cake so it stays as dramatic as the day you made it.
The Perfect Serving Moment
Timing is everything with this cake. Serve it too warm, and your frosting will slide right off like a ghost escaping its tomb. Too cold, and you lose that melt-in-your-mouth texture. Here’s my golden rule:
- Chill then temper: After assembling, refrigerate the cake for 30 minutes to set the frosting. Then let it sit at room temp for 15 minutes before slicing—this brings out the full chocolate flavor while keeping the structure intact.
- Slice with style: Run your knife under hot water and wipe dry between cuts for clean slices that show off those gorgeous black layers against the white frosting.
- Temperature trick: The cake tastes richest when just slightly cooler than room temperature—about 65°F (18°C) is ideal. Any warmer, and the flavors blur together.
Keeping Your Cake Fresh
This cake disappears fast at parties, but if you somehow have leftovers (unlikely!), here’s how to preserve that midnight magic:
- Room temp short-term: Covered with a cake dome or overturned bowl, it’ll keep for 2 days max—any longer and the frosting starts to weep.
- Fridge for longevity: Store in an airtight container (I use a cake carrier) for up to 5 days. The cold actually improves the chocolate flavor over time!
- Freezer hack: Wrap unfrosted layers tightly in plastic wrap, then foil, and freeze for up to 3 months. Thaw overnight in the fridge before frosting.
Pro tip: If your refrigerated cake seems dry, let it come to room temp before serving—or zap individual slices in the microwave for 10 seconds to revive that just-baked moisture. Just don’t overdo it, or you’ll have chocolate pudding!
The Great Frosting Debate
Cream cheese frosting can be finicky, so here’s my storage playbook:
- Pre-frosting: Made frosting ahead? Store it airtight in the fridge for up to 3 days. Let it come to room temp and re-whip briefly before using.
- Post-frosting: Once frosted, the cake keeps best refrigerated due to the dairy. Bring to room temp before serving for ideal texture.
- Hot weather fix: If your kitchen’s warm, store the frosted cake in the fridge and serve chilled—the frosting holds its shape better.
Remember: This cake is like Halloween night—best enjoyed fresh but still magical even after a day or two. Now go slice into that dark beauty and watch everyone’s eyes widen with delicious surprise!
Black Velvet Cake Nutritional Information
Listen, we all know cake isn’t health food—but hey, it’s Halloween! A little indulgence never hurt anybody. Here’s the nutritional breakdown per slice (based on 12 servings), but remember these are estimates. Your exact numbers might dance up or down depending on brands and how generous you are with that frosting!
- Calories: 320 (blame the delicious butter and cream cheese!)
- Fat: 14g (8g saturated from all that cocoa goodness)
- Carbs: 45g (24g sugars—it’s cake, people!)
- Protein: 6g (thank the eggs and buttermilk for that)
- Sodium: 220mg (mostly from the baking soda and salt)
- Fiber: 3g (cocoa powder brings some redeeming value)
Now for my standard disclaimer (because my nutritionist friend made me add this): These numbers can vary based on:
- Whether you use Dutch-process or natural cocoa powder
- How thick you spread the frosting (no judgement if you go heavy!)
- If you substitute any ingredients (almond milk vs buttermilk, etc.)
Pro tip: If you’re watching sugar intake, you can reduce the granulated sugar to 1 cup—the frosting will still make it plenty sweet. But honestly? Halloween comes once a year. Live a little!
Frequently Asked Questions
Over the years, I’ve gotten so many questions about this cake—mostly from panicked bakers mid-recipe! Here are the answers to the ones I hear most often, straight from my flour-dusted notebook of kitchen wisdom:
Can I use liquid food coloring instead of gel?
Oh honey, don’t do it! I learned this lesson the hard way—liquid coloring makes your batter runny and turns the cake gray instead of black. Gel coloring is concentrated, so you get that deep gothic color without throwing off the batter consistency. In a pinch? Use black cocoa powder to boost the color.
How long does black velvet cake keep fresh?
Properly stored (that means airtight in the fridge!), it stays delicious for up to 5 days. The flavor actually improves after a day as the chocolate mellows. Left at room temp, enjoy it within 2 days—any longer and the frosting gets weepy. Pro tip: Cover cut edges with plastic wrap to prevent drying.
Can I make cupcakes instead of a layer cake?
Absolutely! This batter makes about 24 standard cupcakes—just fill liners ⅔ full and bake 18-20 minutes. They’re perfect for Halloween parties! For extra drama, pipe the frosting high and dust with edible black glitter. I once made mini cupcakes and called them “bat bites”—huge hit with the kids.
What’s the best way to freeze black velvet cake?
Freeze unfrosted layers wrapped tightly in plastic wrap then foil for up to 3 months. Thaw overnight in the fridge before frosting. Want to freeze it frosted? Chill the whole cake first to set the frosting, then wrap carefully. Just know the frosting texture might change slightly—still tasty though!
What can I use if I don’t have buttermilk?
No buttermilk? No problem! My go-to substitute: mix 1 cup milk with 1 tablespoon lemon juice or vinegar and let it sit for 5 minutes until slightly curdled. Plain yogurt thinned with milk works too (½ cup yogurt + ½ cup milk). The acidity helps activate the baking soda, so don’t skip it!


Dark Magic Black Velvet Cake with 5 Spooky Twists
- Total Time: 50 minutes
- Yield: 12 servings
- Diet: Vegetarian
Description
A rich, dark chocolate cake with deep black color, perfect for Halloween celebrations.
Ingredients
- 2 cups flour
- 1 cup cocoa powder
- 1 cup sugar
- 3 eggs
- 1 tbsp black food coloring
- 1/2 cup vegetable oil
- 1 cup buttermilk
- 1 tsp baking soda
- 1 tsp vanilla extract
- 1/2 tsp salt
Instructions
- Preheat oven to 350°F (175°C). Grease two 9-inch round cake pans.
- Mix flour, cocoa, sugar, baking soda, and salt in a bowl.
- In another bowl, whisk eggs, oil, buttermilk, and vanilla.
- Combine wet and dry ingredients, then add black food coloring.
- Divide batter between pans and bake for 25-30 minutes.
- Cool cakes completely before frosting.
Notes
- Use gel food coloring for best color results
- For extra dark color, add 1 extra tbsp cocoa powder
- Let cakes cool completely before frosting
- Prep Time: 20 minutes
- Cook Time: 30 minutes
- Category: Dessert
- Method: Baking
- Cuisine: American


