Nothing screams “fall” quite like the smell of caramel and apples baking together—except maybe when they’re layered over a creamy cheesecake filling and a buttery graham cracker crust. These caramel apple cheesecake bars are my go-to dessert for cozy gatherings, and trust me, they disappear faster than the autumn leaves fall. I started making them years ago when my sister begged me to bring something “festive but easy” to Thanksgiving, and now they’re practically mandatory at every family event.
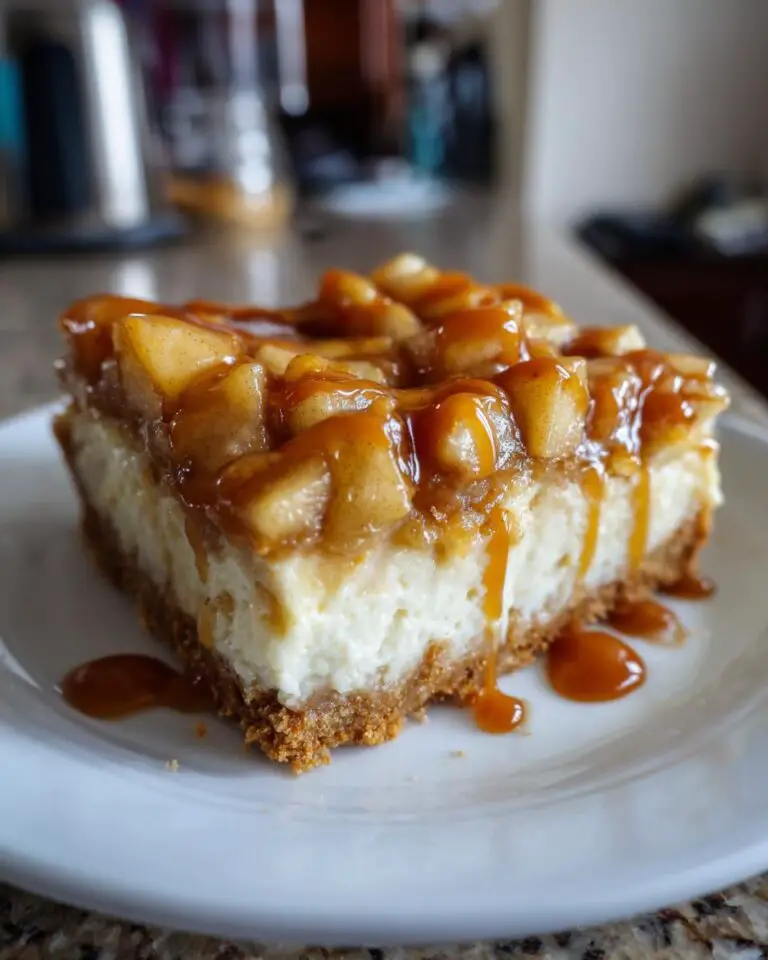
What makes these bars special? That perfect balance of textures and flavors—the crunch of the graham cracker base, the velvety cheesecake layer, the tart bite of apples, and that glorious caramel drizzle that makes everything better. They’re like autumn in dessert form, and I’ve yet to meet someone who doesn’t swoon after the first bite. Plus, they’re way simpler to make than a whole cheesecake (no water bath drama here!). Whether you’re hosting friends or just treating yourself, these bars are the ultimate sweet celebration of the season.

Why You’ll Love These Caramel Apple Cheesecake Bars
Oh, where do I even start? These bars are basically everything wonderful about fall packed into one irresistible dessert. Here’s why they’ve become my most-requested recipe:
First off, they’re incredibly easy – no fancy techniques or temperamental ingredients here. Just mix, layer, bake, and chill (though the hardest part is waiting those two hours while they set!).
The textures? Absolute magic. That buttery graham cracker crust gives that satisfying crunch against the silky cheesecake layer, while the tart apples add just the right amount of bite. And that caramel drizzle? Pure heaven.
They’re the perfect dessert for any autumn gathering – Thanksgiving, Halloween parties, or just because it’s Tuesday and you deserve something special. Every time I bring these somewhere, people lose their minds (in the best way). Last year at our neighborhood potluck, three people asked for the recipe before they’d even finished their first piece!
Honestly, these bars taste like cozy sweaters and crisp fall afternoons – but way more delicious. Once you try them, you’ll understand why my family now calls them “autumn in dessert form.”
Ingredients for Caramel Apple Cheesecake Bars
Here’s everything you’ll need to make these dreamy bars—and a few insider tips to make sure they turn out perfect every time. Trust me, I’ve learned a few things after making these more times than I can count!
For the crust:
- 1 ½ cups graham cracker crumbs (about 10 full sheets—I just toss them in a bag and roll with a pin for that perfect texture)
- 6 tablespoons melted butter (salted or unsalted both work, but I prefer salted for that sweet-salty kick)
- 2 tablespoons sugar (just a touch to balance the crumbs)
For the cheesecake layer:
- 16 oz cream cheese, softened (this is KEY—take it out at least an hour early or you’ll get lumps!)
- ½ cup granulated sugar
- 2 large eggs, room temp (they mix in smoother this way)
- 1 teaspoon vanilla extract (the good stuff makes a difference)
For the topping:
- 2 medium apples, peeled and diced (Granny Smith are my favorite—that tartness cuts through the sweetness perfectly)
- ½ cup caramel sauce (homemade or store-bought both work—no judgment here!)
- ½ teaspoon cinnamon (optional, but oh-so-cozy)
How to Make Caramel Apple Cheesecake Bars
Okay, let’s get to the fun part – turning those simple ingredients into the most irresistible fall dessert you’ll ever make! I’ll walk you through each step (and share all my hard-earned tricks to prevent cracks and ensure perfect layers).
Preparing the Graham Cracker Crust
First things first – that buttery, crunchy foundation! Preheat your oven to 350°F while you work. In a medium bowl, mix together your graham cracker crumbs, melted butter, and sugar until it looks like wet sand (you should be able to squeeze it and have it hold its shape).
Now, here’s my secret for the perfect crust: dump it into your lined 9×9 pan and use the bottom of a measuring cup to press it down firmly and evenly. We’re talking serious pressure here – this prevents crumbly disasters later! Pop it in the oven for 8 minutes to set (this helps avoid a soggy bottom), then let it cool slightly while you make the filling.
Making the Cheesecake Filling
This is where room-temperature ingredients save the day! In a large bowl, beat your softened cream cheese until it’s completely smooth – no lumps allowed! Scrape down the sides, then gradually add the sugar while mixing. Next come the eggs one at a time (fully incorporating each before adding the next), followed by the vanilla.
Pro tip: Don’t overmix once the eggs are in! Too much air causes cracks. Just mix until everything is combined – it should look like velvety, pale yellow clouds. Taste a spoonful (chef’s privilege!) and swoon over how good it already is.
Assembling and Baking
Pour that luscious filling over your pre-baked crust (it’s okay if the crust is still slightly warm). Now for the pretty part – scatter your diced apples evenly over the top. I like to press them in just slightly so they don’t roll off when slicing later. Drizzle about ¼ cup of caramel sauce over everything, then sprinkle with cinnamon if using.
Bake for 25-30 minutes until the edges are set but the center still jiggles slightly when nudged – this is crucial for that perfect creamy texture! Let the pan cool completely on a rack, then drizzle with the remaining caramel before chilling for at least 2 hours (overnight is even better). The hardest part? Waiting patiently while the magic happens in the fridge!

Tips for Perfect Caramel Apple Cheesecake Bars
After making these bars more times than I can count (and learning from a few hilarious kitchen disasters), here are my absolute must-know tips for caramel apple cheesecake bar perfection:
Chill them like you mean it! I know it’s tempting to dig in right away, but trust me – those two hours in the fridge make all the difference. The cheesecake needs time to set properly so you get clean slices instead of gooey messes. (Confession: I once skipped this step and ended up serving “caramel apple cheesecake soup” – delicious but not exactly photogenic!)
Tart apples are your BFFs. Granny Smith’s natural acidity cuts through the sweetness beautifully. Sweeter apples can make the whole dessert cloying. Pro tip: toss your diced apples with a squeeze of lemon juice to prevent browning and add extra zing.
Hot knife = clean slices. Dip your knife in hot water and wipe it clean between cuts. This gives you those gorgeous, Instagram-worthy slices without dragging the caramel everywhere.
Storage is simple! These keep beautifully in the fridge for up to 5 days (if they last that long). Just press plastic wrap directly on the surface to prevent drying. You can also freeze them for up to 3 months – perfect for unexpected guests or sudden caramel apple emergencies!
Variations for Caramel Apple Cheesecake Bars
One of my favorite things about this recipe? How easily you can tweak it to make it your own! Here are some delicious twists I’ve tried (and loved) over the years:
Nutty crust upgrade: Swap out ¼ cup of the graham crumbs for finely chopped pecans or walnuts. The toasty flavor pairs amazingly with the caramel and apples – it’s like autumn in every bite!
Spiced apples: Toss your diced apples with an extra teaspoon of cinnamon, a pinch of nutmeg, and a dash of cardamom before sprinkling them on. It gives that cozy “apple pie” vibe without extra work.
Dulce de leche magic: Out of caramel? Use dulce de leche instead – it’s richer and creamier, making these bars taste extra decadent. (Pssst… I’ve even swirled it into the cheesecake layer for a marbled effect!)
The possibilities are endless – that’s the beauty of these bars. Make them once as written, then get creative with your own signature version!
Serving and Storing Caramel Apple Cheesecake Bars
Here’s the best part—these bars actually get better after a night in the fridge! The flavors meld together beautifully, and that cheesecake layer firms up to that perfect creamy-but-sliceable texture. When you’re ready to serve, I love adding one last drizzle of warmed caramel right before cutting—it makes everything glisten like autumn sunshine.
For storage, just cover the pan tightly with plastic wrap (press it right against the surface to prevent drying). They’ll keep happily in the fridge for up to 5 days—not that they’ve ever lasted that long in my house! If you somehow have leftovers, pop them in individual containers so you can grab a sweet treat whenever the craving hits. And yes, they taste fantastic straight from the fridge at midnight—not that I’d know anything about that!
Nutritional Information
Just so you know what you’re diving into, here’s the scoop per bar (based on 12 servings): about 250 calories, 12g fat, and 20g sugar—but honestly, who’s counting when it tastes this good? Remember, these are estimates and will vary slightly based on your exact ingredients. Now go enjoy every delicious bite!
FAQs About Caramel Apple Cheesecake Bars
I get so many questions about these bars—here are the answers to the ones that pop up most often! Trust me, I’ve tested all these scenarios myself (sometimes through hilarious trial and error).
Can I Use Store-Bought Caramel?
Absolutely! While homemade caramel is delicious (and so satisfying to make), a good-quality store-bought sauce works perfectly in a pinch. My grocery store’s refrigerated section has an amazing one that’s just thick enough to drizzle beautifully. Just avoid the ice cream toppings in squeeze bottles—they’re usually too thin and will make your crust soggy.
How Do I Prevent a Soggy Crust?
Ah, the eternal struggle! Two tricks save the day: first, make sure to pre-bake your crust for those crucial 8 minutes—it creates a protective “seal.” Second, let your cheesecake layer cool completely before adding the caramel drizzle on top (the chilled cheesecake acts as a barrier). If you’re extra worried, you can even brush the baked crust with a thin layer of melted chocolate before adding the filling—it’s like a waterproof jacket for your graham crackers!
Can I Freeze These Bars?
You bet! They freeze beautifully for up to 3 months. Just wrap individual squares tightly in plastic wrap, then foil. Thaw overnight in the fridge—the texture stays perfect! I always keep a few stashed for emergencies (like when my book club shows up unannounced).
Can I Use Different Apples?
Granny Smith is my ride-or-die for that perfect tartness, but Honeycrisp or Pink Lady work if you prefer sweeter bars. Just avoid super-juicy varieties like Fuji—they release too much liquid while baking. Pro tip: mix half tart and half sweet apples for balanced flavor!
How Do I Get Clean Slices?
Three words: chill, hot knife. After the bars are fully set (minimum 2 hours in fridge), run your sharpest knife under hot water, wipe it dry, and make one swift cut. Repeat between each slice—it should glide through like butter! Bonus: dip the knife in hot water between cuts to keep caramel from dragging.
Final Thoughts
There you have it—my all-time favorite fall dessert that never fails to impress! I’d love to hear how your caramel apple cheesecake bars turn out. Snap a photo and tag me when you make them (I live for those golden caramel drizzle shots!). Happy baking, friends—may your autumn be as sweet as these bars!
You can find more inspiration on Pinterest!


Caramel Apple Cheesecake Bars with 2-Ingredient Crust
- Total Time: 2 hours 45 minutes
- Yield: 12 bars
- Diet: Vegetarian
Description
Delicious caramel apple cheesecake bars with a graham cracker crust, perfect for fall.
Ingredients
- 16 oz cream cheese
- 1 cup sugar
- 2 apples, peeled and diced
- ½ cup caramel sauce
- 1 cup graham cracker crumbs
Instructions
- Preheat oven to 350°F.
- Mix graham cracker crumbs with melted butter and press into a baking pan.
- Beat cream cheese and sugar until smooth.
- Spread the cream cheese mixture over the crust.
- Top with diced apples and drizzle caramel sauce.
- Bake for 25-30 minutes.
- Chill for at least 2 hours before serving.
Notes
- Use tart apples like Granny Smith for the best flavor.
- Chill the bars for easier slicing.
- Prep Time: 15 minutes
- Cook Time: 30 minutes
- Category: Dessert
- Method: Baking
- Cuisine: American


