Halloween just isn’t complete without something sweet, and my Candy Corn Fudge has become our family’s must-make treat every October. I’ll never forget the year I first threw this together – my niece declared it “magic” because it came together in minutes with no oven required! Just three simple ingredients transform into the creamiest, dreamiest fudge studded with those iconic candy corns. It’s so easy the kids can help (though good luck keeping their fingers out of the bowl). The hardest part? Waiting those two hours for it to set – but trust me, that first bite of sweet white chocolate and candy corn goodness is worth every minute.
Why You’ll Love This Candy Corn Fudge

This recipe is my go-to for Halloween for so many reasons – let me count the ways you’ll adore it too:
- Effortless magic: No baking, no fancy skills needed – just melt, stir, and chill. Even my 6-year-old nephew can make this (with supervision near the stove, of course!).
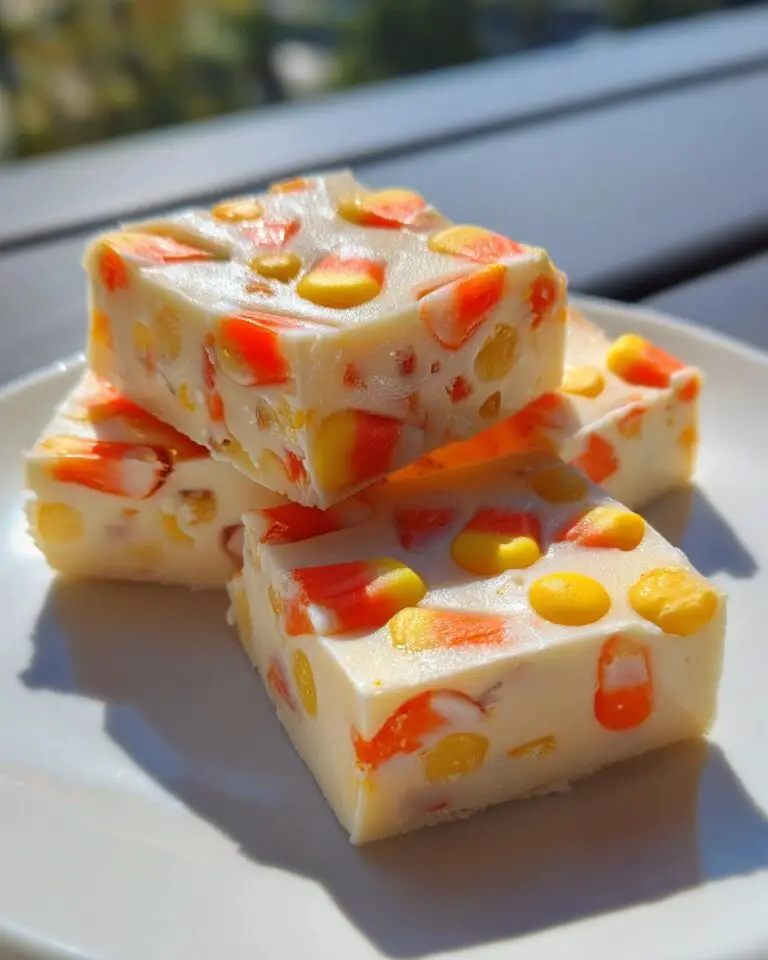
- Instant Halloween spirit: Those cheerful candy corn pieces make every bite feel like a celebration. I always sneak a few extra on top before it sets for that picture-perfect finish.
- Creamy dreamy texture: The white chocolate and condensed milk create the smoothest fudge you’ll ever taste – like biting into a candy cloud with little bursts of sweetness.
- Last-minute lifesaver: When you realize you forgot to make treats for the school party? This saves the day in under 15 minutes of active time.
- Nostalgia in every bite: It somehow tastes like childhood Halloweens – sweet, simple, and impossible to resist sneaking “just one more” piece.
Ingredients for Candy Corn Fudge
Here’s the beautiful part – you only need three key ingredients to make this magical Halloween treat! But let me tell you exactly what to grab because quality matters with such a simple recipe:
- 2 cups white chocolate chips – Not white baking chips, not almond bark – real white chocolate chips! I learned the hard way that cheap substitutes make grainy fudge. Ghirardelli or Guittard are my go-tos.
- 1 cup sweetened condensed milk – That iconic Eagle Brand can with the cow on it? Perfect. Don’t even think about evaporated milk – they’re totally different beasts in the baking world.
- 1 cup candy corn – Plus about ¼ cup extra if you want to press some on top for a pretty finish (and who doesn’t want pretty fudge?). I like Brach’s classic tri-color candy corns – their texture stays perfect in the fudge.
See? I told you it was simple! Now let’s get that white chocolate melting…
Equipment You’ll Need
One of my favorite things about this candy corn fudge? You probably already have everything you need right in your kitchen! No fancy gadgets required – just these basic tools:
- 8×8-inch baking pan – That trusty square pan you use for brownies is perfect. If you only have a 9×9, no worries – your fudge will just be slightly thinner (which means you can cut more pieces – bonus!).
- Parchment paper – The real MVP for easy removal! Pro tip: leave some overhang on two sides like little handles – makes lifting out the set fudge a breeze.
- Medium saucepan – Nothing fancy, just something sturdy for melting our chocolatey goodness. I grab my everyday 2-quart saucepan – it’s the Goldilocks size for this recipe.
- Silicone spatula – My absolute must-have for scraping every last bit of that creamy fudge into the pan. Plus it won’t scratch your pan like metal spoons might.
That’s it! No stand mixers, no candy thermometers – just simple tools for simple (but oh-so-delicious) magic. Now let’s get to the fun part…
How to Make Candy Corn Fudge
Alright, let’s dive into the magic! Making this candy corn fudge couldn’t be simpler, but I’ve got some tricks to make sure yours turns out perfectly smooth every time. Follow these steps, and you’ll be the Halloween hero of your neighborhood!
Step 1: Prepare the Pan
First things first – let’s set ourselves up for success! Grab that 8×8-inch pan and line it with parchment paper. Here’s my foolproof method: tear off a sheet bigger than your pan, then gently press it in, letting the excess hang over two sides like little handles. This makes lifting out your fudge later SO much easier – no wrestling with sticky edges! Pro tip: if the parchment won’t stay put, just dab a tiny bit of butter in the corners to help it stick.
Step 2: Melt the White Chocolate
Now for the most crucial step – melting the chocolate! White chocolate is delicate, so we need to baby it. Pour your white chocolate chips into the saucepan and set it over LOW heat. I’m talking the lowest setting your stove has – we’re aiming for gentle warmth, not a full boil. Stir constantly with your spatula, moving the chocolate around the pan. You’ll see it slowly transform from little chips to a smooth, creamy pool. The second it’s fully melted, take it off the heat – overheated white chocolate turns grainy faster than you can say “trick or treat!”
Step 3: Combine with Condensed Milk
While your chocolate is still warm (but off the heat!), pour in that glorious sweetened condensed milk. Stir slowly at first – it might look like they’ll never combine, but keep faith! After about 30 seconds of stirring, you’ll see the magic happen as they transform into one silky, luxurious mixture. Scrape the sides and bottom well – we don’t want any sneaky unmixed spots hiding down there!
Step 4: Add Candy Corn
Here comes the fun part! Pour in your candy corn and give everything a good stir until they’re evenly distributed. Want that picture-perfect top? Reserve about a quarter cup of candy corn before mixing and gently press them into the top after pouring into your pan. They’ll stay right where you put them as the fudge sets. My kids love helping with this part – we make little patterns and smiley faces!
Step 5: Chill and Set
Patience time! Carefully pour your mixture into the prepared pan, smoothing it into an even layer with your spatula. Now pop it in the fridge for at least 2 hours – I know it’s tempting to peek early, but trust me, that full chilling time makes all the difference. The fudge should be completely firm when gently pressed. Pro tip: if you’re in a hurry, you can speed things up by putting it in the freezer for 45 minutes – just don’t forget about it!
Tips for Perfect Candy Corn Fudge
After making countless batches of this fudge (and yes, eating plenty of “test” pieces), I’ve learned a few secrets to guarantee candy corn fudge perfection every time. Here are my can’t-live-without tips:
Quality chocolate makes all the difference
I know it’s tempting to grab whatever white chocolate is cheapest, but resist! Cheap white baking chips contain stabilizers that leave your fudge grainy. Look for real white chocolate chips with cocoa butter listed first – they melt smoother than a ghost floating through walls. My favorites are Ghirardelli or Guittard – their rich creaminess takes this fudge from good to “Oh my gourd!” amazing.
Patience is a virtue (especially with chilling)
That two-hour chill time isn’t just a suggestion – it’s sacred! I learned this the hard way when I tried cutting into a batch after just one hour. The knife came out looking like it survived a candy corn massacre. The fudge needs that full time to set properly. If you’re antsy, distract yourself with some Halloween decorating – before you know it, you’ll have perfect, clean-cut squares.
The warm knife trick
Even perfectly chilled fudge can stick to your knife. Here’s my foolproof method: run your knife under hot water and dry it quickly before each cut. The heat helps glide through smoothly without dragging. Wipe the blade between cuts for picture-perfect edges every time. Bonus: you get to “clean” the knife by licking off any leftover fudge – purely for efficiency, of course!
Room temp matters more than you think
If your kitchen feels like a witch’s cauldron (hello, summer Halloween parties!), let your fudge sit at room temperature for 10 minutes before cutting. Super-cold fudge straight from the fridge can crack under pressure. A brief warm-up makes it more cooperative – kind of like how we all are after our morning coffee!
Variations of Candy Corn Fudge

While I’m obsessed with the classic candy corn version, sometimes it’s fun to mix things up! Here are my favorite twists that still keep that Halloween spirit alive:
Festive Orange Swirl
For an extra pop of Halloween color, try adding orange food coloring! After mixing the melted chocolate and condensed milk, separate about 1/3 of the mixture into another bowl. Stir in a few drops of orange gel food coloring (liquid makes the fudge too runny). Pour the white mixture into the pan first, then drizzle the orange on top and swirl with a toothpick. It looks like a candy corn sunset when sliced!
Salty-Sweet Pretzel Crunch
If you love that salty-sweet combo, swap half the candy corn for crushed pretzel pieces. The contrast is magical! I use those mini pretzel twists and give them a rough chop so you get little bursts of saltiness. Bonus: sprinkle some pretzel dust on top before chilling for extra crunch. My husband swears this version is even better than the original (but don’t tell my niece I said that).
Chocolate Drizzle Delight
For chocolate lovers, melt 1/4 cup semi-sweet chips with a teaspoon of coconut oil and drizzle over the set fudge. The dark chocolate makes those candy corn colors really pop! I like to make spooky spiderweb designs – just zigzag the chocolate across, then drag a toothpick from center to edges. Looks fancy but takes 30 seconds.
Peanut Butter Twist
Stir 1/4 cup creamy peanut butter into the warm white chocolate mixture before adding candy corn. It gives the fudge this incredible richness that pairs perfectly with the sweetness. Top with those candy corn and peanut butter cup pieces you can find around Halloween for the ultimate mashup.
The best part? You can mix and match these ideas! Orange swirl with pretzel crunch? Yes please! Just don’t go too wild – the beauty of this fudge is its simplicity. Now if you’ll excuse me, I need to go “test” another batch…
Storing and Serving Candy Corn Fudge
Here’s the best news about this candy corn fudge – it actually gets better as it sits! That is, if you can resist eating it all in one sitting (no judgment from me). Over the years, I’ve perfected how to store it so every bite stays as fresh as the first.
Keeping it fresh
The secret to longevity? An airtight container in the fridge! Once your fudge is completely set, cut it into squares and layer them between sheets of parchment paper in a container with a tight-fitting lid. This prevents them from sticking together and keeps out fridge smells (because nobody wants onion-scented fudge). It’ll stay perfect for up to a week – though in my house, it’s lucky to last 24 hours!
Serving suggestions
This fudge is delicious straight from the fridge – that slight chill makes the creamy texture even more magical. For parties, I like to arrange the squares on a spooky platter with some extra candy corn scattered around. If you’re feeling fancy, dust them lightly with edible gold glitter for “witch’s gold” fudge – the kids go wild for it!
Pro tip: If your kitchen is warm, keep the fudge refrigerated until right before serving. That sweet white chocolate can get a little melty if left out too long. Not that a little mess ever stopped anyone from enjoying it – some of my best Halloween memories involve chocolate-covered fingers!
The great freezing debate
“Can you freeze it?” my neighbors always ask. Technically yes – wrap individual squares tightly in plastic wrap, then store in a freezer bag for up to 2 months. But here’s my honest opinion: the texture changes slightly when thawed. It’s still tasty, but loses that perfect creamy consistency. I’d rather make smaller fresh batches than freeze it. Unless we’re talking about hiding a secret stash from the kids – then freezer rules don’t apply!
Candy Corn Fudge FAQs
After years of making this fudge for Halloween parties and neighborhood gatherings, I’ve been asked just about every question imaginable! Here are the answers to the ones that pop up most often:
Can I use milk chocolate instead of white chocolate?
Technically yes, but it won’t give you that classic candy corn look or flavor. Milk chocolate overpowers the candy corn’s sweetness and turns the whole batch brown – not very festive! If you must swap, I’d suggest using only 1/4 milk chocolate mixed with 3/4 white chocolate to keep some of that Halloween magic.
Help! My fudge turned out grainy – what went wrong?
Oh no! This usually happens for one of three reasons:
1) The chocolate got too hot while melting (remember – LOW heat!)
2) You stirred in the candy corn while the mixture was still on the heat
3) Lower quality chocolate was used
Don’t panic though – grainy fudge still tastes delicious! Next time, melt the chocolate slower and take it off the heat the second it’s smooth.
Can I freeze the fudge for later?
You can, but I don’t love the texture after thawing – it gets slightly crumbly. If you must freeze it, wrap individual squares tightly in plastic wrap first, then store in a freezer bag for up to 2 months. Thaw in the fridge overnight. But honestly? This fudge is so quick to make fresh, I’d rather whip up a new batch when the craving hits!
How do I get clean slices without the candy corn sticking to my knife?
That warm knife trick I mentioned earlier is golden! Run your knife under hot water, dry it quickly, and make smooth cuts in one motion. Wipe the blade between cuts – the candy corn can be clingy! Also, chilling the fudge the full 2 hours helps the candy corn set firmly in place.
Can I use evaporated milk instead of condensed?
Absolutely not – they’re totally different products! Sweetened condensed milk is thick and syrupy while evaporated milk is thin and unsweetened. Using evaporated milk will give you a sad, soupy mess. Trust me – I learned this the hard way during my first Halloween in college. Stick to the real deal!
Still have questions? Just ask – I’ve probably made every mistake possible with this recipe over the years and can save you from repeating them! Now go enjoy that fudge – you’ve earned it.
Nutritional Information

Okay, let’s be real – we’re not eating candy corn fudge for its health benefits! But since folks often ask, here’s the approximate nutritional breakdown per square (based on cutting into 16 pieces). Remember, these are estimates – your exact numbers will vary slightly based on the specific ingredients you use:
- Calories: 180 (Consider it fuel for trick-or-treating!)
- Sugar: 22g (It’s dessert – embrace the sweetness!)
- Fat: 8g (That’s where all the creamy goodness comes from)
- Saturated Fat: 5g (Blame the delicious white chocolate)
- Carbohydrates: 25g (Mostly from that magical condensed milk)
- Protein: 2g (Surprising little boost from the milk solids)
Important note: Nutritional values are estimates and vary based on ingredients used. If you’re watching specific dietary needs, always check your product labels. Now go enjoy your fudge guilt-free – Halloween comes just once a year!
You can also find more recipe inspiration on Pinterest.
Print
3-Ingredient Candy Corn Fudge Magic You’ll Crave
- Total Time: 2 hours 15 minutes
- Yield: 16 squares
- Diet: Vegetarian
Description
A simple no-bake candy corn fudge made with white chocolate and condensed milk. Perfect for Halloween treats.
Ingredients
- 2 cups white chocolate
- 1 cup condensed milk
- 1 cup candy corn
Instructions
- Line an 8×8 inch pan with parchment paper.
- Melt white chocolate and condensed milk in a saucepan over low heat, stirring until smooth.
- Remove from heat and stir in candy corn.
- Pour mixture into the prepared pan and spread evenly.
- Chill in the refrigerator for 2 hours or until firm.
- Cut into squares and serve.
Notes
- Store fudge in an airtight container in the refrigerator.
- Use high-quality white chocolate for best results.
- Add food coloring for a festive touch.
- Prep Time: 10 minutes
- Cook Time: 5 minutes
- Category: Dessert
- Method: No-Bake
- Cuisine: American


