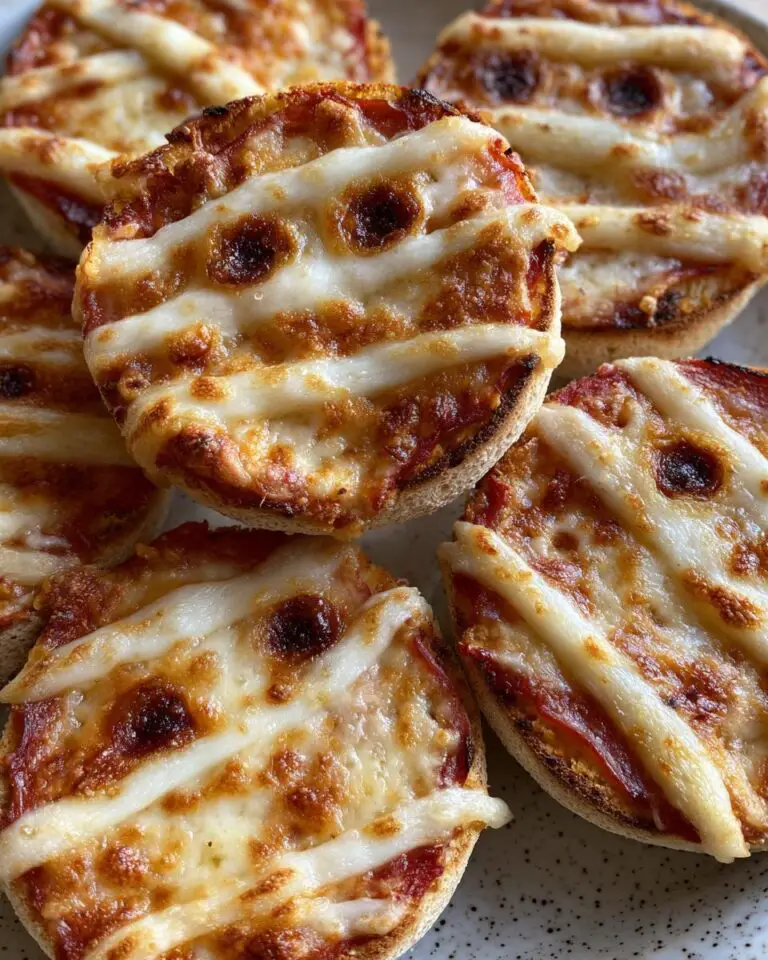
There’s just something magical about Halloween snacks that look as fun as they taste. When my kids first saw these adorable mummy pizzas, their eyes lit up like jack-o’-lanterns! These little English muffin masterpieces have become our must-make Halloween tradition – whether we’re whipping them up for a spooky family dinner or bringing them to school parties.
What I love most (besides how ridiculously easy they are) is how the melted mozzarella cheese looks like perfect mummy bandages when you arrange it just right. Last year, my youngest insisted we use sliced black olives for eyes, and suddenly our snack table looked like a tiny army of friendly mummies. The best part? From start to finish, you’re only about 15 minutes away from these cute and creepy treats that somehow disappear even faster than Halloween candy!
Mummy Pizzas Ingredients
Here’s the beautiful part – you probably have most of these ingredients sitting in your kitchen right now! That’s what makes these mummy pizzas so perfect when you suddenly remember the school Halloween party is tomorrow (been there!). Just gather:
- 4 English muffins – split in half (I’ve used whole wheat when trying to be “healthy,” but honestly, the kids prefer the regular ones)
- 1/2 cup pizza sauce – my secret? I sometimes mix in a pinch of garlic powder and dried oregano to make it extra flavorful
- 1 cup shredded mozzarella cheese – pre-shredded works fine, but if you have time, freshly shredded melts into those perfect “bandage” strands
Now for the fun extras – these are totally optional but make your mummies come alive (well, undead):
- Sliced black olives or small pepperoni circles for the eyes (my kids argue over which looks spookier)
- A few basil leaves torn into strips for extra “mummy wrapping” texture
- A light sprinkle of parmesan over the sauce before adding mozzarella adds nice depth
See? Nothing fancy – just simple ingredients that transform into pure Halloween magic!
How to Make Mummy Pizzas

Okay, let’s make some edible mummies! This is the part where the kids usually fight over who gets to arrange the cheese “bandages” (pro tip: let everyone do their own muffin half to avoid tears). Here’s how we do it:
- Fire up that oven to 375°F (190°C) – no need to wait for it to preheat completely if you’re in a hurry (I won’t tell).
- Split those English muffins and lay them out on a baking sheet. No need to grease it – the muffins have enough personality already.
- Spread the sauce – about a tablespoon per half. My kids always want extra, but too much makes the muffins soggy. I use the back of a spoon to swirl it evenly.
- Now the fun part – the mozzarella “bandages!” Grab small pinches of cheese and lay them in slightly messy strips across the muffin, leaving little gaps where the eyes will go. They should look like haphazard mummy wrappings, not perfect lines – imperfections make them cuter!
- Pop in the eyes – press two olive slices or tiny pepperoni circles into those bare sauce spots you left. Sometimes I use a toothpick to help place them just right.
- Bake for 10-12 minutes until the cheese melts and gets those perfect golden bubbly bits. The smell will have little monsters gathering in your kitchen!
- Let them cool just a minute – melted cheese burns are no fun, but you want them warm enough for the cheese to stay stretchy when you pull them apart.
Tips for Perfect Mummy Pizzas
After making approximately 487 of these (okay maybe 50), here are my hard-earned secrets:
- Use room temp muffins – if they’re fresh from the fridge, toast them lightly first so the sauce doesn’t make them soggy
- Thin cheese strands work best – fat globs of cheese won’t look like wrappings. If your shreds are too thick, just pull them apart with your fingers
- Make a “test mummy” – bake just one first to check your oven’s hot spots and perfect your cheese arrangement
- Get creative with eyes – capers, tiny pickled onion slices, or even corn kernels make fun alternatives to olives
Why You’ll Love These Mummy Pizzas

Listen, I get it—you’re busy, the kids are screaming for snacks, and Halloween stress is real. That’s exactly why these mummy pizzas have become my go-to lifesaver. Here’s why they’ll steal your heart (and stomach) too:
- 15 minutes flat from fridge to table—even when you forgot about the class party until the school bus is coming down the street
- Little hands can help—my 4-year-old can spread sauce and place cheese “bandages” (messy hands mean more memories, right?)
- Endlessly customizable—swap in pesto instead of pizza sauce, use pepper jack cheese for “dirty” bandages, or go veggie-heavy with bell pepper strips
- The ultimate excitement-to-effort ratio—kids lose their minds over how fun they look, while you bask in the glory of minimal cleanup
- Secretly wholesome—packed with protein from the cheese and carbs from the muffins to balance out all that trick-or-treat sugar
Last Halloween, my neighbor’s kid—who normally turns up his nose at anything resembling dinner—ate three of these without realizing he was consuming an actual meal. That’s the magic of food that plays dress-up!
Mummy Pizzas Variations
Once you’ve mastered the classic version, the fun really begins! These little mummies love playing dress-up with different ingredients. Here are some of our favorite spins that keep things exciting:
- Cheese swap – Try cheddar for golden “aged” bandages or pepper jack for spicy mummies with attitude
- Breakfast mummies – Use scrambled egg “filling” with bacon strip bandages and grape tomato eyes
- Veggie lovers – Thin strips of zucchini or bell pepper make perfect green wrappings over pesto sauce
- Dessert edition – Swap pizza sauce for Nutella, use marshmallow strips as bandages, and chocolate chip eyes
- Gluten-free ghosts – Use gluten-free bagels or cauliflower crust rounds for hauntingly good dietary needs
My personal favorite? The “zombie” version where we let the cheese melt completely over the eyes—like the mummy’s coming apart at the seams! The kids think it’s hilarious when their food looks like it’s falling apart.
Serving and Storing Mummy Pizzas
Here’s the thing about mummy pizzas – they’re at their absolute best straight from the oven when the cheese is still gloriously stretchy and the English muffin has that perfect crisp-tender bite. I always set them out immediately because, let’s be honest, they never last long anyway! If you’re serving these at a party, arrange them on a platter with some spooky decorations – I like to add plastic spiders or fake cobwebs for extra Halloween vibes.
Now, if by some miracle you have leftovers (it’s happened exactly once in my house), here’s how to keep them tasty:
- Room temp is fine for about 2 hours if you’re nibbling while handing out candy to trick-or-treaters
- For longer storage, pop them in an airtight container in the fridge for up to 2 days – the cheese will harden, but they’re still delicious
- Reheating magic: 30 seconds in the microwave works in a pinch, but for that fresh-from-the-oven texture, I use the toaster oven at 350°F for 3-4 minutes
One year, I made a double batch the night before Halloween and froze half – just wrap them tightly in foil first. Thawed them in the fridge overnight, then reheated in the oven for a quick school lunch surprise. The cheese didn’t look quite as perfect, but the taste was still fantastic!
Mummy Pizzas Nutritional Information

Okay, let’s be real – we’re not making mummy pizzas because they’re health food (though I did convince my kids they’re “brain food” for trick-or-treating!). But in case you’re curious, here’s the nutritional breakdown per mini pizza. Remember, these are estimates – your exact numbers will vary based on the brands you use and how generous you are with the cheese!
- Serving Size: 1 mini pizza (about 1/2 an English muffin with toppings)
- Calories: Around 120 – perfect for little monster hands reaching for seconds
- Protein: 6g (thank you, melty mozzarella!)
- Carbs: 15g – mostly from that tasty English muffin base
- Sugar: Just 2g (unless you sneak in extra sauce – no judgment!)
- Fat: 4g (but let’s call it “essential mummy wrapping lubrication”)
Now, here’s where it gets fun – you can totally tweak these numbers:
- Swap in whole wheat English muffins and you’ll add about 1g more fiber per serving
- Use part-skim mozzarella to trim about 1g of fat per pizza
- Skip the olives? You’ll save about 5 calories (but lose some spooky personality!)
The best part? Compared to most Halloween treats, these give kids actual staying power thanks to the protein and complex carbs. Plus, they’re way more balanced than eating their body weight in candy corn! As my grandma used to say while handing out Halloween apples (that no one ever took), “At least it’s got some nutrition!”
Disclaimer: Nutritional values are estimates and vary based on ingredients used.
Frequently Asked Questions
Oh my gosh, I get SO many questions about these adorable little mummy pizzas! Here are the ones that pop up most often – along with all my best tips from years of Halloween snack-making chaos:
Q: Can I use pita bread instead of English muffins?
Absolutely! Pita works great – just cut smaller rounds to keep that perfect mummy size. The texture will be slightly different (less nooks for sauce to hide in), but still delicious. Bagel halves or even thick slices of French bread work in a pinch too. Honestly, any bread base that can handle toppings will make a happy mummy!
Q: How long do mummy pizzas stay fresh?
They’re honestly best eaten right away (and let’s be real – they usually are!). But if you must store them, room temp for 2 hours max, or refrigerated for up to 2 days in an airtight container. The cheese hardens when cold, but a quick toast or microwave revive them pretty well. I don’t recommend freezing unless you’re desperate – the texture changes too much for my taste.
Q: My cheese melts into a blob instead of staying in bandage strips – help!
This used to drive me nuts too! The secret is using less cheese than you think you need, and arranging it in very thin strands. Also, make sure your oven is fully preheated – that initial blast of heat helps set the cheese quickly. If all else fails, try broiling for just the last minute to get that perfect melt without losing definition.
Q: Can I make these ahead for a party?
You can prep the muffin halves with sauce and cheese up to 2 hours before baking – just cover loosely with plastic wrap. But bake them right before serving for that perfect melted cheese effect. For classroom parties, I’ll often assemble them at home, then bake quickly in the teacher’s lounge microwave (shh, don’t tell!). They won’t brown, but the cheese still melts nicely.
Q: What other Halloween snacks pair well with these?
We love serving them with “witches’ brew” punch (just lime sherbet in ginger ale!), carrot sticks as “monster fingers,” and clementines with celery stems for “mini pumpkins.” For dessert? Obviously mummy cookies! But honestly, these little pizzas are so satisfying, you might not need much else – except maybe some candy for bribery. I mean… for dessert! Check out more fun Halloween ideas on Pinterest.
Ready to Make Some Adorable Mummy Pizzas?
Alright, Halloween hero – you’ve got all my best mummy pizza secrets now! The only thing left is to grab those English muffins and get creative. Trust me, the moment you pull that first batch of cheesy, slightly creepy (but mostly cute) mini mummies out of the oven, you’ll be hooked. My kids still talk about “that time mom made the mummies with the pepperoni eyes” years later!
I’d love to see what spooky creations you come up with – tag me on social media with your mummy masterpieces! Did you try the breakfast version? Use rainbow cheese? Make a whole mummy army? Nothing makes me happier than seeing how other families put their own fun spin on this silly-simple recipe. And if your little monsters gobble them up as fast as mine do, you might just find yourself making these year-round (no judgment here – mummies aren’t just for Halloween!).
Now go forth and create some edible magic – just don’t blame me when your kids start requesting “mummy everything” for every meal! Who knows, maybe we’ll start a whole undead food movement. One English muffin at a time.
Print
15-Minute Mummy Pizzas Your Kids Will Crave Eternally
- Total Time: 17 minutes
- Yield: 8 mini pizzas
- Diet: Vegetarian
Description
Easy and fun mini mummy pizzas made with English muffins, pizza sauce, and mozzarella. Perfect for Halloween or a spooky snack.
Ingredients
- 4 English muffins
- 1/2 cup pizza sauce
- 1 cup mozzarella cheese, shredded
Instructions
- Preheat your oven to 375°F (190°C).
- Split the English muffins in half and place them on a baking sheet.
- Spread pizza sauce evenly on each muffin half.
- Sprinkle mozzarella cheese in thin lines to resemble mummy bandages, leaving small gaps for the “eyes.”
- Bake for 10-12 minutes or until the cheese melts and turns golden.
- Let cool slightly before serving.
Notes
- Add sliced olives or small pieces of pepperoni for the mummy’s eyes.
- Use whole wheat English muffins for a healthier option.
- Prep Time: 5 minutes
- Cook Time: 12 minutes
- Category: Appetizer
- Method: Baking
- Cuisine: American


