Every Halloween, my kitchen turns into a spooky bakery, and these ghost cupcakes always steal the show! I remember the first time I made them—my niece squealed with delight when she saw their cute little faces peeking out from the frosting. That’s when I knew they’d become our annual tradition.
These ghost cupcakes are ridiculously easy to whip up, but they look like you spent hours on them. The secret? Marshmallow frosting! It’s fluffy, sticky, and perfect for shaping into playful ghost swirls. Whether you’re hosting a Halloween party or just want a fun treat, these little spirits will haunt your dessert table in the best way possible.
Ingredients for Ghost Cupcakes
Don’t let the ghostly look fool you—these cupcakes need just a handful of simple ingredients to come to life! I always say, if you’ve got a box of cupcake mix and a tub of marshmallow fluff, you’re already halfway there. Here’s what you’ll need:
- 12 baked cupcakes (any flavor—I love chocolate for spooky contrast, but vanilla works too), cooled completely
- ½ cup white frosting (store-bought or homemade), at room temperature
Marshmallow Frosting Ingredients
The real magic is in this fluffy ghost frosting—it’s like edible clouds with a sweet, sticky personality. Here’s your potion:
- 1 (7 oz) tub marshmallow fluff (or about 1 heaping cup if you’re measuring from a larger container)
- Optional but fun: Black icing gel or mini chocolate chips for ghost faces—I’ve even used edible candy eyes when I’m feeling fancy!
Pro tip: If your marshmallow fluff is stubbornly stuck to the tub, pop it in the microwave for 5-10 seconds—just enough to loosen it up without melting!
How to Make Ghost Cupcakes

Trust me, these adorable ghost cupcakes come together faster than you can say “Boo!” The secret is working in stages—cool cupcakes first, then whip up that dreamy frosting, and finally, let your inner artist shine with the decorating. Here’s exactly how I do it every year (with plenty of marshmallow-fluff finger-licking along the way).
Preparing the Cupcakes
Whether you’re using a box mix or your favorite from-scratch recipe, bake those cupcakes first! I always make mine the night before—just let them cool completely on a wire rack (about 2 hours). Cold cupcakes hold their shape better when you frost them. No time? Store-bought unfrosted cupcakes work in a pinch—just peel off any decorative sprinkles first.
Making the Ghost Frosting
This is where the magic happens! Grab a big bowl and plop in your marshmallow fluff. If it’s being stubborn, that quick microwave zap I mentioned earlier helps. Add your white frosting and fold gently with a spatula—no vigorous stirring or you’ll deflate all that fluffy goodness. You want it thick enough to hold peaks but soft enough to spread. Too stiff? A teaspoon of milk loosens it right up.
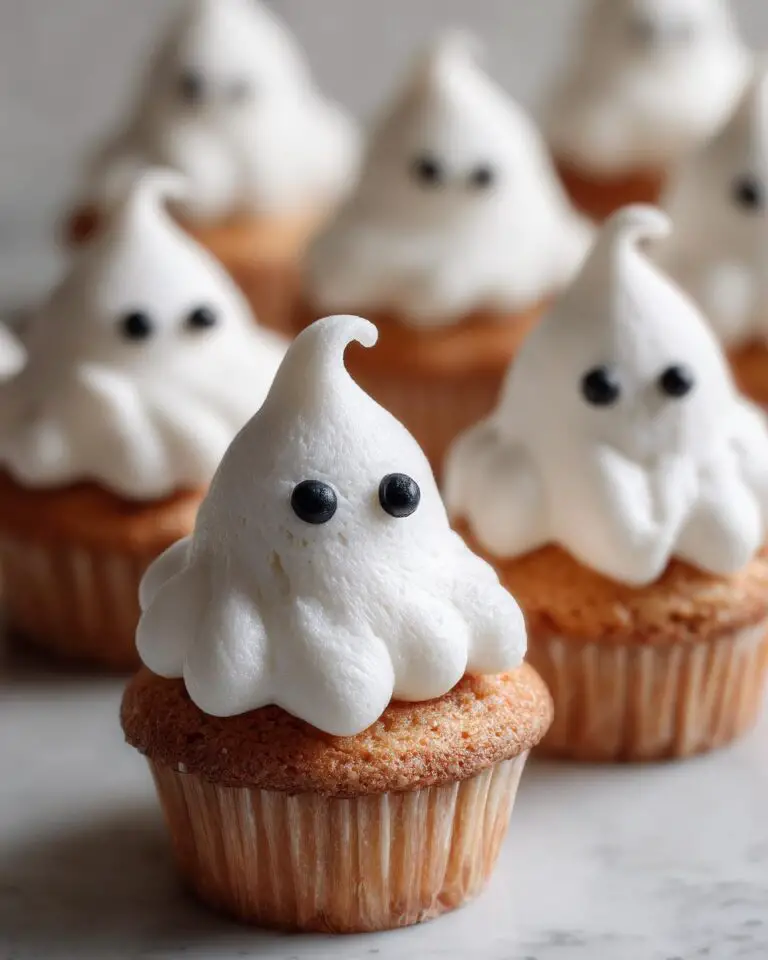
Decorating Ghost Cupcakes
Now for the fun part! I use two methods: For rustic ghosts, scoop frosting with an ice cream scoop and plop it on top, then drag a spoon upward to create wispy peaks. For polished ghosts, fit a piping bag with a large round tip (or just snip the corner of a Ziploc bag) and pipe tall swirls, pulling up at the end for that perfect ghostly point. Pro tip: Chill cupcakes for 10 minutes before adding eyes—it keeps the black icing from bleeding. Use a toothpick to dot on cute expressions!
Tips for Perfect Ghost Cupcakes

After years of making these ghostly treats (and yes, a few hilarious frosting disasters), I’ve learned all the tricks to get them just right. Here’s my cheat sheet for picture-perfect cupcakes every time!
Temperature is key: If your frosting feels more like marshmallow soup than fluffy clouds, pop the bowl in the fridge for 10 minutes. Too firm? Let it sit at room temp—the sweet spot is when it holds its shape but still spreads easily.
Avoid the “melted ghost” look: Always start with completely cooled cupcakes! I learned this the hard way when my first batch turned into ghostly puddles. Now I wait at least 2 hours, or sometimes bake them the night before.
Clean piping hack: Keep a tall glass nearby when filling your piping bag—fold the bag over the rim like a cuff, and spoon in the frosting mess-free. No more sticky hands!
Expression perfection: Those cute little faces are easier than you think! For dots, dip the handle end of a paintbrush in black gel. For swirls and smiles, use a toothpick—just drag it gently through the frosting before it sets.
The rescue remedy: If your ghosts start sagging, don’t panic! Slide the whole tray into the fridge for 15 minutes—they’ll perk right back up. Works like magic every Halloween when I’m rushing to finish before trick-or-treaters arrive!
Ghost Cupcakes Variations
One of my favorite things about these ghost cupcakes is how easily you can switch them up! Over the years, I’ve played with dozens of fun twists—here are the best ones that still keep that adorable spooky spirit alive.
- Chocolate ghost brigade: Swap vanilla cupcakes for rich chocolate—the dark base makes the white ghosts pop even more! Bonus: The cocoa flavor balances the marshmallow sweetness perfectly.
- Glowing eyes: Instead of black icing, use mini M&Ms (the yellow ones look eerily awesome) or those edible silver ball bearings for a “ghost in the machine” vibe.
- Spooky sprinkles: Before adding the ghost frosting, roll the cupcake edges in orange and black sprinkles. It gives them a fun “floating in a haunted night sky” look!
- Peanut butter ghosts: Mix 2 tablespoons peanut butter into the frosting for a nutty twist. My husband swears this version tastes like a ghostly Reese’s cup.
- Vegan friendly: Use your favorite plant-based cupcakes and mix marshmallow fluff with dairy-free frosting. Pro tip: Coconut whipped cream works too, but chill it extra long.
- Mini ghosts: Bake the recipe as mini cupcakes—they’re bite-sized and perfect for classroom parties. Pipe tiny ghosts using a star tip for extra texture.
The best part? Kids love helping brainstorm new variations. Last year, my niece insisted we make “zombie ghosts” with green food coloring streaks—messy but unforgettable!
Storing Ghost Cupcakes
Here’s the spooky truth – these ghost cupcakes disappear FAST at my house! But if you’ve got leftovers (or want to prep ahead), storing them right keeps them fresh and adorable. I’ve learned a few tricks after rescuing one too many sad, droopy ghosts.
Room temperature storage: Pop them in an airtight container with parchment between layers. They’ll stay perfect for about 2 days—just make sure your kitchen isn’t too warm, or the frosting may start to slump. I use my trusty cupcake carrier, but a big Tupperware works great too.
Chilling option: If your kitchen runs hot or you need them to last longer, the fridge is your friend! Store them the same way, but let them come to room temp for 15 minutes before serving—cold marshmallow frosting tastes like sweet concrete. They’ll keep beautifully for 3-4 days chilled.
Freezing surprise: Yes, you can freeze ghost cupcakes! Flash-freeze them uncovered first (about 1 hour) so the frosting sets, then wrap individually in plastic wrap. They’ll haunt your freezer happily for up to 2 months. Thaw overnight in the fridge—the ghosts might lose some height, but they’ll still taste delicious.
One warning from experience: Never store them with the container lid touching the frosting unless you want flat-headed ghosts! I learned that lesson the year all my spirits looked like they’d been stepped on by a giant.
Ghost Cupcakes Nutritional Info

Okay, let’s talk numbers—but keep in mind, these are just friendly estimates! Your ghost cupcakes’ exact stats will totally depend on your ingredients (homemade vs. store-bought, frosting choices, etc.). Here’s the general spooky scoop based on my usual vanilla cupcakes with marshmallow frosting:
- Calories: Around 180-220 per cupcake—those fluffy ghosts are light but mighty!
- Sugar: Mostly from the frosting (obviously), about 15-20g per serving. Pro tip: If you’re watching sugar, try mixing half marshmallow fluff with whipped cream cheese.
- Fat: 6-8g, mostly from the cupcake base and frosting. Using low-fat frosting? The ghosts might not stand as tall, but they’ll still taste great.
Remember: These treats are all about fun, not fretting over numbers! I always say one ghost cupcake won’t haunt your diet—but two or three might start whispering sweet nothings from your hips.
Ghost Cupcakes FAQs
After making these ghost cupcakes year after year (and fielding questions from friends and family), I’ve heard it all! Here are the most common questions that come up—along with my tried-and-true answers straight from the haunted kitchen.
Can I use homemade frosting instead of store-bought?
Absolutely! My grandma’s buttercream works beautifully—just make sure it’s stiff enough to hold those ghostly peaks. Mix 1 cup powdered sugar with ½ cup softened butter and a splash of vanilla, then blend in the marshmallow fluff. Pro tip: If your homemade frosting is too soft, add extra powdered sugar a tablespoon at a time until it firms up.
How do I make vegan ghost cupcakes?
Easier than you’d think! Use your favorite vegan cupcake recipe (I love a flax egg chocolate version) and look for vegan marshmallow fluff (most grocery stores carry it now). For the frosting base, coconut whipped cream or dairy-free cream cheese frosting blends perfectly. The decorating technique stays exactly the same—those ghosts don’t care if they’re plant-based!
Why did my ghosts melt/sag after piping?
Oh honey, I’ve been there! Usually it means either: 1) Your cupcakes weren’t completely cool (warmth = melty ghosts), or 2) Your frosting needed more chilling time. The fix? Pop the whole tray in the fridge for 15 minutes—they’ll stand right back up like proud little spirits. If it’s really hot in your kitchen, work in small batches and keep the frosting bowl chilled.
Can I make these ahead of time?
You bet! I always bake the cupcakes 1-2 days early and store them unfrosted at room temperature. The frosting keeps separately in the fridge for 3 days (just let it soften slightly before using). Assemble your ghosts the morning of your event—they’ll look freshest, but will still hold up great if made a full day ahead.
What’s the best way to transport ghost cupcakes?
After the infamous “Ghost Pancake Incident of 2018” (let’s just say my car seats still have marshmallow residue), I now swear by cupcake carriers with individual slots. No carrier? Place cupcakes in a shallow box with crumpled parchment paper between them—the paper acts like little ghost seatbelts! Chill them thoroughly before traveling, and avoid hot cars if possible.
Got more questions? Spill them in the comments—I love solving cupcake mysteries almost as much as I love eating these fluffy little phantoms!
Nothing makes me happier than seeing YOUR ghostly creations come to life! Seriously, I do a little happy dance every time someone tags me in their spooky cupcake photos—it’s like Halloween all year round in my notifications. So go ahead, show off those adorable spirits!
Snap a pic of your haunted masterpieces and share them with #GhostCupcakeMagic—I’ll be watching for your posts! Pro tip: Natural light near a window makes those marshmallow ghosts glow like real specters. Kids’ reactions make the best photos too—my camera roll is 90% nieces and nephews making “Boo!” faces with frosting smudges.
Got a hilarious frosting fail or brilliant new variation? Tell me ALL about it in the comments below. Some of my favorite cupcake hacks have come from readers (shoutout to Linda from Ohio who taught me the Oreo-crumb “graveyard” base idea). Let’s keep this sweet ghost squad growing!
Happy haunting… I mean, baking!
You can also find more recipe inspiration on Pinterest.
Print
Spooky Ghost Cupcakes with 5 Brilliant Marshmallow Tricks
- Total Time: 35 minutes
- Yield: 12 cupcakes
- Diet: Vegetarian
Description
Cute Halloween ghost cupcakes topped with fluffy marshmallow frosting for a spooky treat.
Ingredients
- 12 cupcakes (any flavor)
- 1 tub marshmallow fluff
- 1/2 cup white frosting
Instructions
- Bake the cupcakes and let them cool completely.
- Mix marshmallow fluff with white frosting until smooth.
- Spread the frosting on each cupcake with a spatula.
- Use a spoon to create a ghost shape with peaks.
- Add edible eyes or black icing for the ghost’s face.
Notes
- Use a piping bag for cleaner ghost shapes.
- Store in an airtight container to keep them fresh.
- Chill before serving if the frosting is too soft.
- Prep Time: 15 minutes
- Cook Time: 20 minutes
- Category: Dessert
- Method: Baking
- Cuisine: American


