Okay, so you’re planning a Halloween party and want something that looks amazing but doesn’t tie you down in the kitchen all night? You absolutely NEED a Halloween Charcuterie Board. Seriously, it’s my go-to for easy entertaining! I remember one year, I threw together a last-minute board for a Halloween get-together, and people went absolutely bonkers for it. They were raving about how festive and spooky it looked, and honestly, it took me maybe 20 minutes. It just instantly elevates the whole vibe, you know? It’s the perfect way to serve up a bunch of yummy fall appetizers without any actual cooking. Get ready to wow your guests!
Why You’ll Love This Halloween Charcuterie Board
Honestly, this board is a lifesaver for any Easy Halloween Party. It looks like you spent hours, but it’s so simple! Plus, it’s perfect for those who want Fall Appetizers Easy to put together.
Quick Assembly, Big Impact
Seriously, you can whip this up in about 20 minutes! It’s the ultimate stress-free solution for hosting, letting you actually enjoy the party instead of being stuck in the kitchen.
Visually Stunning & Thematic
This isn’t just food; it’s decor! A beautifully arranged Halloween-themed Charcuterie Board just screams Halloween and makes your whole spread pop. It’s so much fun to create!
Customizable for Everyone
The best part? You can totally tailor it! Whether you’re aiming for a Halloween Healthy Charcuterie Board or a delicious Halloween Charcuterie Board Vegetarian spread, it’s super adaptable to whatever your guests love.
Gathering Your Halloween Charcuterie Board Ingredients
Alright, let’s talk about what you’ll need for this amazing Halloween Charcuterie Board! It’s all about variety and fun. I love gathering these bits and pieces because it feels like I’m collecting treasures for a spooky treasure hunt. You don’t need a ton of anything, just a good mix to make it exciting.
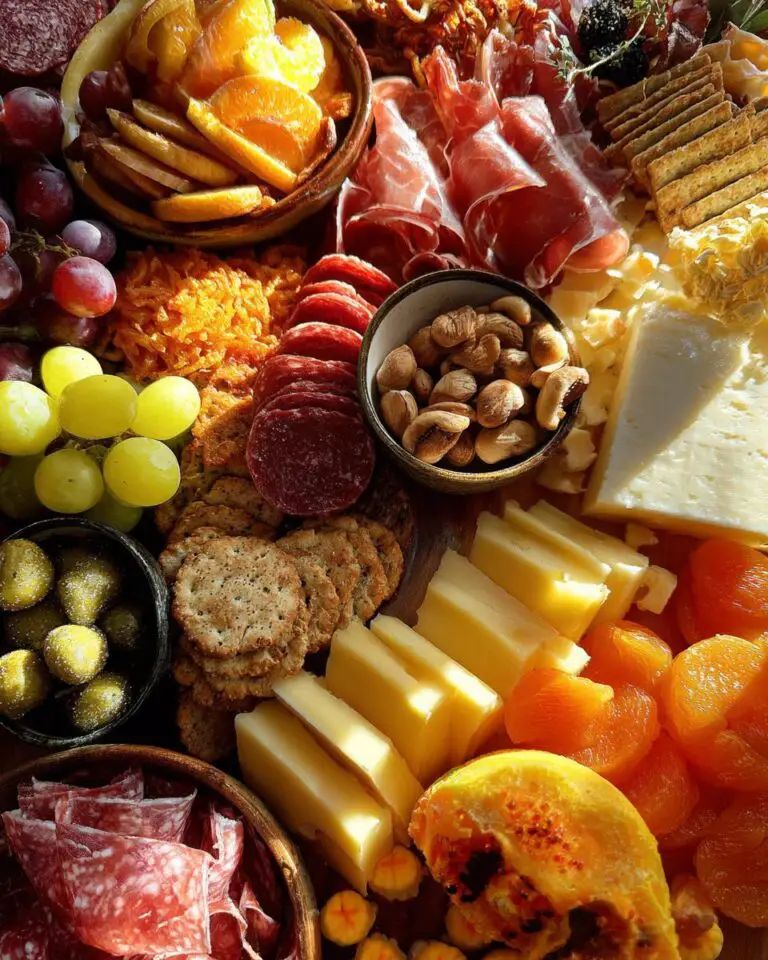
The Savory Foundation of Your Halloween Charcuterie Board
Start with your cheeses and meats! I usually grab a couple of different cheeses – maybe a sharp cheddar, a creamy brie, and a tangy goat cheese. Slice them up or leave them whole, whatever feels easiest. For meats, salami and prosciutto are always winners. Then, you need your crunchy bits: a mix of crackers and breadsticks works perfectly. Don’t forget some salty olives and maybe a few cornichons or dill pickles to give everyone a little zing!
Sweet and Spooky Additions for Your Halloween Charcuterie Board
Now for the fun stuff! Fresh fruit adds color and freshness. I love using red grapes, sliced apples (toss them with a tiny bit of lemon juice so they don’t brown!), and some juicy berries. Dried apricots and figs are great too, they add a chewy texture. For nuts, almonds and walnuts are my favorites. And of course, you can’t have a Halloween board without some candy! Think candy corn, chocolate eyeballs, or even some little ghost-shaped gummies. It’s all about those festive touches!

Optional Enhancements for Your Halloween Charcuterie Board
If you’re feeling fancy, grab some spooky-shaped cookie cutters – they work wonders on cheese to make little pumpkins or ghosts! And a little bowl of something creamy, like hummus or a yummy cheese spread, is always a nice addition if you have the space. It just adds another layer of deliciousness!
Step-by-Step Guide to Building Your Halloween Charcuterie Board
Okay, let’s get this spooky masterpiece assembled! Building a Halloween Charcuterie Board is honestly the best part. It’s like playing with your food, but in the most delicious way possible. Don’t stress about perfection; the goal is fun and festive!
Preparing Your Halloween Charcuterie Board Base
First things first, grab your biggest board or platter. This is your canvas! Start by placing your cheeses and any larger meat items. I like to spread them out a bit so they don’t get too crowded. Think about creating little clusters or zones. For instance, put all your cheddar blocks together, maybe your brie wheel in the center. It gives the board structure before you start filling in all the yummy bits.
Filling in the Gaps with Flavor and Texture
Now, grab those crackers, breadsticks, and anything else that’s relatively flat. Tuck them in around the cheeses and meats. Think about varying textures here! We’ve got the creamy cheese, the savory meats, and now we’re adding the crunch from crackers. Next, pile in your fruits – grapes look great spilling out of a little bowl or just scattered, and apple slices add a nice crispness. Toss in handfuls of nuts, olives, and pickles wherever you see empty spaces. Just keep filling in until the board looks full and abundant.

Adding the Halloween Charm to Your Charcuterie Board
This is where the magic happens! Sprinkle in your Halloween candies like candy corn or those creepy chocolate eyeballs. If you’ve got those cookie cutters, now’s the time to use them on your cheeses to make fun shapes! Push them in gently so they stand out. Don’t be afraid to let some candies peek out from behind the cheese or tuck them into little nooks. It’s all about creating those fun, spooky surprises.
Creating Your Halloween-themed Scene
For the final touch, arrange everything so it looks intentionally spooky or festive. You can create a little pathway with crackers leading to a “haunted” cheese, or arrange grapes to look like spiderwebs. The key is to make it look like a deliberate, fun display. This whole arrangement really makes it a proper Halloween-themed Charcuterie Board!
Tips for the Ultimate Halloween Charcuterie Board
Okay, so you’ve got the basics down, but let me give you a few insider tips to make your Halloween Charcuterie Board truly unforgettable. It’s all about those little details that take it from good to *great*!
Ingredient Selection for a Balanced Halloween Charcuterie Board
When picking your goodies, think variety! You want a mix of textures – creamy cheeses, crunchy crackers, chewy dried fruit. Taste is important too; sweet, savory, salty, and a little tangy. Don’t forget to think about your guests! If you’re aiming for a Halloween Healthy Charcuterie Board, load up on fruits, veggies, and lighter cheeses. And a Halloween Charcuterie Board Vegetarian can be just as amazing with lots of plant-based options like hummus, roasted red peppers, and a great selection of vegan cheeses and crackers.
Arrangement Techniques for a Showstopping Halloween Charcuterie Board
My biggest tip for arrangement? Start with your anchors – the cheeses and any bowls. Then, fill in the bigger spaces with meats and crackers, creating little rivers or clusters. Tuck smaller items like nuts and candies into any gaps. Don’t be afraid to let things overlap a little; it makes the board look abundant and inviting. Think about color too – you want those bright fruits and maybe some colorful candies to really pop against the more neutral cheeses and crackers.
Frequently Asked Questions About Your Halloween Charcuterie Board
Got questions about making the ultimate Halloween spread? I totally get it! It’s easy to want to nail every detail for your guests.
What are the best cheeses for a Halloween Charcuterie Board?
Oh, cheese is key! I love using cheddar because you can easily cut it into fun shapes like pumpkins or ghosts with cookie cutters. Brie is always a crowd-pleaser, and goat cheese adds a nice tangy bite. Basically, any cheese you love works, but ones that slice or spread easily are great for decorating!
Can I make a Halloween Charcuterie Board vegetarian?
Absolutely! A Halloween Charcuterie Board Vegetarian style is super easy and just as delicious. Just skip the meats and load up on more cheeses, maybe some hummus or a yummy veggie dip, lots of colorful fruits and veggies like bell pepper strips or cucumber slices, and plenty of crackers and nuts. Delicious!
How do I make a Halloween Charcuterie Board spooky?
This is the fun part! You can get creative with cookie cutters for cheese shapes, arrange grapes to look like little eyeballs, or use candy corn and chocolate eyeballs as “spooky” garnishes. You could even try arranging some items to make a simple Jackolantern Charcuterie face on your board. It’s all about playful presentation!
Serving and Storing Your Halloween Charcuterie Board
Alright, you’ve built this masterpiece, now let’s talk about getting it to the party and what to do with any goodies left over. It’s all about making it easy and delicious!
Best Practices for Serving Your Halloween Charcuterie Board
For the best flavor, try to serve your Halloween Charcuterie Board at room temperature. Take the cheeses and any dips out of the fridge about 30 minutes before your guests arrive. Arrange everything beautifully on the board just before people start mingling. It looks so much more appealing when it’s fresh!
Storing Leftovers from Your Halloween Charcuterie Board
If, by some miracle, you have leftovers, just carefully pack them up! Wrap cheeses tightly in plastic wrap or cheese paper. Store fruits, nuts, and crackers in airtight containers. If you used a dip, make sure it’s covered well. Most items will keep in the fridge for a few days, but things like crackers might lose their crunch.

Estimated Nutritional Information for Your Halloween Charcuterie Board
Okay, so when it comes to a big, beautiful spread like this Halloween Charcuterie Board, the nutritional info can be a bit of a wild card. It really depends on exactly what cheeses you pick, how much salami makes it onto the board (or into your mouth!), and what kind of crackers you go with. Because everyone builds their board a little differently, it’s super tough to give exact numbers. Think of it as a delightful mix of everything – a little bit of savory, a little bit of sweet, and a whole lot of fun!
Print
Spooky Halloween Charcuterie Board: 1 Easy Guide
- Total Time: 20 minutes
- Yield: 6-8 servings
- Diet: Vegetarian
Description
A festive and spooky Halloween-themed charcuterie board perfect for parties. It features a mix of sweet and savory items arranged in a fun, holiday-inspired design.
Ingredients
- Assorted Cheeses (e.g., cheddar, brie, goat cheese)
- Cured Meats (e.g., salami, prosciutto)
- Crackers and Breadsticks
- Fresh Fruits (e.g., grapes, apple slices, berries)
- Dried Fruits (e.g., apricots, figs)
- Nuts (e.g., almonds, walnuts)
- Olives
- Pickles
- Halloween-themed Candies (e.g., candy corn, chocolate eyeballs)
- Optional: Spooky-shaped cookie cutters for cheese
Instructions
- Arrange cheeses and meats on a large platter or board.
- Fill in gaps with crackers, breadsticks, fruits, nuts, olives, and pickles.
- Add Halloween candies and any decorative elements.
- Use cookie cutters to shape cheese into pumpkins or ghosts if desired.
- Arrange elements to create a spooky or festive scene.
Notes
- Consider dietary restrictions and preferences when selecting ingredients.
- Add a small bowl of dip like hummus or a cheese spread.
- Get creative with the arrangement to enhance the Halloween theme.
- Prep Time: 20 minutes
- Cook Time: 0 minutes
- Category: Appetizer
- Method: Assembly
- Cuisine: American


