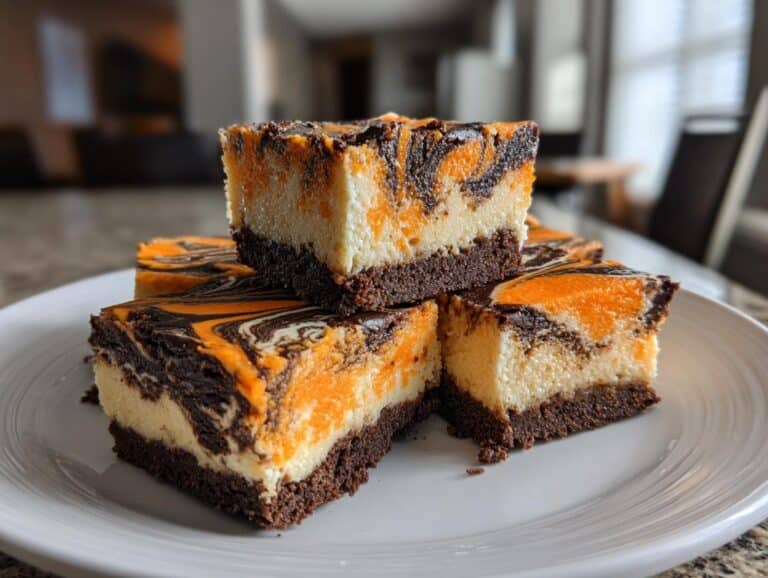
I’ll never forget the first time I made these Halloween Cheesecake Bars—my kitchen looked like a mad scientist’s lab, with bowls of orange and black batter everywhere, but the result? Pure magic. These aren’t just any cheesecake bars; they’re a spooky spectacle with that irresistible Oreo crust (trust me, it’s the crunch you didn’t know you needed). Every Halloween, my friends beg me to bring them, and honestly? They’re so easy, I almost feel guilty taking the compliments. The way the vibrant colors peek through each slice makes even the most reluctant dessert-eaters sneak seconds. If you want a showstopper that’s secretly simple, you’ve just found your recipe.

Why You’ll Love These Halloween Cheesecake Bars
Let me tell you why these bars are about to become your new Halloween obsession. First off, they’re stupid easy—no fancy techniques, just creamy cheesecake meets crushed Oreos (seriously, what’s not to love?). They’re the ultimate party trick: those orange and black swirls make everyone’s eyes widen when you slice into them. Customize the colors to match your spooky vibe—go neon orange, deep black, or even purple if you’re feeling extra witchy. And that crust? It’s like a chocolatey crunch hug for the smooth filling. Perfect for potlucks, kid-friendly (just try not to eat all the decorations), and guaranteed to disappear faster than ghosts at sunrise.
Ingredients for Halloween Cheesecake Bars
Gather these goodies—I promise, nothing weird or hard-to-find here. Just simple, delicious ingredients that’ll make your kitchen smell like a haunted bakery (in the best way possible). Pro tip: Measure everything before you start. Trust me, scrambling mid-recipe with sticky fingers is no one’s idea of fun.
- 16 oz cream cheese (that’s 2 blocks), softened to room temperature—this is NON-NEGOTIABLE unless you want lumpy batter
- 1 cup granulated sugar (yes, the full cup—we’re making dessert, not health food)
- 2 large eggs, also at room temp (cold eggs = sad, dense cheesecake)
- 1 tsp vanilla extract (the real stuff, please—imitation vanilla is basically Halloween horror)
- 1 cup finely crushed Oreos (about 10 cookies)—I whack mine with a rolling pin in a ziplock bag for therapy
- 5 tbsp melted butter (salted or unsalted both work, but I always go salted for that sweet-salty kick)
- Orange and black gel food coloring (not liquid! Gel gives those vibrant, spooky colors without thinning your batter)
- Pinch of salt (balances the sweetness—your taste buds will thank you)
See? Nothing scary here—just pantry staples ready to transform into something magical. Now let’s talk equipment while that cream cheese finishes softening (if you forgot, no judgment—just pop it in the microwave for 10-second bursts until it gives when you poke it).
Equipment You’ll Need
Don’t worry—you won’t need any fancy gadgets for these bars. Just grab these trusty tools (I bet you already have most of them):
- 8×8-inch baking pan (square or rectangle—just keep an eye on bake time if yours is deeper)
- Parchment paper (for easy lifting—no stuck-on crust disasters)
- Hand mixer or stand mixer (but a strong arm and whisk work in a pinch)
- Spatula (to scrape every last bit of batter—waste not!)
- Mixing bowls (one for crust, one for filling, and maybe a third for color mixing chaos)
- Measuring cups/spoons (eyeballing sugar amounts is a risky Halloween trick)
That’s it! Now let’s make some magic.
How to Make Halloween Cheesecake Bars
Alright, let’s get spooky! These bars come together faster than a ghost vanishing—just follow these steps, and you’ll have a dessert that’ll steal the show at any Halloween bash. Pro tip: Read through all the steps first (I’ve learned this the hard way after many mid-recipe “wait, what?!” moments).
Step 1: Prepare the Oreo Crust
First things first: Preheat that oven to 350°F (175°C)—no cheating here, or your crust won’t crisp up right. Now, grab your crushed Oreos and mix them with the melted butter until it looks like wet sand (you’ll know it’s perfect when you can squeeze a handful and it holds its shape).
Line your baking pan with parchment paper, letting some hang over the edges—this’ll be your lifesaver later. Dump the Oreo mixture in and press it down HARD with your fingers. Then, take a glass (I use a small juice glass) and roll it over the crust to pack it even tighter. You want it firm, like a chocolatey sidewalk. Pop it in the oven for 8 minutes—just enough to set it. Let it cool while you make the filling.
Step 2: Make the Cheesecake Filling
Here’s where room-temperature cream cheese is your best friend. If it’s still chilly, you’ll end up with lumpy batter (and nobody wants that). Beat the cream cheese alone first until it’s smooth—about 1 minute. Scrape down the bowl! Then add the sugar and beat another minute until it’s fluffy.
Now, add the eggs one at a time, mixing just until combined after each. Overbeating here = cracks later, so resist the urge to go wild with the mixer. Stir in the vanilla and salt last—just enough to say “hello” to each other in the bowl.
Step 3: Color and Layer the Batter
Time for the fun part! Divide your batter evenly between two bowls (eyeballing is fine—this isn’t rocket science). Add orange gel coloring to one bowl and black to the other. Start with a few drops, then add more until you get those vibrant Halloween hues. Gel coloring won’t water down like liquid does.
Now, alternate dollops of each color over the crust—I do orange first, then black, then repeat. Take a butter knife and swirl gently if you want a marbled effect (don’t overdo it, or you’ll get mud brown instead of spooky swirls).

Step 4: Bake and Cool
Slide the pan into the oven and set your timer for 25 minutes. When it goes off, give the pan a gentle shake—the center should jiggle like Jell-O, not slosh like soup. If it’s too wobbly, add 3-5 more minutes.
Here’s the hard part: LET IT COOL COMPLETELY. I mean it—no peeking, no poking. Rush this, and your beautiful bars will crack like a haunted mirror. After an hour at room temp, chill them in the fridge for at least 2 hours (overnight is even better). The wait is torture, but oh boy, is it worth it.
Tips for Perfect Halloween Cheesecake Bars
After making these bars more times than I can count (and learning from every oops along the way), here are my can’t-skip secrets: First, always line your pan with parchment paper—those overhanging edges turn bar removal into a graceful lift instead of a crumbly disaster. Second, gel food coloring is non-negotiable—liquid stuff makes your batter runny and dull. Third, resist slicing while warm! Chill for at least 2 hours (overnight is golden) for clean cuts that show off those killer swirls. Bonus tip: Run your knife under hot water between slices for Instagram-worthy edges every time.

Ingredient Substitutions & Variations
Want to mix things up? Go wild—but keep these tips in mind. Gluten-free Oreos work like a charm for the crust (just crush ’em extra fine). Cutting sugar? You can drop to 3/4 cup, but expect a denser texture—that sugar helps keep things light. For colors, purple and green make wicked alternatives! Swap vanilla for almond extract if you’re feeling fancy, but go easy—it’s potent stuff. Just avoid liquid food coloring unless you enjoy sad, watery batter.
Serving and Storing Halloween Cheesecake Bars
Okay, here’s the deal—these bars taste even better after a good chill, so resist slicing right away! Let them hang out in the fridge for at least 2 hours (overnight is magic). When it’s party time, lift them out using the parchment paper and cut into squares with a hot knife (wipe it clean between slices for those picture-perfect edges). Leftovers? Ha! As if—but if by some miracle you have any, stash them in an airtight container in the fridge for up to 3 days. They freeze beautifully too—just wrap individual bars tightly and freeze for up to a month. Thaw in the fridge overnight when those Halloween cravings strike again!
Halloween Cheesecake Bars FAQs
Got questions? I’ve got answers—here’s everything I’ve learned after making these bars year after year (and fielding texts from panicked friends mid-baking).
Can I use liquid food coloring instead of gel?
Nope! Liquid coloring waters down your batter and gives you sad, pastel colors instead of those vibrant Halloween shades. Gel or paste food coloring is your only option here—trust me, I learned this the messy way.
How do I prevent cracks in my cheesecake bars?
Three secrets: Don’t overmix the batter after adding eggs, don’t overbake (that jiggle test is crucial!), and cool them slooowly. If a crack does appear? Cover it with spooky sprinkles—no one will know!
Can I make these ahead of time?
Absolutely! These bars actually taste better after chilling overnight. Just wrap the pan tightly in plastic once cooled. The flavors meld, and the texture gets even creamier—it’s like magic.
Why is my Oreo crust crumbling?
You probably didn’t pack it tightly enough or skipped the butter. Really press that crust down hard—I use a glass to compact it. And measure your butter precisely—too little makes a loose crust.
Can I freeze these bars?
You bet! Freeze them sliced on a parchment-lined tray first, then transfer to an airtight container. They’ll keep for a month—just thaw overnight in the fridge when your Halloween sweet tooth strikes.
Nutritional Information
Here’s the scoop—each of these spooky bars packs about 220 calories, with 12g fat (7g saturated) and 18g sugar. But remember, these are estimates—your exact numbers might dance around a bit depending on your cream cheese brand or how generously you measure those Oreos. Everything in moderation, right? (Says the person who definitely eats two bars at once.) Now go share your creations—tag us on social media if you make these spooky bars!


Spooky 5-Minute Halloween Cheesecake Bars with Oreo Crust
- Total Time: 40 minutes
- Yield: 12 bars
- Diet: Vegetarian
Description
Spooky Halloween cheesecake bars with an Oreo crust. Perfect for festive gatherings.
Ingredients
- 16 oz cream cheese
- 1 cup sugar
- 1 cup crushed Oreos
- Food coloring (orange and black)
Instructions
- Preheat oven to 350°F (175°C).
- Mix crushed Oreos with melted butter and press into a lined baking pan.
- Beat cream cheese and sugar until smooth.
- Divide batter and mix with food coloring.
- Layer colored batter over the crust.
- Bake for 25-30 minutes.
- Cool completely before slicing.
Notes
- Use gel food coloring for vibrant colors.
- Chill before serving for best texture.
- Prep Time: 15 minutes
- Cook Time: 25 minutes
- Category: Dessert
- Method: Baking
- Cuisine: American


