Halloween parties just got spookier with these devilishly fun Halloween Deviled Eggs! I discovered this crazy-simple trick years ago when I desperately needed a last-minute party snack. Picture this: midnight on October 30th, my fridge nearly empty except for eggs and condiments. That’s when inspiration struck – why not turn classic deviled eggs into something terrifyingly tasty?
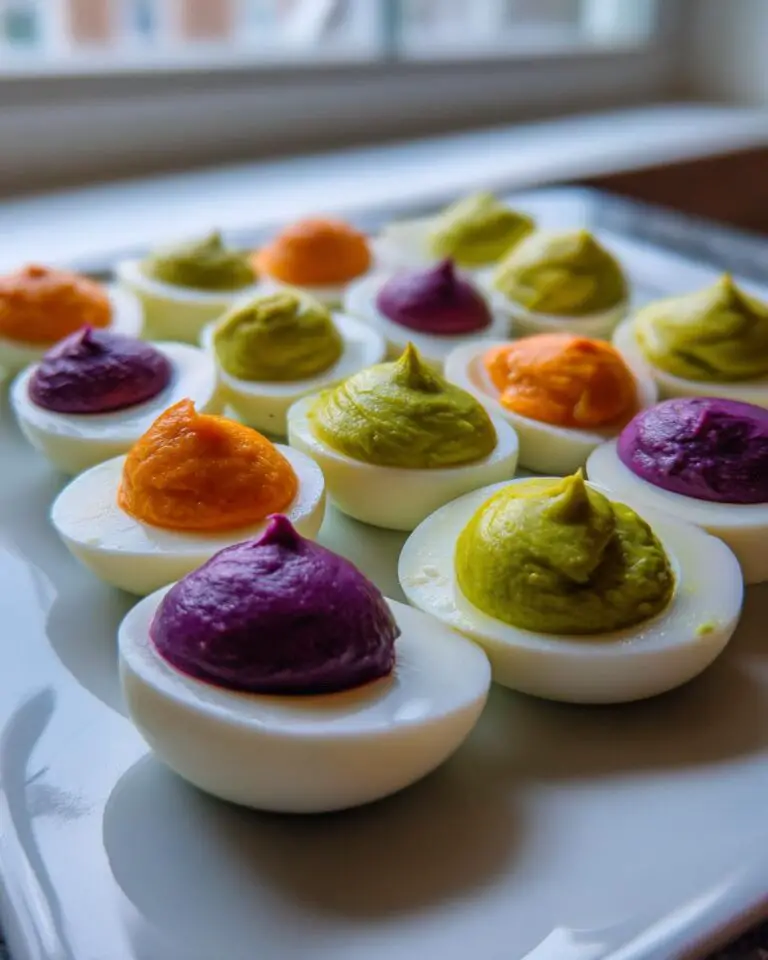
What makes these Halloween Deviled Eggs special isn’t just their creepy colors (though the neon green ones always get screams). They’re ridiculously easy to make with basic ingredients you probably have right now. Just wait till you see kids’ faces when you serve these vibrant orange, purple, and green appetizers at your Halloween gathering!
Why You’ll Love These Halloween Deviled Eggs
Let me tell you why these Halloween Deviled Eggs will become your new go-to party trick:
- Quick & easy – From fridge to spooky in under 30 minutes (perfect for last-minute Halloween panic!)
- Party showstopper – The vibrant colors make guests do a double-take every single time
- Endless color options – Want neon green zombie eggs? Blood-red vampire eggs? Your imagination’s the limit
- Kid-approved fun – Little witches and goblins love helping mix colors and fill the eggs
Trust me, once you see how these Halloween Deviled Eggs disappear at parties, you’ll be making them every October!
Ingredients for Halloween Deviled Eggs
What I love most about these spooky deviled eggs? You likely have most of these staples in your kitchen right now! Here’s exactly what you’ll need to create your ghoulish appetizers:
- 6 large eggs – Fresh is best! Older eggs can be harder to peel (I learned that the messy way last year)
- ¼ cup mayonnaise – My secret? Use full-fat for the creamiest filling
- 1 teaspoon yellow mustard – Just enough for that classic deviled egg tang without overpowering the colors
- Gel food coloring – Get wild with colors! I always use at least 3-4 spooky shades (that electric green and deep purple are my favorites)
A quick pro tip from someone who’s made this mistake before: skip the liquid food coloring! Gel gives you those vibrant, Halloween-worthy colors without watering down your yolk mixture. Trust me, your neon orange “pumpkin” eggs will thank you.
Equipment You’ll Need
No fancy gadgets required here – just grab these basic kitchen tools (you probably already have most of them!):
- Medium pot – For boiling those eggs to perfection
- Slotted spoon – Makes fishing eggs out of hot water way less scary
- Mixing bowl – Where the yolk magic happens
- Sharp knife – For slicing eggs cleanly in half (no jagged edges for our pretty deviled eggs!)
- Small bowls – One for each spooky color you plan to make
- Piping bag or spoon – Honestly, a ziplock with the corner snipped works in a pinch!
See? I told you this was simple. Now let’s make some creepy-cute eggs!
How to Make Halloween Deviled Eggs
Now for the fun part – transforming ordinary eggs into spooky Halloween treats! Follow these simple steps and you’ll have creepy-cute deviled eggs ready to haunt your party table in no time.
Step 1: Boil and Peel the Eggs
First things first – let’s get those eggs boiled just right! Place your eggs in a single layer at the bottom of your pot and cover with cold water by about an inch. Bring to a rolling boil, then immediately reduce heat to low and let simmer for exactly 10 minutes (set a timer – overcooked eggs get that weird gray ring).
Here’s my trick for perfect peeling: shock those hot eggs in an ice bath immediately after cooking. The sudden temperature change makes the shells practically jump off! Let them sit in the icy water for at least 5 minutes while you gather your other ingredients.

Step 2: Prepare the Yolk Filling
Once your eggs are cooled and peeled (carefully now!), slice them lengthwise and pop the yolks into your mixing bowl. Arrange the hollowed-out whites on your serving platter – they’ll be waiting for their colorful makeover soon!
Now mash those yolks with your fork until they’re completely crumbled (no lumps allowed!). Add the mayo and mustard and mix until silky smooth. Taste and adjust seasonings if needed – I sometimes add a tiny pinch of salt or paprika at this stage.
Step 3: Color the Filling
Here’s where the Halloween magic happens! Divide your yolk mixture evenly between small bowls – one for each spooky color you want to create. Now grab that gel food coloring and go wild! Start with just a toothpick dab of color and mix well before adding more.
Pro tip from someone who’s created some frighteningly neon eggs: gel colors intensify as they sit, so go lighter than you think at first. Want zombie green? Start with yellow and add tiny amounts of blue. Blood red? Mix a bit of pink and red. The colors will brighten up beautifully after chilling!

Step 4: Fill the Egg Whites
Time to bring your Halloween Deviled Eggs to life! You can simply spoon the colored filling back into the waiting egg whites (the rustic look is perfectly spooky), or for extra fancy eggs, pipe it in using a piping bag or ziplock with the corner snipped.
My favorite presentation trick? Alternate colors randomly on your platter for a fun, confetti-like effect. Or group them by color for a bold rainbow of creepy eggs. Either way, they’ll disappear faster than ghosts at sunrise!

Tips for Perfect Halloween Deviled Eggs
After making these spooky treats more times than I can count (and learning from plenty of hilarious disasters), here are my must-know tips for deviled egg success:
Chill before peeling – That ice bath isn’t just for stopping the cooking process. Cold eggs peel WAY easier than warm ones. I’ve lost too many egg whites to impatience!
Gel over liquid – Liquid food coloring makes your yolk mixture watery and sad. Gel gives you those insane Halloween colors without sacrificing texture.
Taste as you go – Different mayo brands vary in saltiness. Mix a bit, taste, then adjust with extra mustard or a pinch of salt if needed.
Remember – even “failed” eggs still taste amazing. My first batch turned out grayish-purple (oops!), but they disappeared just as fast!
Creative Variations for Halloween Deviled Eggs
Why stop at colorful fillings when you can take these Halloween Deviled Eggs to the next level of spooky? Here are some of my favorite creepy twists that always get screams at parties:
Turn them into spider eggs by adding sliced black olive “legs” sticking out from the sides. For a bloody effect, dust the tops with paprika or cayenne pepper (kids love this!). Want something truly terrifying? Use a toothpick to drag food coloring into web patterns on the egg whites before filling.
The best part? These Halloween Deviled Eggs adapt to whatever creepy vision you have – I once made tiny mummy eggs with piped filling “bandages” that were almost too cute to eat!
Storing and Serving Halloween Deviled Eggs
These Halloween Deviled Eggs are best served chilled, so keep them in the fridge until your party’s about to start. I learned the hard way that they’ll keep their vibrant colors and fresh taste for about 2 days – any longer and they start getting a bit… spookier than intended!
For maximum creep factor, serve them on a dark platter – that black slate board or purple dish you’ve been saving makes those neon colors really pop. Trust me, when you set these out against a dark background, your guests will gasp before they even take a bite!
Halloween Deviled Eggs Nutritional Information
Let’s be real – nobody eats Halloween treats for their health benefits! But since you’re curious (and maybe want to balance out all that candy), here’s the scoop on these spooky snacks. Each egg half comes in at about 60 calories – not bad for such a fun party bite!
Remember, nutritional values are just estimates and will vary based on the exact ingredients you use. The mayo and mustard amounts can easily be adjusted if you’re watching certain nutrients. Personally, I figure Halloween comes just once a year – so I say enjoy those neon-colored eggs without guilt!
Frequently Asked Questions
After making these Halloween Deviled Eggs for countless haunted parties, I’ve heard every question imaginable! Here are the answers to what people ask most:
Can I use liquid food coloring instead of gel?
Technically yes, but you’ll get much better results with gel! Liquid coloring tends to make the yolk mixture watery and gives less vibrant colors. If it’s all you have, use it sparingly and add a tiny bit more mayo to balance the texture.
How far in advance can I make these spooky appetizers?
The sweet spot is 4-6 hours before serving. You can make them up to a day ahead, but the colors might bleed slightly. Store them in an airtight container in the fridge – just take them out 20 minutes before serving so they’re not ice-cold.
What’s the best way to transport Halloween Deviled Eggs?
I swear by my muffin tin trick! Place each colored egg half in a muffin cup – they won’t slide around. Cover tightly with plastic wrap and transport in a cooler. The eggs stay perfectly intact and the colors stay bright!
Can I make these deviled eggs with vegan ingredients?
Absolutely! I’ve had great success using firm tofu instead of eggs – just crumble and mix with vegan mayo. The food coloring works the same way, and you can still create all those fun Halloween colors!
Why are my egg whites breaking when I peel them?
Older eggs are actually easier to peel than fresh ones! Also, that ice bath is crucial – it helps separate the membrane from the white. If you’re still struggling, try peeling them under running cold water. And remember – even “ugly” eggs taste delicious once they’re filled!
Final Thoughts
There you have it – the easiest way to turn basic eggs into a Halloween sensation! I can’t wait to hear about your spooky creations. Tag me if you share photos of your monstrous masterpieces. Now go make some eggs that’ll have your guests screaming (with delight, not terror)! You can find more fun recipes on Pinterest.
Print
Creepy Halloween Deviled Eggs That Will Haunt Your Tastebuds
- Total Time: 25 mins
- Yield: 12 halves
- Diet: Vegetarian
Description
Spooky Halloween Deviled Eggs with Food Coloring
Ingredients
- 6 eggs
- ¼ cup mayo
- 1 tsp mustard
- Food coloring
Instructions
- Boil eggs until hard.
- Peel and halve eggs lengthwise.
- Remove yolks and mix with mayo and mustard.
- Divide yolk mixture into separate bowls.
- Add food coloring to each bowl and mix well.
- Spoon colored yolk mixtures back into egg whites.
- Serve chilled.
Notes
- Use gel food coloring for vibrant colors.
- Chill eggs before peeling for easier handling.
- Adjust mayo and mustard to taste.
- Prep Time: 15 mins
- Cook Time: 10 mins
- Category: Appetizer
- Method: Boiling
- Cuisine: American


