Alright, get ready for some serious Halloween fun because we’re diving into the ultimate Halloween Grilled Cheese Halloween Meal! Honestly, when October rolls around, my kitchen just *feels* different. It’s all about those cozy, spooky vibes, and nothing screams comfort food like a perfectly gooey grilled cheese. I remember one year, my little nephew was absolutely terrified of trick-or-treating, so I whipped up these little ghost-shaped grilled cheeses for him. Seeing his face light up? Priceless! It’s such an easy way to make dinner feel super festive and special, even on a busy weeknight. Trust me, this is the easiest, most fun way to get your Halloween grub on!
Why You’ll Love This Halloween Grilled Cheese Halloween Meal
This isn’t just any grilled cheese; it’s a little slice of Halloween magic! It’s incredibly easy to make, which is a lifesaver when you’re busy getting ready for trick-or-treaters or carving pumpkins. Plus, it’s a total hit with kids (and adults too, let’s be honest!). The best part? You can totally customize it to be as spooky or as silly as you want. It’s the perfect way to get that festive spirit onto your dinner plate without a fuss.
Quick and Easy Halloween Food Dinner
Seriously, the prep time is practically zero, and it cooks up in minutes! This makes it the absolute perfect go-to for a weeknight Halloween Grilled Cheese Halloween Meal. You can have a delicious, festive dinner on the table before the kids even finish their spooky movie marathon.
Spooky Fun for Everyone
The real joy comes from decorating these! We’re talking about turning simple cheese and bread into little ghosts, spiders, or whatever spooky creature you can dream up. It’s such a fun, interactive way to get everyone involved in the Halloween spirit, and the results are always super cute (and tasty!).
Essential Ingredients for Your Halloween Grilled Cheese Halloween Meal
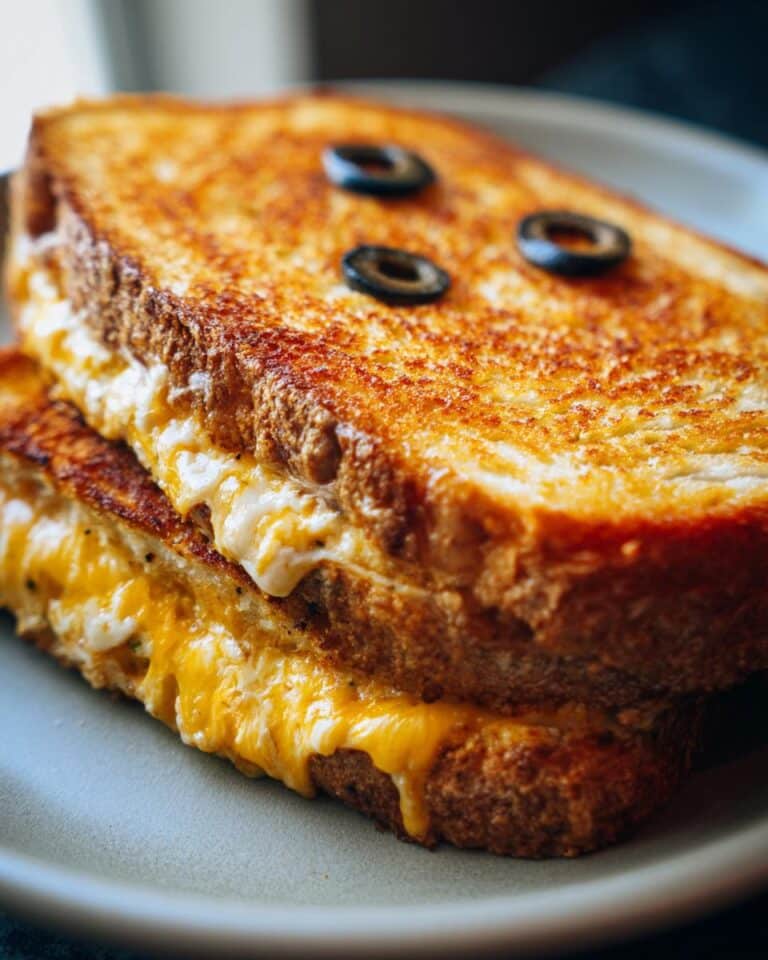
Alright, let’s get down to the good stuff – what you’ll need to whip up this amazing Halloween Grilled Cheese Halloween Meal! It’s super simple, which is exactly what we want when the Halloween excitement is high. First up, you’ll want 2 slices of sturdy bread. I’m partial to a good sourdough or even a hearty whole wheat, but really, whatever you have on hand works! Then, grab 2 slices of your favorite melting cheese. Cheddar is a classic for a reason, but provolone or a nice Monterey Jack works wonders too. And don’t forget 1 tablespoon of unsalted butter, softened, because that’s key for that perfect golden crust. For the spooky factor, a few black olives are perfect for little decorations!

Bread Choices for the Perfect Halloween Meal
The bread is your canvas, so choose wisely! A nice, sturdy sourdough gives a great tangy flavor and holds up well to grilling. Challah bread makes it a little richer and sweeter, which is a nice contrast. Even a simple whole wheat bread works beautifully. Just make sure it’s not too thin, or it might get soggy!
Cheese Selections for Gooey Goodness
This is where the magic happens! Cheddar, sharp or mild, is a go-to for its classic flavor and great melt. Provolone gives a nice, mild stretch. For something extra special, try mixing a slice of cheddar with a slice of provolone or Monterey Jack. The more cheese, the better, right?
Creative Decorations for Spooky Food
This is the fun part! For those spooky designs, black olives are fantastic. You can cut little circles for eyes or even a little triangle for a ghost mouth. Pickle slices can make great spider legs or creepy eyes too! Sometimes I even cut shapes out of the cheese itself before it goes in the sandwich. Get creative!
How to Prepare Your Delicious Halloween Grilled Cheese Halloween Meal
Alright, let’s get this Halloween masterpiece made! First things first, you’ll want to butter one side of each slice of bread. This is what gives us that gorgeous golden-brown crust. Then, place one slice, butter-side down, into your skillet over medium heat. This is where the magic starts happening! You’re looking at about 5 minutes of prep and 8 minutes of cooking for the whole thing, so it’s super quick.
Step 1: Buttering and Assembling
So, you’ve buttered your bread, right? Perfect! Lay one slice butter-down in your pan. Now, pile on your cheese slices – get them right in the middle. Then, top it off with the other slice of bread, making sure the buttered side is facing up. Easy peasy!
Step 2: Grilling to Golden Perfection
Now, let that baby grill for about 3-4 minutes on the first side. You want it to get beautifully golden brown and for the cheese inside to start getting all melty and gooey. Carefully, and I mean *carefully*, flip it over. Grill the other side for another 3-4 minutes until it’s just as golden and the cheese is completely melted and delicious. You’ll know it’s ready when it’s perfectly crisp on the outside and oozy on the inside.

Step 3: Adding the Halloween Touch
This is where we make it spooky! While the second side is grilling, or right after you flip it, you can add your decorations. Take those black olives and cut them into little shapes. You can make two tiny circles for ghost eyes, or a little sliver for a mouth. Or try cutting a little olive spider! Just press them gently onto the top slice of the sandwich. It’s amazing how a few little olive pieces can totally transform your Halloween Grilled Cheese Halloween Meal into something spooky and fun!
Tips for Success with Your Halloween Grilled Cheese Halloween Meal
You want your Halloween Grilled Cheese Halloween Meal to be absolutely perfect, right? A few little tricks make all the difference! It’s all about that golden crust and super melty cheese. Don’t worry, it’s really not complicated, but these little pointers will make sure your grilled cheese is a showstopper. It’s the small details that really elevate this simple dish into something special for your spooky celebrations!
Getting the Perfect Golden Crust
The secret to that gorgeous, golden-brown crust is all in the buttering and the heat. Make sure you spread the butter evenly edge-to-edge on the bread. And keep your heat on medium – too high and it burns before the cheese melts, too low and it gets greasy. Patience is key here!
Melting Cheese Like a Pro
For the best melt, make sure your cheese slices cover as much of the bread as possible. If you’re using thicker cheese, you might want to give it a head start in the pan before adding the top slice of bread. And remember, medium heat is your friend here; it allows the cheese to melt through without burning the bread!
Variations for Fun Halloween Food Treats
Want to jazz up your Halloween Grilled Cheese Halloween Meal even more? You totally can! Try adding a tiny pinch of cinnamon or nutmeg to the butter before spreading it on the bread for a warmer, spiced flavor. Some folks even like a whisper of garlic powder for a savory kick. For a touch of sweet and spooky, a drizzle of honey or a sprinkle of pumpkin pie spice on the cheese before grilling can be amazing. These little twists make your grilled cheese even more of a delightful Halloween food treat!
Serving Suggestions for Your Spooky Meal
To make your Halloween food dinner truly spectacular, serve your festive grilled cheese with some fun sides! A cup of creamy tomato soup is a classic pairing that’s perfect for dipping and adds a nice bit of color. You could also serve it with some spooky-shaped sweet potato fries or a side salad with a “bloody” raspberry vinaigrette. For drinks, apple cider or a ghastly green punch would be perfect. It all just adds to that fun, spooky atmosphere!
Frequently Asked Questions about Halloween Grilled Cheese Halloween Meal
Got questions about making the best Halloween Grilled Cheese Halloween Meal? I’ve got you covered! It’s honestly one of the simplest things to make, but sometimes those little questions pop up. We’ll get you sorted so your spooky sandwich is perfect every time. Let’s dive into some common queries!
Can I make Halloween grilled cheese ahead of time?
You can definitely assemble them ahead of time! Butter the bread and layer the cheese, then wrap them tightly in plastic wrap and store them in the fridge. When you’re ready to cook, just pop them straight into the skillet. It makes getting dinner on the table even faster!
What are some other easy Halloween food ideas?
Oh, there are tons of easy Halloween food treats! Think “spider” deviled eggs with olive legs, “monster” mouth apple slices with peanut butter and mini marshmallows, or even just cutting sandwiches into spooky shapes with cookie cutters. They’re all super simple and get everyone in the Halloween spirit!
How can I make the Halloween grilled cheese even spookier?
Beyond olives, you can get really creative! Use thin strips of pickle or bell pepper for spider legs, or cut out tiny cheese stars or ghosts to put on top. Sometimes I’ll cut little windows in the top slice of bread before grilling to reveal the cheese underneath in a fun way. Even a simple sprinkle of paprika can look like blood spatter!

Storage and Reheating Instructions
If you happen to have any leftover Halloween Grilled Cheese Halloween Meal (which is rare in my house!), it’s best to store them wrapped tightly in foil or plastic wrap in the refrigerator. To reheat, I find the best way to get it crispy again is to pop it back into a skillet over medium-low heat for a few minutes per side. You can also try toasting it in a toaster oven. Microwaving just doesn’t give you that lovely crunch, so stick to dry heat!
I absolutely LOVE seeing what you all come up with! Did you make a spooky sandwich that looks like a famous Halloween meme funny? Did it turn out hilariously perfect or hilariously… not? Share your photos and stories in the comments below! I’m always looking for new Halloween meme ideas and want to see your amazing creations. Let’s get this Halloween party started!
Print
Spooky Halloween Grilled Cheese: 1 Festive Dish
- Total Time: 13 minutes
- Yield: 1 serving
- Diet: Vegetarian
Description
A festive Halloween-themed grilled cheese sandwich, perfect for a spooky and fun meal.
Ingredients
- 2 slices of bread
- 2 slices of cheese (e.g., cheddar, provolone)
- 1 tablespoon butter
- Optional: Black olives for decoration
Instructions
- Butter one side of each slice of bread.
- Place one slice of bread, butter-side down, in a non-stick skillet over medium heat.
- Layer the cheese slices on top of the bread in the skillet.
- Place the second slice of bread on top of the cheese, butter-side up.
- Grill for 3-4 minutes, until the bottom slice is golden brown and the cheese begins to melt.
- Carefully flip the sandwich and grill for another 3-4 minutes, until the second side is golden brown and the cheese is fully melted.
- If desired, cut out shapes from black olives and press them onto the top slice of the grilled cheese to create a spooky design (e.g., ghost eyes, spiderweb).
Notes
- Use cookie cutters to create fun shapes for your cheese before assembling the sandwich.
- Experiment with different types of bread and cheese for varied flavors.
- Prep Time: 5 minutes
- Cook Time: 8 minutes
- Category: Main Course
- Method: Grilling
- Cuisine: American

 9")


 12")
 13")