Okay, listen up, because I’m about to share a recipe that’s basically my love letter to autumn. These Irresistible Salted Caramel Apple Bars for Fall are everything you dream about when the leaves start to turn and there’s a crispness in the air. Seriously, forget complicated pies – these bars have all the cozy, comforting flavors but are SO much easier to make. I remember the first time I whipped these up; the smell alone had my whole house smelling like the best fall festival you could imagine. It’s that perfect combo of buttery crust, sweet-tart apples, and that gooey, salty caramel that just screams comfort. You’re going to fall in love, trust me!
What Makes These Irresistible Salted Caramel Apple Bars for Fall Special
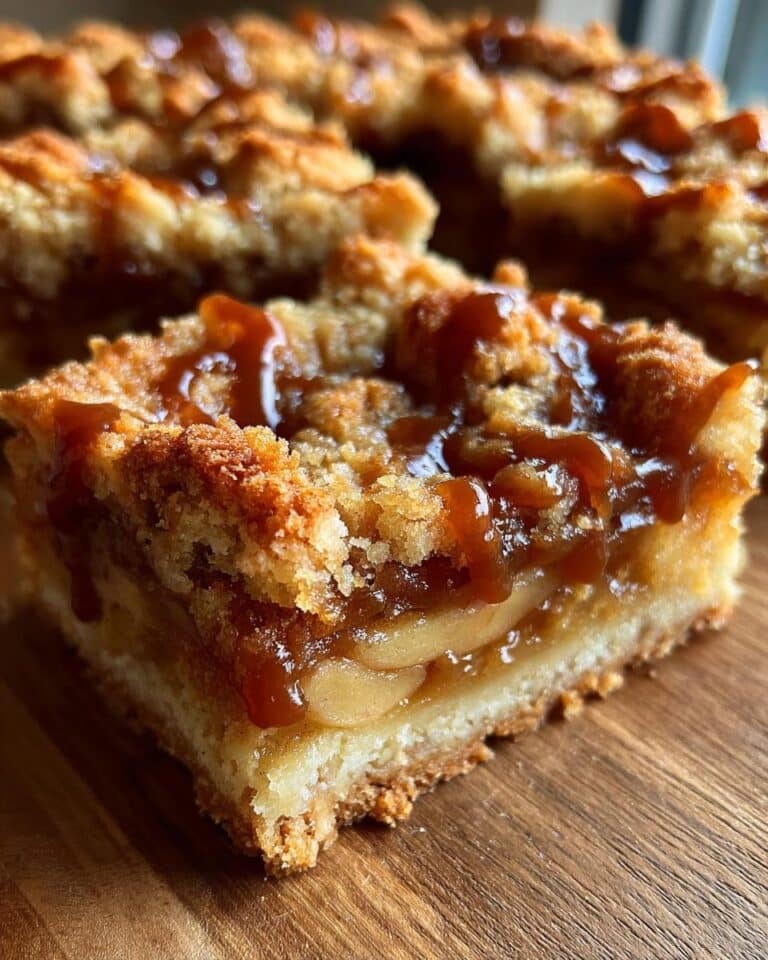
You know how some desserts just *feel* like a warm hug? That’s these bars! What makes them truly special is that perfect harmony between the crumbly, buttery shortbread crust, the tender, slightly tart apples bursting with cinnamon and nutmeg, and that luscious, homemade salted caramel sauce. It’s not just sweet; it’s that delightful sweet-and-salty dance that keeps you coming back for more. These aren’t just apple bars; they’re little squares of pure autumn bliss, the ultimate comfort food for chilly evenings.
A Taste of Autumn in Every Bite
The moment you bake these, your kitchen fills with the most incredible aroma – warm apples, cozy spices, and that hint of toasted butter. Then you take a bite, and it’s like fall decided to become a dessert. The soft apples, the chewy caramel, the crisp crust… pure magic!

Gathering Your Ingredients for Irresistible Salted Caramel Apple Bars for Fall
Alright, let’s get our ducks in a row and gather up everything we need for these amazing bars. It’s always best to have it all ready to go before you start mixing, right? This way, we can just flow through the recipe. For these Irresistible Salted Caramel Apple Bars for Fall, we’ve got three main players: the crust, the apple filling, and that dreamy caramel sauce. Don’t worry if you don’t have *exactly* the apple types I mention; we’ll chat about that later. Just make sure you’ve got your ingredients measured out and ready to rock and roll!
For the Buttery Shortbread Crust
We need 1 cup (that’s two sticks, folks!) of unsalted butter, make sure it’s softened so it creams up nicely. Then, we’ll use 1/2 cup of regular granulated sugar, a good teaspoon of vanilla extract for that lovely aroma, and 2 and 1/2 cups of all-purpose flour. Don’t forget 1/2 teaspoon of salt to balance out all that sweetness.
For the Tender Apple Filling
For the star of the show, grab about 6 medium apples. You’ll want to peel them, get rid of the core, and slice them up – aim for about 6 cups worth. Then, we’ll need another 1/2 cup of granulated sugar, 1/4 cup of all-purpose flour to thicken things up, 1 teaspoon of ground cinnamon, and just a pinch of nutmeg (about 1/4 teaspoon). A tablespoon of lemon juice is key here too, to brighten everything up!
For the Gooey Salted Caramel Sauce
This is where the magic happens! You’ll need 1 cup of granulated sugar and 1/4 cup of water for the caramel base. Then, warm up 1/2 cup of heavy cream – make sure it’s nice and warm! We’ll also need 4 tablespoons of unsalted butter, cut into little pieces, and the grand finale: 1 teaspoon of good sea salt. That salt is what makes it *salted* caramel, after all!
Crafting Your Irresistible Salted Caramel Apple Bars for Fall: Step-by-Step
Okay, let’s get down to business and make these gorgeous bars! It’s actually pretty straightforward, and before you know it, you’ll have a pan full of fall perfection. Just follow along with me here.
Preparing the Crust Base
First things first, let’s get that oven preheated to 350°F (175°C) and give a 9×13 inch baking pan a good greasing and flouring. Now, for the crust, grab a big bowl. Cream together that softened butter and sugar until it’s nice and fluffy – think light and airy. Beat in the vanilla extract. Then, gradually add your flour and salt, mixing until everything is *just* combined. Don’t overmix! Press about half of this dough nice and evenly into the bottom of your prepared pan. This is our base!
Assembling the Apple Filling
In a separate bowl, toss your peeled, cored, and sliced apples with that tablespoon of lemon juice. This little bit of acidity helps brighten the flavor and keeps them from browning too much. Now, in a small bowl, whisk together the 1/2 cup sugar, 1/4 cup flour, cinnamon, and nutmeg. Pour this dry mixture over the apples and toss gently until they’re all coated. Spread this lovely apple mixture evenly right over that crust layer in the pan.

Creating the Perfect Salted Caramel
This is the fun part! In a medium saucepan, combine the 1 cup of sugar and 1/4 cup of water. Cook this over medium heat, stirring *just* until the sugar dissolves. Once it’s dissolved, stop stirring and let it bubble away. You’re watching for a beautiful amber color – like deep honey. This can happen fast, so keep an eye on it! Once it’s amber, *very carefully* whisk in the warm heavy cream. It’s going to bubble up like crazy, so stand back a bit! Keep whisking until it smooths out, then stir in the butter pieces and the sea salt until everything is beautifully blended and glossy. So gorgeous!
Bringing All the Layers Together
Now for the grand finale of assembly! Carefully, slowly pour that luscious salted caramel sauce you just made evenly over the apple filling. Try to get it all over so every bite has that caramel goodness. Then, take the remaining half of your crust dough and crumble it randomly over the caramel layer. Don’t press it down; just let it fall in little clumps. This gives you that wonderful texture contrast.

Baking and Cooling for Perfection
Pop that pan into your preheated oven and bake for about 40 to 50 minutes. You’re looking for the topping to be a lovely golden brown and for the apples underneath to be tender when you poke them with a knife. The caramel should be bubbling around the edges. Once it’s done, the hardest part: let it cool completely in the pan on a wire rack. Seriously, I know it’s tempting, but waiting until they’re totally cool will make cutting them into clean bars SO much easier. Trust me on this!
Tips for Achieving Perfect Apple Pie Bars
Making these bars is pretty straightforward, but a few little tricks can make them absolutely perfect every single time. It’s all about a little bit of know-how and paying attention to the details. These tips will help ensure your Apple Pie Bars are a total knockout, whether you’re bringing them to a gathering or just treating yourself!
Choosing the Best Apples for Your Pie Bar Recipes
When you’re making these Apple Recipes Easy, the kind of apple really matters! I love using a mix, like Honeycrisp for sweetness and crunch, and maybe a Gala or Fuji. They hold their shape so well when baked and have that perfect balance of tart and sweet. Avoid apples that get too mushy, or you’ll lose that lovely texture in the filling.
Mastering the Salted Caramel
Making caramel can be a little nerve-wracking, but trust me, it’s worth it! The key is to be patient and watch the color closely. Make sure your cream is *warm* before you add it – this stops the caramel from seizing up into a hard lump. If it looks a little lumpy at first, just keep whisking gently over low heat, and it should smooth right out. And don’t forget that pinch of salt; it makes all the difference!
Frequently Asked Questions about Irresistible Salted Caramel Apple Bars for Fall
Got questions? I’ve got answers! These bars are pretty forgiving, but here are a few things folks often ask.
Can I use different types of apples in these baked apple recipes?
Absolutely! While I love a mix like Honeycrisp and Gala for their flavor and texture, feel free to use your favorites. Just aim for apples that won’t turn to mush when baked, like Fuji or Braeburn. The main thing is to get about 6 cups sliced!
How long do these apple pie bars typically last?
These bars are best enjoyed within 3-4 days. Keep them stored in an airtight container at room temperature. If it’s super warm where you are, the fridge is a good idea, but they can firm up a bit, so let them sit out for a few minutes before serving.
Are these considered easy Thanksgiving dessert recipes for kids?
Oh, totally! These are fantastic Thanksgiving Desserts Kids will adore. They’re way less fussy than a whole pie, and who doesn’t love caramel and apples? They’re a great way to get little ones involved in making a special treat without too much stress.
Storing and Reheating Your Irresistible Salted Caramel Apple Bars
Got leftovers? Lucky you! Once these bars have cooled completely, you can store them in an airtight container at room temperature for about 3-4 days. They’re actually pretty delicious at room temp! If your kitchen is on the warmer side, popping them in the fridge is a good idea, but just remember they might firm up a bit. If you want to reheat them, just pop a bar in the microwave for about 15-20 seconds to soften that caramel layer and warm up the apples. So good!
Nutritional Estimates for Your Salted Caramel Apple Bars
Just so you know, these numbers are estimates and can vary based on your specific ingredients and apple types. On average, one bar has around 350 calories, 20g of fat (with about 12g being saturated), 40g of carbohydrates, and 3g of protein. It’s a satisfying fall treat!
For more delicious recipes and inspiration, check out our Pinterest page!
Print
Fall’s 10 Irresistible Salted Caramel Apple Bars
- Total Time: 1 hour 20 minutes
- Yield: 24 bars
- Diet: Vegetarian
Description
These irresistible salted caramel apple bars are a perfect fall treat. They combine a tender apple filling with a gooey salted caramel sauce and a buttery shortbread crust. Easy to make and always a crowd-pleaser.
Ingredients
- For the Crust: 1 cup (2 sticks) unsalted butter, softened; 1/2 cup granulated sugar; 1 teaspoon vanilla extract; 2 1/2 cups all-purpose flour; 1/2 teaspoon salt
- For the Filling: 6 medium apples, peeled, cored, and sliced (about 6 cups); 1/2 cup granulated sugar; 1/4 cup all-purpose flour; 1 teaspoon ground cinnamon; 1/4 teaspoon ground nutmeg; 1 tablespoon lemon juice
- For the Salted Caramel: 1 cup granulated sugar; 1/4 cup water; 1/2 cup heavy cream, warmed; 4 tablespoons unsalted butter, cut into pieces; 1 teaspoon sea salt
Instructions
- Preheat oven to 350°F (175°C). Grease and flour a 9×13 inch baking pan.
- For the crust: In a large bowl, cream together butter and sugar until light and fluffy. Beat in vanilla extract. Gradually add flour and salt, mixing until just combined. Press half of the dough evenly into the bottom of the prepared pan.
- For the filling: In a separate bowl, toss apples with lemon juice. In a small bowl, whisk together sugar, flour, cinnamon, and nutmeg. Add to apples and toss to coat. Spread the apple mixture evenly over the crust.
- For the salted caramel: In a medium saucepan, combine sugar and water. Cook over medium heat, stirring until sugar dissolves. Bring to a boil and cook, without stirring, until it turns an amber color. Carefully whisk in the warm heavy cream (it will bubble up). Stir in butter and salt until smooth.
- Pour the salted caramel evenly over the apple filling.
- Crumble the remaining half of the crust dough over the caramel layer.
- Bake for 40-50 minutes, or until the topping is golden brown and the apples are tender.
- Let cool completely before cutting into bars.
Notes
- For best results, use a mix of apple varieties like Honeycrisp, Gala, or Fuji.
- Ensure the heavy cream is warm before adding it to the hot caramel to prevent seizing.
- Allow bars to cool completely for clean cuts.
- Prep Time: 30 minutes
- Cook Time: 50 minutes
- Category: Dessert
- Method: Baking
- Cuisine: American

 9")


 12")
 13")