Halloween treats should be fun, easy, and just a little bit messy—that’s why my Pumpkin Patch Dirt Cups have been a hit at every party I’ve ever thrown! I still remember the first time I made these for my niece’s Halloween bash. The kids went wild for the Oreo “dirt” and candy pumpkins, and the adults? Well, let’s just say I caught a few sneaking seconds (and thirds!). The best part? You can whip these up in minutes with just three simple ingredients. No baking, no fuss—just pure Halloween magic in every spoonful.

Why You’ll Love These Pumpkin Patch Dirt Cups
Trust me, these adorable dessert cups will become your new Halloween tradition! Here’s why everyone goes crazy for them:
- Super quick – You can throw these together in 10 minutes flat (perfect for last-minute party prep!)
- No oven needed – Just layer, chill, and serve – no baking means more time for costume prep
- Kid-approved magic – What child can resist digging into edible “dirt” topped with candy pumpkins?
- Party perfect – They look festive in clear cups and disappear faster than ghosts at sunrise
Seriously, I’ve never brought these to a gathering without getting asked for the recipe. They’re that good!
Ingredients for Pumpkin Patch Dirt Cups
The beauty of these Halloween treats? You probably have most of this in your pantry already! Here’s what you’ll need for the perfect Pumpkin Patch Dirt Cups:
- 2 cups finely crushed Oreos – About 24 cookies (I like to keep some larger crumbs for texture)
- 2 cups prepared chocolate pudding – The instant kind works great (or homemade if you’re feeling fancy)
- 12 candy pumpkins – Those cute orange ones you see everywhere in fall
Don’t stress if you’re missing something – gummy worms make a fun swap for pumpkins, or try vanilla pudding for a creamier twist. Halloween is all about creativity!
How to Make Pumpkin Patch Dirt Cups
Okay, let’s get messy (in the best way possible)! These adorable Halloween treats come together faster than you can say “trick or treat.” Here’s exactly how I layer up the magic:

Step 1: Crush the Oreos
Grab your Oreos – the whole cookie, cream filling and all! My favorite method? Toss them in a zip-top bag and go to town with a rolling pin. You want mostly fine crumbs with a few bigger pieces for texture. No rolling pin? A food processor works wonders (pulse 10-12 times).
Step 2: Layer Pudding and Crumbs
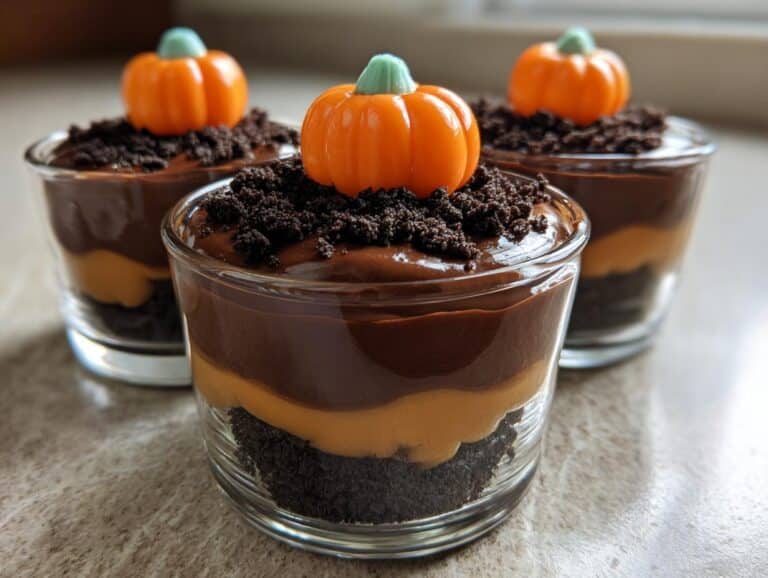
Now the fun part! Start with about 1 tablespoon of Oreo crumbs in each clear cup – this is your “dirt” foundation. Next, spoon in pudding until it’s about halfway up (I use 2 tablespoons per layer). Repeat: more crumbs, more pudding, leaving just enough room at the top for your pumpkins. Pro tip: tilt the cups slightly as you layer for that cute “hillside” effect!
Step 3: Add Candy Pumpkins
Time to plant your pumpkin patch! Gently press 2-3 candy pumpkins into the top Oreo layer – I like to cluster them together like they’re growing. Get creative with arrangements! For extra Halloween flair, add a gummy worm peeking out from the “dirt.” Then pop them in the fridge for at least an hour (if you can wait that long!).

Tips for Perfect Pumpkin Patch Dirt Cups
After making these adorable treats for years (and through many Halloween disasters!), I’ve learned a few tricks to make your Pumpkin Patch Dirt Cups absolutely foolproof:
- Chill your pudding first – Cold pudding holds its shape better when layering (no sad, soupy cups!)
- Clear cups are key – Those pretty layers deserve to be seen! Plastic tumblers or mason jars work great
- Double (or triple!) the batch – These disappear FAST at parties – I always make extra
- Crush extra Oreos – Keep some aside for sprinkling on top right before serving for fresh “dirt” texture
Oh, and a bonus tip from my niece: “The more pumpkins, the better!” Can’t argue with that logic.
Ingredient Substitutions & Variations
One of my favorite things about these Pumpkin Patch Dirt Cups? How easily you can mix them up! Here are my go-to swaps when I need to adapt the recipe:
- Pudding options: Vanilla or butterscotch pudding make delicious creamy alternatives
- Cookie choices: Gluten-free Oreos work perfectly, or try chocolate graham crackers
- Candy subs: Vegan candy pumpkins or gummy worms add the same festive touch
- Extra fun: Mix in crushed pretzels for salty-sweet “rocks” in your dirt
The possibilities are endless – that’s the beauty of Halloween cooking!
Serving and Storing Pumpkin Patch Dirt Cups
These cuties are best served ice-cold straight from the fridge – the pudding firms up perfectly and those Oreo crumbs stay nice and crisp! I always pop them in for at least an hour before serving (if my kids don’t raid them first). Leftovers? Just cover with plastic wrap and they’ll keep happily in the fridge for up to 2 days – though they’ve never lasted that long in my house!
Pumpkin Patch Dirt Cups Nutritional Info
Nutrition varies based on your specific ingredients, but here’s the general breakdown per serving (about 1 cup): roughly 250 calories, 35g carbs, and 10g fat. Remember – those candy pumpkins add extra sweetness, so you might want to go easy if you’re watching sugar! But hey, it’s Halloween – treat yourself!
FAQs About Pumpkin Patch Dirt Cups
I get asked these questions all the time – here are the answers straight from my Halloween dessert playbook:
Can I make these ahead? Absolutely! They actually taste better after chilling overnight. Just wait to add the candy pumpkins until right before serving so they don’t get soggy.
Can I use gummy worms? You bet! I swap them for pumpkins all the time – they look extra creepy crawling out of the “dirt.” Kids go nuts for them.
Are they freezer-friendly? Nope – freezing turns the pudding weirdly grainy. Trust me, I learned this the hard way after a freezer experiment gone wrong. Stick to fridge storage!
I’d love to see your Pumpkin Patch Dirt Cup masterpieces! Tag me on Instagram @HalloweenTreatsQueen when you post photos of your edible pumpkin patches – bonus points for creative twists! Nothing makes me happier than seeing families enjoying these spooky-sweet treats together. You can also find more fun recipes on Pinterest!
Print
3-Ingredient Pumpkin Patch Dirt Cups in Just 10 Minutes
- Total Time: 10 minutes
- Yield: 6 servings
- Diet: Vegetarian
Description
Fun Halloween-themed dessert cups with Oreo crumbs and candy pumpkins.
Ingredients
- 2 cups crushed Oreos
- 2 cups pudding
- 12 candy pumpkins
Instructions
- Crush Oreos into fine crumbs.
- Layer pudding and Oreo crumbs in cups.
- Top with candy pumpkins.
- Chill before serving.
Notes
- Use chocolate pudding for best flavor.
- Can substitute gummy worms for pumpkins.
- Prep Time: 10 minutes
- Cook Time: 0 minutes
- Category: Dessert
- Method: No-Bake
- Cuisine: American


