Is there anything better than that first crisp fall morning when the air smells like cinnamon and apples? That’s when I know it’s time to pull out my favorite baking sheet and make these Irresistible Salted Caramel Apple Bars. They’ve become my go-to dessert every September – so easy to throw together, yet fancy enough to impress at potlucks. My neighbor actually started calling them “autumn in a pan” after I brought a batch to our first fall block party last year.
What I love most is how the sweet-tart apples mingle with that rich caramel and buttery oat crumble. It’s like apple pie met coffee cake and had the most delicious baby! And trust me, if I can make these with my two toddlers “helping” (read: sneaking apple slices), anyone can do it. The hardest part? Waiting for them to cool before digging in!

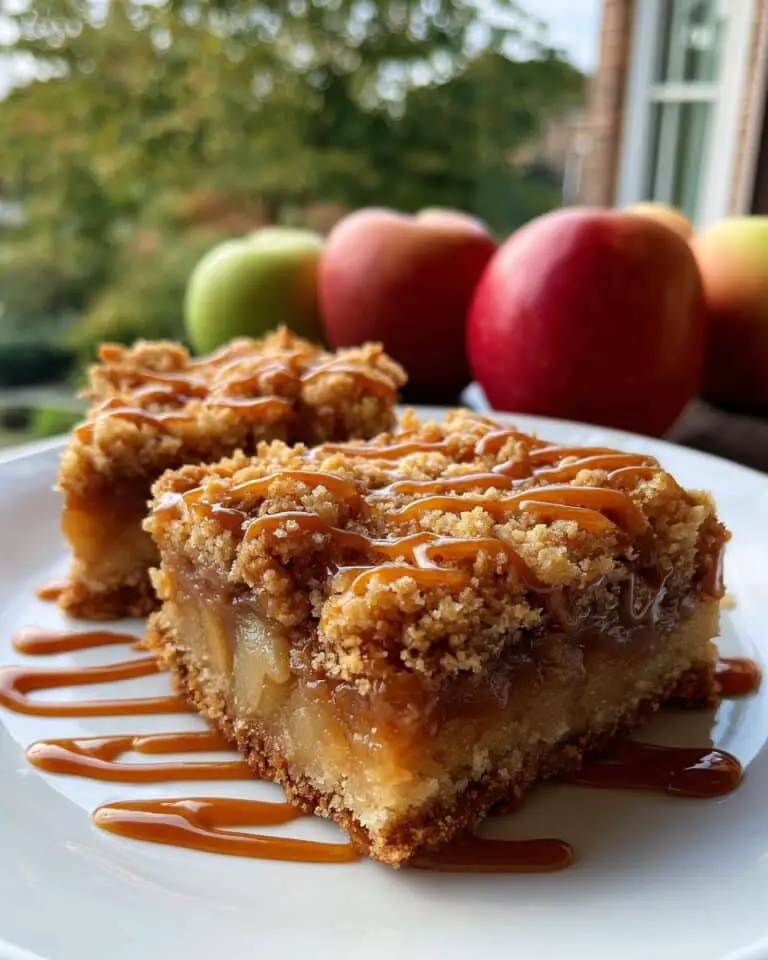
Why You’ll Love These Irresistible Salted Caramel Apple Bars
Oh, where do I even begin? These bars have stolen the show at every fall gathering I’ve brought them to. Here’s why they’ll become your new autumn staple too:
- Effortless elegance – Looks like you spent hours, but takes under an hour start-to-finish (shh, our secret!)
- That perfect fall flavor combo – Warm cinnamon, tart apples, and gooey caramel with just a kiss of salt
- Crowd-pleasing magic – Equally loved by kids sneaking seconds and foodie friends who “don’t usually like sweet treats”
- No fancy equipment needed – Just a bowl, baking pan, and your two hands to make that crumbly topping
- Better the next day – If they last that long! The flavors deepen beautifully overnight
Honestly, the toughest decision is whether to eat them warm with ice cream or room temperature with your morning coffee. (Spoiler: I do both.)
Ingredients for Irresistible Salted Caramel Apple Bars
Grab your favorite mixing bowl – here’s everything you’ll need to make these heavenly bars come together:
- 2 cups all-purpose flour (spooned & leveled)
- 1 cup old-fashioned rolled oats (not instant!)
- 1 cup packed dark brown sugar (trust me, the molasses flavor makes all the difference)
- 1/2 teaspoon fine sea salt
- 1 cup (2 sticks) unsalted butter, melted and slightly cooled
- 3 medium apples, peeled and diced into 1/2-inch pieces (about 3 cups)
- 1/2 cup thick caramel sauce (homemade or store-bought)
- 1 teaspoon ground cinnamon
- 1/4 teaspoon freshly grated nutmeg
- 1 teaspoon pure vanilla extract
Ingredient Notes & Substitutions
Apples: Granny Smith are my go-to – their tartness balances the sweet caramel perfectly. Honeycrisp or Braeburn work too if you prefer sweeter apples. Just avoid super soft varieties like Red Delicious.
Caramel: I’ve used everything from homemade salted caramel to store-bought ice cream topping in a pinch. If your sauce seems thin, simmer it for 5 minutes to thicken before drizzling.
Butter: Please, please use real butter! Margarine just doesn’t give the same rich flavor or crumb texture. If you only have salted butter, reduce the added salt by half.
How to Make Irresistible Salted Caramel Apple Bars
Okay, let’s get baking! This couldn’t be simpler – just three main steps between you and caramel apple heaven. I’ll walk you through each one with all my hard-earned tips (learned from many messy kitchen experiments!).
Step 1: Prepare the Crust
First, preheat your oven to 350°F (175°C) – this gives the oven time to stabilize while you prep. Grab that big mixing bowl and whisk together the flour, oats, brown sugar, and salt. Now pour in the melted butter (make sure it’s cooled slightly so it doesn’t melt the sugar!) and mix until you get this magical crumbly texture that holds together when pressed. About half of this mixture becomes our crust – press it firmly into your greased 9×9 pan. I use the bottom of a measuring cup to really pack it in evenly.
Step 2: Layer Apples and Caramel
Now the fun part! Toss those beautiful diced apples with cinnamon, nutmeg, and vanilla – I use my hands to make sure every piece gets coated. Spread them evenly over the crust layer. Here’s my secret: leave about 1/4-inch border around the edges so the caramel doesn’t bubble over. Speaking of caramel, drizzle it slowly over the apples in zigzags – too much in one spot makes soggy spots!
Step 3: Bake and Cool
Sprinkle the remaining crumb mixture over everything – don’t press it down! The loose topping gives that amazing crisp texture. Bake for 35-40 minutes until golden brown and the apples are tender when poked with a fork. Now comes the hardest part: letting it cool completely (about 2 hours) before cutting. I know it smells amazing, but trust me, cutting warm bars leads to crumbly messes. Worth the wait!

Tips for Perfect Irresistible Salted Caramel Apple Bars
After making these bars more times than I can count (okay fine, I may have a problem), I’ve picked up some foolproof tricks:
- Cold butter hack: If your crumb topping seems too wet, pop the bowl in the fridge for 10 minutes – it’ll be easier to sprinkle evenly.
- Apple prep: Pat diced apples dry with paper towels to prevent sogginess – nobody wants a mushy bottom!
- Doneness test: The edges should be deep golden and you’ll see caramel bubbling along the sides when it’s ready.
- Clean cuts: Wipe your knife between slices for picture-perfect bars every time.
- Storage secret: Layer parchment between bars if stacking – that caramel loves to stick to everything!
Bonus tip: Hide a few for yourself before serving – these disappear faster than pumpkin spice in September!
Serving Suggestions for Irresistible Salted Caramel Apple Bars
Oh honey, these bars are delicious all on their own, but let me tell you how to take them to the next level! Warm slices with a scoop of vanilla ice cream turn into pure magic – the cold cream melting into the spiced apples is heaven. My husband swears by his afternoon coffee pairing, saying the caramel notes complement his dark roast perfectly. For brunch? Try them slightly warmed with a dollop of Greek yogurt. And don’t even get me started on how amazing they are with a drizzle of extra caramel – because sometimes more is more!
Storing and Reheating Irresistible Salted Caramel Apple Bars
Here’s the beautiful thing about these bars – they actually get better after a day! Store them in an airtight container at room temperature for up to 3 days (if they last that long). For longer storage, wrap individual bars tightly in plastic wrap and freeze for up to 2 months. When that caramel craving hits, just pop a frozen bar in the microwave for 15-20 seconds – it’ll taste fresh-baked all over again!
Nutritional Information
Now, I’m no nutritionist (just a caramel-loving home cook!), but here’s the scoop on what’s in these bars. Remember – these are estimates and will vary based on your specific ingredients. Each generous bar has about 280 calories, with 18g of that heavenly sugar we all crave. You’re looking at 12g total fat (7g saturated), 40g carbs with 2g fiber, and 3g protein per serving. Not too shabby for such an indulgent treat! The sodium comes in around 120mg – just enough to make that salted caramel pop without going overboard.
FAQs About Irresistible Salted Caramel Apple Bars
I’ve gotten so many questions about these bars over the years – here are the answers to everything you might wonder before baking up your first batch!
Can I Make These Bars Ahead of Time?
Absolutely! These salted caramel apple bars actually taste better the next day as the flavors develop. Bake them up to 24 hours before serving – just store at room temperature in an airtight container. If you’re prepping further ahead, the unbaked crumb mixture and diced apples (tossed with lemon juice) can hang out separately in the fridge for 2 days before assembling.
What Apples Work Best?
You want apples that hold their shape when baked – my top pick is Granny Smith for that perfect sweet-tart balance. Honeycrisp and Braeburn are great sweeter alternatives. Avoid mealy apples like Red Delicious – they’ll turn mushy! Pro tip: Mix two varieties for more complex flavor.
Can I Freeze These Bars?
Oh honey, yes! These freeze beautifully for up to 2 months. Let them cool completely first, then wrap individual bars tightly in plastic wrap before freezing. When that caramel craving hits, thaw at room temperature for about an hour or microwave briefly (careful – the caramel gets hot fast!).
Can I Use Store-Bought Caramel?
Of course! While homemade caramel is dreamy, good-quality store-bought works great in a pinch. Look for thick dessert sauces near the ice cream toppings. If your sauce seems runny, simmer it for 5 minutes to thicken before drizzling.
How Do I Get Clean Cuts?
Patience is key – let the bars cool completely (about 2 hours) before slicing. Run a sharp knife under hot water and wipe dry between cuts. For extra clean edges, chill the pan in the fridge for 30 minutes first!

Try this recipe and share your results – tag me so I can see your beautiful caramel apple creations! You can find more delicious recipes on our Pinterest page.
Print
Irresistible Salted Caramel Apple Bars in 1 Hour – Divine!
- Total Time: 55 minutes
- Yield: 12 bars
- Diet: Vegetarian
Description
Delicious salted caramel apple bars perfect for fall baking. Easy to make and full of warm flavors.
Ingredients
- 2 cups all-purpose flour
- 1 cup rolled oats
- 1 cup brown sugar
- 1/2 tsp salt
- 1 cup unsalted butter, melted
- 3 medium apples, peeled and diced
- 1/2 cup caramel sauce
- 1 tsp cinnamon
- 1/4 tsp nutmeg
- 1 tsp vanilla extract
Instructions
- Preheat oven to 350°F. Grease a 9×9 inch baking pan.
- Mix flour, oats, brown sugar, and salt in a bowl. Add melted butter and stir until crumbly.
- Press half of the mixture into the pan to form the crust.
- Toss apples with cinnamon, nutmeg, and vanilla. Spread over the crust.
- Drizzle caramel sauce over the apples.
- Sprinkle the remaining crumb mixture on top.
- Bake for 40 minutes or until golden brown.
- Let cool before cutting into bars.
Notes
- Use firm apples like Granny Smith for best texture.
- Store in an airtight container for up to 3 days.
- Serve warm with ice cream for extra indulgence.
- Prep Time: 15 minutes
- Cook Time: 40 minutes
- Category: Dessert
- Method: Baking
- Cuisine: American


