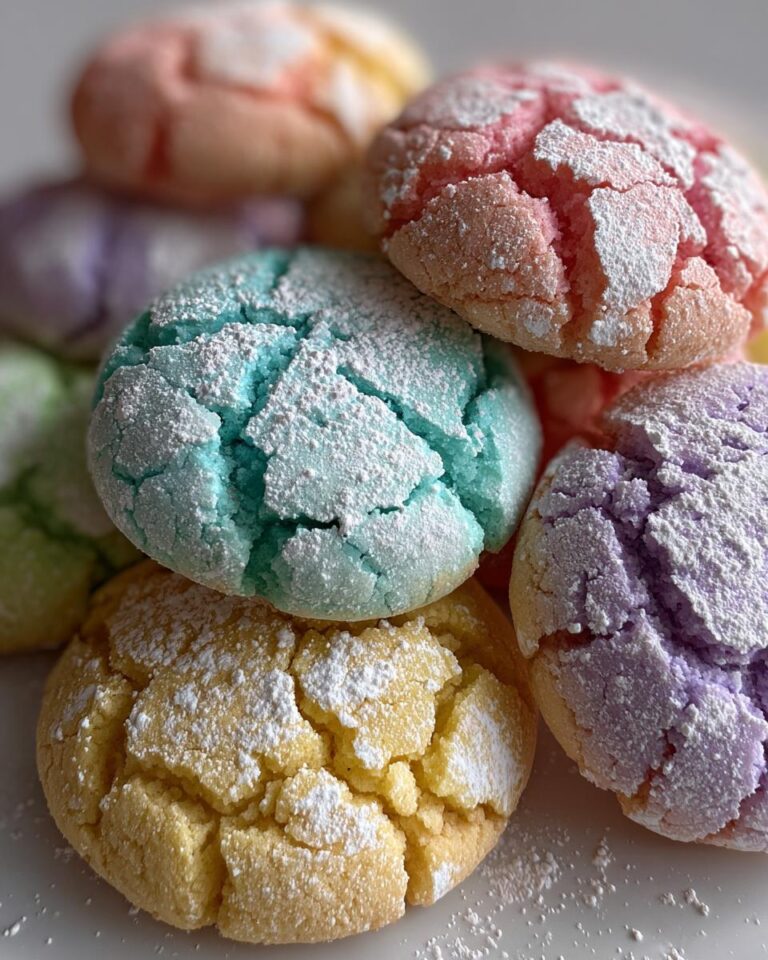
Oh my goodness, spring is just the BEST, isn’t it? I swear, as soon as the weather starts warming up and the flowers start popping, I get this *massive* urge to bake. And this year, I’m absolutely obsessed with these Springtime Crinkle Cookies: A Burst of Pastel Charm. They’re just so darn pretty, perfect for Easter, a baby shower, or honestly, any day you want a little sprinkle of sunshine in your life.
I stumbled upon this recipe a few years ago, right around Easter. My kids were little, and I was determined to make the cutest cookies *ever*. I spent hours scouring Pinterest, and then I found it – a crinkle cookie recipe, but with a springtime twist. The pastel colors, the almond flavor… it was love at first sight! The first batch was a bit of a disaster, I’ll admit. The dough was too sticky, the crinkles weren’t crinkling, the whole shebang. But, I kept at it, tweaking and testing until I got it just right.
Now, these cookies are a regular in my baking rotation, especially in the spring. They’re not just beautiful; they’re also ridiculously delicious. The almond extract gives them this amazing, subtle flavor that everyone raves about. And, honestly, who can resist a cookie that looks like it’s been kissed by a rainbow? Don’t worry, even if you’re not a seasoned baker, you can totally do this! I’m going to walk you through every step, so you can make these beauties, too. Trust me, your friends and family will be *so* impressed.
Ready to get started? Let’s bake some happy!
Ingredients for the Perfect Springtime Crinkle Cookies: A Burst of Pastel Charm
Okay, so here’s what you’ll need to whip up these gorgeous cookies. Don’t worry, the ingredient list isn’t too crazy. I always try to keep things simple, because who has time to hunt down obscure ingredients, right?
Essential Dry Ingredients
First up, the dry stuff! You’ll need 2 1/4 cups of all-purpose flour (I usually just use the regular stuff, but you could try cake flour for extra tenderness, if you’re feeling fancy!). Then, add 1 teaspoon of baking powder, and a generous 1/2 teaspoon of salt. Don’t skip the salt! It really brings out the flavors. Also, you’ll need 1 cup of granulated sugar.
The Wet Ingredients for *Springtime Crinkle Cookies*
Now for the good stuff! You’ll need 1 cup (that’s two sticks) of unsalted butter, softened. Make sure it’s *really* soft, but not melted. I usually take it out of the fridge an hour or two before. Then, you’ll need 2 large eggs, and 1 teaspoon of pure almond extract. The almond extract is what gives these cookies that amazing flavor! Trust me, it’s a game changer. Quality matters here – get the good stuff!
Pastel Colors and Sweet Coating
And finally, the fun part! You’ll need about 1/2 cup of powdered sugar for rolling the cookies. And for the colors, I *highly* recommend using gel food coloring. It gives you the most vibrant colors without adding extra liquid to the dough. You can find these in the baking aisle. I love using pastel pink, blue, yellow, and green, but honestly, any pastel shades you like will do! Go wild!
Step-by-Step Instructions: How to Make Springtime Crinkle Cookies: A Burst of Pastel Charm
Alright, bakers, let’s get down to the nitty-gritty and make these cookies! Don’t worry, it’s easier than it looks. Just follow these steps, and you’ll be munching on pastel perfection in no time.
Preparing the Dough: The First Steps
First things first, grab a medium bowl and whisk together your dry ingredients: the flour, baking powder, and salt. Whisk them together until they’re nice and combined. Set that aside. Next, in a large bowl (or in the bowl of your stand mixer, if you’re fancy!), cream together the softened butter and granulated sugar. Beat them together until the mixture is light and fluffy. This is important for a good texture! It usually takes a few minutes, so be patient. Then, add in your eggs one at a time, beating well after each addition. Finally, stir in that glorious almond extract. The kitchen should start smelling amazing already!
Combining Wet and Dry Ingredients
Now, the moment of truth! Gradually add the dry ingredients to the wet ingredients. I usually do this in three additions, mixing after each one until just combined. Be careful not to overmix! Once the flour is just incorporated, stop mixing. Overmixing can develop the gluten in the flour, which will make your cookies tough. We want soft and chewy, remember?
Chilling and Shaping the Cookie Dough
Here’s a crucial step: chilling! Cover the dough with plastic wrap and pop it in the fridge for at least an hour, or even better, two. This helps the flavors meld and prevents the cookies from spreading too much while baking. Trust me, it’s worth the wait! After the dough has chilled, it’s time to shape your cookies. Roll the dough into 1-inch balls. You should get around 24 cookies from this recipe.
Coating and Baking Your *Springtime Crinkle Cookies*
Now, for the fun part! Pour your powdered sugar into a bowl. Roll each cookie dough ball in the powdered sugar until it’s completely coated. Make sure they’re *thoroughly* covered! Place the sugared cookie dough balls on a baking sheet lined with parchment paper. Preheat your oven to 350°F (175°C). Then, bake the cookies for 10-12 minutes, or until the edges are set and the tops are crinkled. Keep an eye on them, as oven temperatures can vary! They’re done when they look crackly on top, and the crinkles are starting to form.
Cooling and Serving Your *Springtime Crinkle Cookies*
Once the cookies are baked, let them cool on the baking sheet for a few minutes before transferring them to a wire rack to cool completely. This is super important – don’t rush it! Once the cookies are completely cool, they’re ready to enjoy! Serve them on a pretty plate, a vintage cake stand, or even just straight from the cooling rack (no judgment here!). These cookies are perfect for Easter, spring gatherings, or just a sweet treat any time the mood strikes. They’re so good, you might want to hide a few for yourself!
Why You’ll Love These Springtime Crinkle Cookies: A Burst of Pastel Charm
Seriously, these cookies are a winner, and here’s why you’ll become completely obsessed, too!
Quick and Easy
Honestly, from start to finish, you can have these beauties ready in under an hour! Perfect for those last-minute cravings or unexpected guests. No need to spend all day in the kitchen.
Delicious and Flavorful
These cookies are a total explosion of flavor! The almond extract gives them a delicate, almost floral taste, and the powdered sugar coating adds a delightful sweetness and that iconic crinkly texture. They’re soft, chewy, and utterly irresistible.
Perfect for Spring Celebrations
These cookies are just made for spring! They’re absolutely perfect for Easter, Mother’s Day, baby showers, or any spring gathering. They’re so pretty and festive, they’ll be the star of the show!
Ingredient Notes and Substitutions
Okay, let’s chat about some of the ingredients and how you can make a few tweaks to suit your own tastes or what you have on hand. Don’t be afraid to experiment! That’s half the fun of baking, right?
Flour Variations
I usually stick with all-purpose flour, and it works like a charm. But, if you’re feeling adventurous, you could try using cake flour. It has a lower protein content, which means your cookies might be even more tender! Just be careful not to overmix the dough. You could also try a blend of all-purpose and a little bit of whole wheat flour for a slightly nuttier flavor, but just a touch! About a quarter of the total flour amount would be perfect.
Almond Extract Alternatives
Now, the almond extract is key for that yummy almond flavor, but if you don’t have it, or if you want to try something different, you have options! Vanilla extract is a good substitute, although it won’t give you the same almondy taste – it will still be delicious! You could also try a combination of vanilla extract and a tiny pinch of almond emulsion (it’s stronger than extract). Or, if you’re feeling really wild, a few drops of rose water will add a lovely floral note, which is especially nice for spring. Just adjust the amount to your taste!
Food Coloring Options
I *love* gel food coloring for these cookies, because it gives you the most vibrant colors without changing the texture of the dough. Liquid food coloring can sometimes thin out the dough a bit, so you might need to add a touch more flour. But, hey, if that’s all you have, go for it! Just be aware that the colors might be a bit more muted. Also, you can find natural food coloring options these days, made from things like beets and turmeric. They may not be as bright, but they’re a fun, natural alternative! Just be sure to read the instructions on the package.
Tips for Baking the Best Springtime Crinkle Cookies
Want to make sure your cookies are absolutely perfect? Here are a few pro tips to help you on your way! Trust me, these little tricks make a *huge* difference.
Dough Chilling Secrets
Don’t even *think* about skipping the chilling step! I know, I know, it’s tempting to rush, but chilling the dough is absolutely crucial for these cookies. It allows the butter to firm up, which helps them hold their shape and prevents them from spreading too thin during baking. Plus, it gives the flavors a chance to meld together, making them taste even better. I usually chill mine for at least an hour, but if you have time, even longer is great! You can even chill the dough overnight.
Perfecting the Crinkle
The crinkle is what makes these cookies so special, right? To get that perfect crackly effect, make sure you roll the dough balls *thoroughly* in the powdered sugar. You want them completely coated! Don’t be shy! And, when you bake them, the heat will cause the outside to set while the inside stays soft, creating those gorgeous cracks. Also, make sure your oven is preheated to the correct temperature, and don’t open the oven door too often while they’re baking!
Baking Time Adjustments
Every oven is different, so it’s really important to keep an eye on your cookies while they’re baking. The baking time I’ve given you is just a guideline. Start checking them at around 10 minutes. You want the edges to be set, and the tops to look crinkled. If your oven tends to run hot, you might need to reduce the baking time slightly. If it runs cool, you might need to add a minute or two. The best way to know if they’re done is to watch for those crinkles and make sure the edges are golden! You can also test them by gently pressing the top – they should spring back a little.
*Springtime Crinkle Cookies* Variations
So, you’ve mastered the basics, and now you want to get creative? Awesome! These Springtime Crinkle Cookies are super versatile, and there are tons of ways to make them your own. Don’t be afraid to experiment! That’s the best part of baking, right?
Flavor Twists
Want to change up the flavor profile? Try adding a pinch of cardamom or a dash of lemon zest to the dough. You could also swap out the almond extract for a different flavor, like vanilla, or even a little bit of orange extract. For a chocolatey twist, add some cocoa powder to the dough. Yum!
Color and Decoration Ideas
You can use different colors of gel food coloring for the dough! Think lavender, mint green, or even a soft peach. After baking, you could add sprinkles to the tops of the cookies. Or, if you’re feeling fancy, you can drizzle them with a simple glaze. How about white chocolate with a touch of pastel food coloring? So cute!
Serving Suggestions for Your Springtime Crinkle Cookies
Okay, so you’ve baked a batch of these beauties, and now you want to know how to serve them? Easy peasy! They’re absolutely perfect on their own, of course. But, if you want to make things extra special, serve them with a cup of tea or coffee. Or, for a spring-themed brunch, pair them with fresh fruit – strawberries, raspberries, and blueberries would be amazing!
Storage and Reheating Instructions
So, you’ve got leftovers? (As if!) Lucky you! These Springtime Crinkle Cookies are best stored in an airtight container at room temperature. They’ll stay fresh and delicious for about 3-4 days (if they last that long!).
Want to enjoy them a little warm? You can totally pop them in the microwave for a few seconds. Or, if you want to be extra, warm them in a low oven for a few minutes. But, honestly, they’re so good, you don’t even need to! They are perfect right out of the container!
Estimated Nutritional Information for Springtime Crinkle Cookies: A Burst of Pastel Charm
Alright, so I’m not a nutritionist, and I don’t have a fancy lab to test these cookies, but I can give you a rough estimate of the nutritional information. Keep in mind, this is just a ballpark figure, and it can vary depending on the exact ingredients you use and the size of your cookies. But, if you’re curious, here’s what you can expect per cookie:
- Calories: About 150
- Sugar: Roughly 15g
- Sodium: Around 75mg
- Fat: About 8g
- Saturated Fat: Around 5g
- Unsaturated Fat: Around 3g
- Trans Fat: 0g (hopefully!)
- Carbohydrates: About 20g
- Fiber: Basically zero
- Protein: About 2g
- Cholesterol: About 25mg
Again, this is just a quick estimate, but it gives you a general idea. Enjoy these cookies in moderation, and remember, a little treat never hurt anyone! 😉

Oh my goodness, spring is just the BEST, isn’t it? I swear, as soon as the weather starts warming up and the flowers start popping, I get this *massive* urge to bake. And this year, I’m absolutely obsessed with these Springtime Crinkle Cookies: A Burst of Pastel Charm. They’re just so darn pretty, perfect for Easter, a baby shower, or honestly, any day you want a little sprinkle of sunshine in your life.
I stumbled upon this recipe a few years ago, right around Easter. My kids were little, and I was determined to make the cutest cookies *ever*. I spent hours scouring Pinterest, and then I found it – a crinkle cookie recipe, but with a springtime twist. The pastel colors, the almond flavor… it was love at first sight! The first batch was a bit of a disaster, I’ll admit. The dough was too sticky, the crinkles weren’t crinkling, the whole shebang. But, I kept at it, tweaking and testing until I got it just right.

Now, these cookies are a regular in my baking rotation, especially in the spring. They’re not just beautiful; they’re also ridiculously delicious. The almond extract gives them this amazing, subtle flavor that everyone raves about. And, honestly, who can resist a cookie that looks like it’s been kissed by a rainbow? Don’t worry, even if you’re not a seasoned baker, you can totally do this! I’m going to walk you through every step, so you can make these beauties, too. Trust me, your friends and family will be *so* impressed.
Ready to get started? Let’s bake some happy!
Ingredients for the Perfect Springtime Crinkle Cookies: A Burst of Pastel Charm
Okay, so here’s what you’ll need to whip up these gorgeous cookies. Don’t worry, the ingredient list isn’t too crazy. I always try to keep things simple, because who has time to hunt down obscure ingredients, right?
Essential Dry Ingredients
First up, the dry stuff! You’ll need 2 1/4 cups of all-purpose flour (I usually just use the regular stuff, but you could try cake flour for extra tenderness, if you’re feeling fancy!). Then, add 1 teaspoon of baking powder, and a generous 1/2 teaspoon of salt. Don’t skip the salt! It really brings out the flavors. Also, you’ll need 1 cup of granulated sugar.
The Wet Ingredients for *Springtime Crinkle Cookies*
Now for the good stuff! You’ll need 1 cup (that’s two sticks) of unsalted butter, softened. Make sure it’s *really* soft, but not melted. I usually take it out of the fridge an hour or two before. Then, you’ll need 2 large eggs, and 1 teaspoon of pure almond extract. The almond extract is what gives these cookies that amazing flavor! Trust me, it’s a game changer. Quality matters here – get the good stuff!
Pastel Colors and Sweet Coating
And finally, the fun part! You’ll need about 1/2 cup of powdered sugar for rolling the cookies. And for the colors, I *highly* recommend using gel food coloring. It gives you the most vibrant colors without adding extra liquid to the dough. You can find these in the baking aisle. I love using pastel pink, blue, yellow, and green, but honestly, any pastel shades you like will do! Go wild!
Step-by-Step Instructions: How to Make Springtime Crinkle Cookies: A Burst of Pastel Charm
Alright, bakers, let’s get down to the nitty-gritty and make these cookies! Don’t worry, it’s easier than it looks. Just follow these steps, and you’ll be munching on pastel perfection in no time.
Preparing the Dough: The First Steps
First things first, grab a medium bowl and whisk together your dry ingredients: the flour, baking powder, and salt. Whisk them together until they’re nice and combined. Set that aside. Next, in a large bowl (or in the bowl of your stand mixer, if you’re fancy!), cream together the softened butter and granulated sugar. Beat them together until the mixture is light and fluffy. This is important for a good texture! It usually takes a few minutes, so be patient. Then, add in your eggs one at a time, beating well after each addition. Finally, stir in that glorious almond extract. The kitchen should start smelling amazing already!
Combining Wet and Dry Ingredients
Now, the moment of truth! Gradually add the dry ingredients to the wet ingredients. I usually do this in three additions, mixing after each one until just combined. Be careful not to overmix! Once the flour is just incorporated, stop mixing. Overmixing can develop the gluten in the flour, which will make your cookies tough. We want soft and chewy, remember?
Chilling and Shaping the Cookie Dough
Here’s a crucial step: chilling! Cover the dough with plastic wrap and pop it in the fridge for at least an hour, or even better, two. This helps the flavors meld and prevents the cookies from spreading too much while baking. Trust me, it’s worth the wait! After the dough has chilled, it’s time to shape your cookies. Roll the dough into 1-inch balls. You should get around 24 cookies from this recipe.
Coating and Baking Your *Springtime Crinkle Cookies*
Now, for the fun part! Pour your powdered sugar into a bowl. Roll each cookie dough ball in the powdered sugar until it’s completely coated. Make sure they’re *thoroughly* covered! Place the sugared cookie dough balls on a baking sheet lined with parchment paper. Preheat your oven to 350°F (175°C). Then, bake the cookies for 10-12 minutes, or until the edges are set and the tops are crinkled. Keep an eye on them, as oven temperatures can vary! They’re done when they look crackly on top, and the crinkles are starting to form.
Cooling and Serving Your *Springtime Crinkle Cookies*
Once the cookies are baked, let them cool on the baking sheet for a few minutes before transferring them to a wire rack to cool completely. This is super important – don’t rush it! Once the cookies are completely cool, they’re ready to enjoy! Serve them on a pretty plate, a vintage cake stand, or even just straight from the cooling rack (no judgment here!). These cookies are perfect for Easter, spring gatherings, or just a sweet treat any time the mood strikes. They’re so good, you might want to hide a few for yourself!
Why You’ll Love These Springtime Crinkle Cookies: A Burst of Pastel Charm
Seriously, these cookies are a winner, and here’s why you’ll become completely obsessed, too!
Quick and Easy
Honestly, from start to finish, you can have these beauties ready in under an hour! Perfect for those last-minute cravings or unexpected guests. No need to spend all day in the kitchen.
Delicious and Flavorful
These cookies are a total explosion of flavor! The almond extract gives them a delicate, almost floral taste, and the powdered sugar coating adds a delightful sweetness and that iconic crinkly texture. They’re soft, chewy, and utterly irresistible.
Perfect for Spring Celebrations
These cookies are just made for spring! They’re absolutely perfect for Easter, Mother’s Day, baby showers, or any spring gathering. They’re so pretty and festive, they’ll be the star of the show!
Ingredient Notes and Substitutions
Okay, let’s chat about some of the ingredients and how you can make a few tweaks to suit your own tastes or what you have on hand. Don’t be afraid to experiment! That’s half the fun of baking, right?
Flour Variations
I usually stick with all-purpose flour, and it works like a charm. But, if you’re feeling adventurous, you could try using cake flour. It has a lower protein content, which means your cookies might be even more tender! Just be careful not to overmix the dough. You could also try a blend of all-purpose and a little bit of whole wheat flour for a slightly nuttier flavor, but just a touch! About a quarter of the total flour amount would be perfect.
Almond Extract Alternatives
Now, the almond extract is key for that yummy almond flavor, but if you don’t have it, or if you want to try something different, you have options! Vanilla extract is a good substitute, although it won’t give you the same almondy taste – it will still be delicious! You could also try a combination of vanilla extract and a tiny pinch of almond emulsion (it’s stronger than extract). Or, if you’re feeling really wild, a few drops of rose water will add a lovely floral note, which is especially nice for spring. Just adjust the amount to your taste!
Food Coloring Options
I *love* gel food coloring for these cookies, because it gives you the most vibrant colors without changing the texture of the dough. Liquid food coloring can sometimes thin out the dough a bit, so you might need to add a touch more flour. But, hey, if that’s all you have, go for it! Just be aware that the colors might be a bit more muted. Also, you can find natural food coloring options these days, made from things like beets and turmeric. They may not be as bright, but they’re a fun, natural alternative! Just be sure to read the instructions on the package.
Tips for Baking the Best Springtime Crinkle Cookies
Want to make sure your cookies are absolutely perfect? Here are a few pro tips to help you on your way! Trust me, these little tricks make a *huge* difference.
Dough Chilling Secrets
Don’t even *think* about skipping the chilling step! I know, I know, it’s tempting to rush, but chilling the dough is absolutely crucial for these cookies. It allows the butter to firm up, which helps them hold their shape and prevents them from spreading too thin during baking. Plus, it gives the flavors a chance to meld together, making them taste even better. I usually chill mine for at least an hour, but if you have time, even longer is great! You can even chill the dough overnight.
Perfecting the Crinkle
The crinkle is what makes these cookies so special, right? To get that perfect crackly effect, make sure you roll the dough balls *thoroughly* in the powdered sugar. You want them completely coated! Don’t be shy! And, when you bake them, the heat will cause the outside to set while the inside stays soft, creating those gorgeous cracks. Also, make sure your oven is preheated to the correct temperature, and don’t open the oven door too often while they’re baking!
Baking Time Adjustments
Every oven is different, so it’s really important to keep an eye on your cookies while they’re baking. The baking time I’ve given you is just a guideline. Start checking them at around 10 minutes. You want the edges to be set, and the tops to look crinkled. If your oven tends to run hot, you might need to reduce the baking time slightly. If it runs cool, you might need to add a minute or two. The best way to know if they’re done is to watch for those crinkles and make sure the edges are golden! You can also test them by gently pressing the top – they should spring back a little.
*Springtime Crinkle Cookies* Variations
So, you’ve mastered the basics, and now you want to get creative? Awesome! These Springtime Crinkle Cookies are super versatile, and there are tons of ways to make them your own. Don’t be afraid to experiment! That’s the best part of baking, right?
Flavor Twists
Want to change up the flavor profile? Try adding a pinch of cardamom or a dash of lemon zest to the dough. You could also swap out the almond extract for a different flavor, like vanilla, or even a little bit of orange extract. For a chocolatey twist, add some cocoa powder to the dough. Yum!
Color and Decoration Ideas
You can use different colors of gel food coloring for the dough! Think lavender, mint green, or even a soft peach. After baking, you could add sprinkles to the tops of the cookies. Or, if you’re feeling fancy, you can drizzle them with a simple glaze. How about white chocolate with a touch of pastel food coloring? So cute!
Serving Suggestions for Your Springtime Crinkle Cookies
Okay, so you’ve baked a batch of these beauties, and now you want to know how to serve them? Easy peasy! They’re absolutely perfect on their own, of course. But, if you want to make things extra special, serve them with a cup of tea or coffee. Or, for a spring-themed brunch, pair them with fresh fruit – strawberries, raspberries, and blueberries would be amazing!
Storage and Reheating Instructions
So, you’ve got leftovers? (As if!) Lucky you! These Springtime Crinkle Cookies are best stored in an airtight container at room temperature. They’ll stay fresh and delicious for about 3-4 days (if they last that long!).
Want to enjoy them a little warm? You can totally pop them in the microwave for a few seconds. Or, if you want to be extra, warm them in a low oven for a few minutes. But, honestly, they’re so good, you don’t even need to! They are perfect right out of the container!
Estimated Nutritional Information for Springtime Crinkle Cookies: A Burst of Pastel Charm
Alright, so I’m not a nutritionist, and I don’t have a fancy lab to test these cookies, but I can give you a rough estimate of the nutritional information. Keep in mind, this is just a ballpark figure, and it can vary depending on the exact ingredients you use and the size of your cookies. But, if you’re curious, here’s what you can expect per cookie:
- Calories: About 150
- Sugar: Roughly 15g
- Sodium: Around 75mg
- Fat: About 8g
- Saturated Fat: Around 5g
- Unsaturated Fat: Around 3g
- Trans Fat: 0g (hopefully!)
- Carbohydrates: About 20g
- Fiber: Basically zero
- Protein: About 2g
- Cholesterol: About 25mg
Again, this is just a quick estimate, but it gives you a general idea. Enjoy these cookies in moderation, and remember, a little treat never hurt anyone! 😉
Print
**Springtime Crinkle Cookies: 24 Ways to a Yummy Day!**
- Total Time: 45 minutes
- Yield: 24 cookies
- Diet: Vegetarian
Description
These Springtime Crinkle Cookies are a delightful treat. They offer a burst of pastel charm. Perfect for Easter or any spring celebration.
Ingredients
- All-purpose flour
- Baking powder
- Salt
- Granulated sugar
- Unsalted butter
- Eggs
- Almond extract
- Powdered sugar
- Food coloring (pastel shades)
Instructions
- Whisk together flour, baking powder, and salt.
- Cream butter and sugar. Add eggs and almond extract.
- Gradually add dry ingredients to wet ingredients.
- Chill dough.
- Shape dough into balls.
- Roll in powdered sugar.
- Bake until crinkled and set.
- Cool completely.
Notes
- Use gel food coloring for vibrant colors.
- Chill dough for at least 30 minutes.
- Adjust baking time based on your oven.
- Store cookies in an airtight container.
- Prep Time: 30 minutes
- Cook Time: 10-12 minutes
- Category: Dessert
- Method: Baking
- Cuisine: American

 7")


 10")
 11")