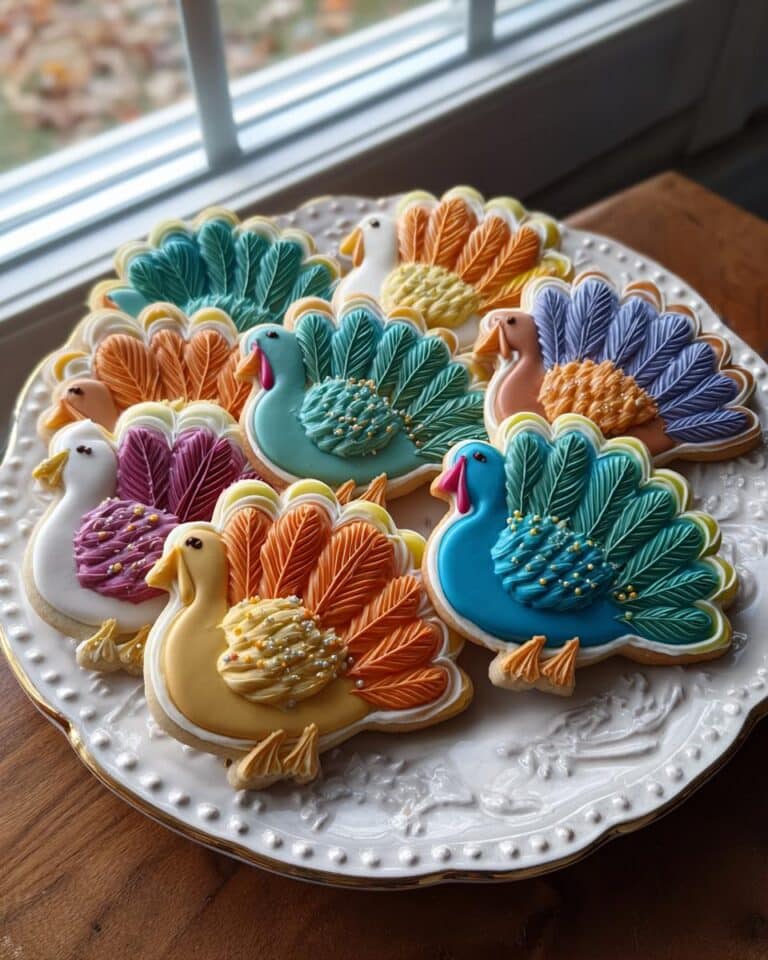
Oh, Thanksgiving! It’s one of my absolute favorite holidays for so many reasons, and honestly, the food is a HUGE part of that! But you know what really makes it special for me? It’s the little touches, like these absolutely adorable Thanksgiving Cookies. I’ve been baking for the holidays for ages, and every year, these decorated turkey cookies are a showstopper. They’re not just cookies; they’re little edible art pieces that bring so much joy to the table. Plus, they’re surprisingly easy to make, which is always a win when you’ve got a million other things to do!
Gathering Your Thanksgiving Cookies Ingredients
Alright, to get these festive Thanksgiving cookies made, you’ll need to gather a few things. Don’t worry, most of it is probably already in your pantry! We’re talking about the good stuff that makes a sugar cookie truly delicious and sturdy enough for decorating. Trust me, having everything ready makes the whole process so much smoother. It’s like having a little baking buddy right there with you!
Essential Baking Components
First up, let’s get our baking crew assembled. You’ll need 2 cups of all-purpose flour, which is our base. Then, for a little lift, grab 1 teaspoon of baking powder and 1/2 teaspoon of salt to balance things out. Now for the rich stuff: 1 cup (that’s two sticks!) of unsalted butter, softened – make sure it’s nice and soft, not melted! We also need 1 cup of granulated sugar for that classic sweetness. For binding and richness, we’ll use 2 large eggs, and finally, 1 teaspoon of vanilla extract to make everything smell amazing.
Coloring Your Thanksgiving Cookies
This is where the magic really happens to make them look like turkeys! You’ll want some food coloring. Grab brown for the turkey body, orange for the beak and that little wattle thingy, red for the snood (that dangly bit!), and then a few pretty colors like yellow and green for the fabulous tail feathers. You don’t need a whole lot, just enough to tint small portions of the dough.
Decorating Essentials for Thanksgiving Cookies
Once our little turkey cookies are baked and cooled, it’s time to bring them to life! You’ll need your decorating tools. I usually go with either royal icing or buttercream frosting. Royal icing dries nice and hard, perfect for layering colors, while buttercream is super creamy and delicious. Either one works great for making these Thanksgiving Turkey Cookies Decorated absolutely irresistible!
How to Prepare Your Thanksgiving Cookies
Okay, deep breaths! Now comes the fun part, where we turn simple ingredients into these amazing little Thanksgiving turkeys. It might seem like a lot of steps, but I promise, each one is super straightforward. Just follow along, and you’ll have a whole flock of decorated cookies before you know it. It’s honestly one of my favorite parts of getting ready for Thanksgiving!
Creating the Cookie Dough
First things first, let’s get that cookie dough made. In a medium bowl, just whisk together your flour, baking powder, and salt. Easy peasy. Now, grab your biggest mixing bowl and cream together that softened butter and granulated sugar. You want it to get nice and fluffy – think light and airy, like a cloud! Then, beat in your eggs one at a time, making sure each one is mixed in before you add the next. Stir in that lovely vanilla extract. Now, here’s the key: gradually add your dry ingredients to the wet ones. Mix until it’s *just* combined. Seriously, don’t overmix it, or you’ll end up with tough cookies, and nobody wants that!
Next, divide your dough into a few smaller bowls. This is where we add the color! Tint each portion with your food coloring to get those turkey shades: brown for the body, orange for the beak and wattle, red for the snood, and yellow and green for those vibrant feathers. It’s like painting with dough!

Chilling and Shaping Your Thanksgiving Cookies
Alright, now that our dough is all colored up, we need to give it a little chill. Wrap each color separately in plastic wrap and pop them in the fridge for at least 30 minutes. This makes the dough much easier to handle and prevents them from spreading too much in the oven. Once chilled, preheat your oven to 350°F (175°C) and line your baking sheets with parchment paper – this is a lifesaver for cleanup!
Now, take your chilled dough. You can either roll it out on a lightly floured surface to about 1/4-inch thickness or just take pieces and shape them freehand if you’re feeling artistic! I like to roll it out so they’re all pretty uniform. Use a turkey-shaped cookie cutter, or if you don’t have one, just freehand the shapes – they’ll still look amazing. Place your cut-out shapes onto the prepared baking sheets, leaving a little space between them.
Baking Your Thanksgiving Cookies to Perfection
Time to bake! Pop those baking sheets into your preheated oven. They usually only need about 8 to 10 minutes. You’re looking for the edges to be just lightly golden. Keep an eye on them, as ovens can vary! Once they’re done, let them cool on the baking sheet for a few minutes. This helps them firm up a bit before you move them. Then, carefully transfer them to a wire rack to cool completely. This is super important – you don’t want to decorate warm cookies, or your frosting will just melt into a colorful mess!

Decorating Your Thanksgiving Turkey Cookies
This is the grand finale, folks! Once your cookies are totally, completely cool, it’s time to make them into adorable turkeys. This is where the “Thanksgiving Turkey Cookies Decorated” really shine! Use your royal icing or buttercream – I like to put mine in piping bags or even just Ziploc bags with a corner snipped off for easier control. Start with the brown dough for the turkey’s body. Then, add the orange beak and wattle, the red snood, and get creative with those colorful feather shapes in the back! You can use yellow, green, or any other colors you like. If you have edible markers, you can even add little eyes or extra details. It’s so much fun to see them come to life!
Expert Tips for Perfect Thanksgiving Sugar Cookies Easy
Alright, so you’ve made it this far, and you’re ready to bake up some amazing Thanksgiving Sugar Cookies Easy! I’ve learned a few tricks over the years that make these decorated turkey cookies turn out just right, so listen up! Following these little tips will help make your cookie decorating Thanksgiving a breeze.
Ensuring Proper Dough Consistency
The dough for these Thanksgiving Cookies is key! If it feels too sticky to handle, don’t panic. Just add a tiny bit more flour, maybe a tablespoon at a time, until it’s manageable. If it seems too dry and crumbly, a splash of milk or another egg yolk can work wonders. You want it soft and pliable, not sticky, and not dry and brittle.
Achieving Clean Cookie Shapes
For those super clean turkey shapes, make sure your dough is well-chilled. Rolling it out on a surface lightly dusted with flour helps too. When you cut out your shapes, press straight down firmly and then lift straight up. If you’re using a cutter, try not to wiggle it around too much, or you’ll get jagged edges. Sometimes, just using a knife to carefully trim around a template works wonders for really crisp lines!
Successful Cookie Cooling for Decoration
Seriously, this is non-negotiable for successful cookie decorating Thanksgiving! Make sure your cookies are *completely* cool before you even think about frosting. If they’re even a little warm, your beautiful royal icing or buttercream will melt right off, creating a colorful puddle instead of a cute turkey. Patience here is totally rewarded!
Frequently Asked Questions about Thanksgiving Cookies
Got questions about these adorable Thanksgiving Cookies? I’ve got answers! It’s totally normal to wonder about the best way to store them or if you can get a head start on the baking. Let’s dive into some common queries to make your holiday baking even smoother!
How do I store decorated Thanksgiving Cookies?
Storing your beautiful Thanksgiving Turkey Cookies Decorated is super simple. Once they’re completely decorated and the frosting is dry, just pop them into an airtight container. You can layer them with parchment paper in between if you’re worried about them sticking, but usually, it’s not an issue. Keep them at room temperature, and they’ll stay fresh for a good few days. Perfect for having treats ready for guests!
Oh, absolutely! You can totally make the cookie dough ahead of time, which is a lifesaver during the busy holiday season. Just follow the steps up to dividing and tinting the dough. Then, wrap each colored portion tightly in plastic wrap. You can keep it in the refrigerator for up to 2-3 days. When you’re ready to bake, just let it sit out for a few minutes to soften up a bit before rolling and cutting. It’s one of my favorite time-saving tricks!
If you want to branch out from turkeys, there are tons of simple Thanksgiving cookies decorated ideas! You could make leaf shapes and use fall colors for ombre effects, dot cookies with a simple frosting for a “thankful” message, or even use small round cookies and pipe little pumpkin faces. Even just using fall-colored sprinkles on basic sugar cookies makes for lovely seasonal cookie ideas that are super easy!
What is the best frosting for decorating Thanksgiving Turkey Cookies?
Honestly, both royal icing and buttercream work wonderfully for decorating these Thanksgiving Turkey Cookies. Royal icing dries hard, which is great if you plan to stack them or want really crisp lines and details. Buttercream is softer, creamier, and generally sweeter, which many people love for the taste. For these turkeys, royal icing gives you that nice, smooth finish for the feathers, but a sturdy buttercream can also look fantastic!
Nutritional Estimate for Your Thanksgiving Cookies
Now, I know we’re all about flavor and fun here, but it’s good to have a general idea of what’s in these festive treats. Keep in mind, these numbers are approximate and can really change depending on how much frosting you use – because let’s be real, we love our frosting! For one of these delicious Thanksgiving Cookies, you can expect around 150-200 calories, with about 8-12g of fat (around 5-7g saturated), 2g of protein, 20-25g of carbohydrates, and 15-20g of sugar. It’s a holiday, so enjoy!

I just LOVE seeing what you all create in your own kitchens! If you make these Thanksgiving Cookies, please, please share your adorable turkey creations with me. Snap a pic and tag me or just leave a comment below telling me how they turned out. I’d be thrilled to see your decorating skills shine! You can also find more inspiration on Pinterest.
Print
Adorable Thanksgiving Cookies: 10 Easy Steps
- Total Time: 1 hour 45 minutes (including chilling time)
- Yield: 24 cookies
- Diet: Vegetarian
Description
Delicious sugar cookies shaped and decorated like Thanksgiving turkeys. These cookies are perfect for your holiday celebrations.
Ingredients
- 2 cups all-purpose flour
- 1 teaspoon baking powder
- 1/2 teaspoon salt
- 1 cup (2 sticks) unsalted butter, softened
- 1 cup granulated sugar
- 2 large eggs
- 1 teaspoon vanilla extract
- Food coloring (brown, orange, red, yellow, green)
- Royal icing or buttercream frosting
Instructions
- In a medium bowl, whisk together flour, baking powder, and salt.
- In a large bowl, cream together softened butter and granulated sugar until light and fluffy.
- Beat in eggs one at a time, then stir in vanilla extract.
- Gradually add the dry ingredients to the wet ingredients, mixing until just combined.
- Divide the dough into portions and tint with food coloring to create turkey colors (brown for the body, orange for the beak and wattle, red for the snood, and various colors for feathers).
- Chill the dough for at least 30 minutes.
- Preheat your oven to 350°F (175°C). Line baking sheets with parchment paper.
- Roll out the dough to about 1/4-inch thickness. Cut out turkey shapes using a cookie cutter or freehand.
- Bake for 8-10 minutes, or until edges are lightly golden. Let cool on the baking sheet for a few minutes before transferring to a wire rack to cool completely.
- Once cookies are completely cool, decorate them with colored royal icing or frosting to resemble turkeys.
Notes
- Ensure cookies are completely cool before decorating to prevent frosting from melting.
- You can use edible markers for finer details.
- Store decorated cookies in an airtight container at room temperature.
- Prep Time: 45 minutes
- Cook Time: 10 minutes
- Category: Dessert
- Method: Baking and Decorating
- Cuisine: American


